Trailer Brake Controller Wiring : Mastering the Art of Safe and Efficient Braking.
Trailer brake controller wiring provides a connection between your vehicle and trailer brakes, ensuring safe and efficient braking while towing. In order to properly install and set up your brake controller, you need to understand the wiring process, which involves connecting the controller to the vehicle’s electrical system.
This article discusses the importance of trailer brake controller wiring and provides a step-by-step guide to help you successfully wire your trailer brake controller. By following these instructions, you can ensure that your trailer brakes are functioning properly and will provide the necessary stopping power when needed.
Join us as we dive into the world of trailer brake controller wiring and learn how to do it right.
Credit: spectrum.ieee.org
Types Of Trailer Brake Controllers
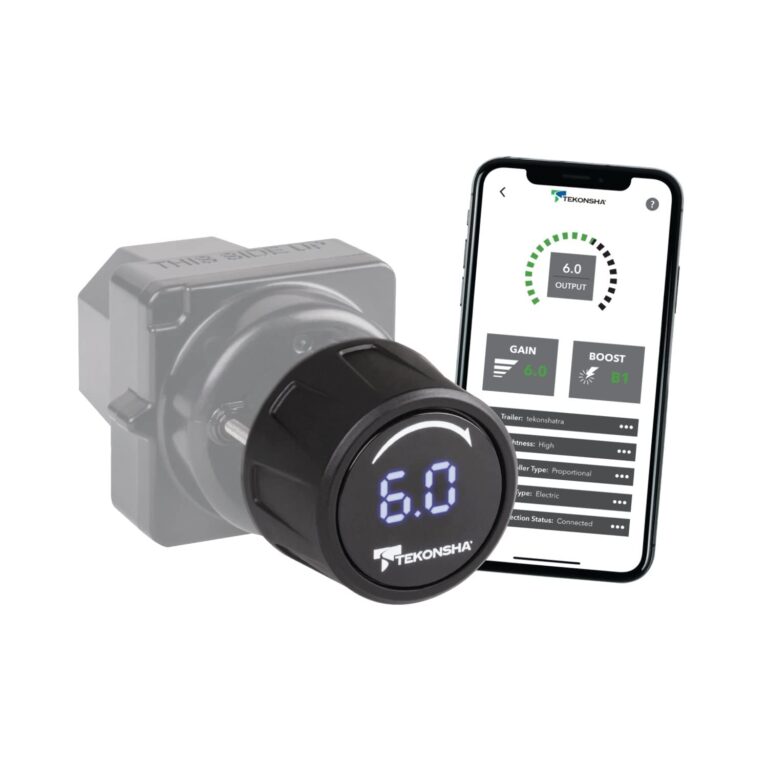
Electric Brake Controllers: A Closer Look At Electric Brake Controllers And Their Wiring
Electric brake controllers are essential devices for ensuring the safe operation of trailers with electric brakes. These controllers work by applying varying levels of electric current to the trailer brakes, enabling smooth and effective braking.
When it comes to wiring electric brake controllers, there are a few key points to understand:
- A power source is required: Electric brake controllers draw power from the vehicle’s battery. It is important to connect the controller to a reliable power source, typically by tapping into the vehicle’s 12-volt battery or using a dedicated brake controller wiring harness.
- Brake signal connection: Electric brake controllers need a signal from the vehicle’s brake pedal to activate the trailer brakes. This signal can be obtained by connecting the controller’s brake signal wire to the vehicle’s brake switch wire or the stop lamp wire.
- Ground connection: Proper grounding is crucial for the effective operation of electric brake controllers. It is recommended to connect the controller’s ground wire directly to the vehicle’s metal frame, ensuring a solid connection.
- Trailer brake wiring: Electric brake controllers also require wiring connections to the trailer’s brakes. This typically involves running wires from the controller to each brake on the trailer and connecting them accordingly.
Hydraulic Brake Controllers: Exploring The Wiring Requirements For Hydraulic Brake Controllers
Hydraulic brake controllers are designed for trailers equipped with hydraulic brakes, which rely on hydraulic fluid pressure to activate the brakes. These controllers use a different wiring setup compared to electric brake controllers.
Here are the key points to consider when wiring hydraulic brake controllers:
- Brake fluid pressure sensing: Hydraulic brake controllers require a connection to the trailer’s brake fluid system to sense the pressure and activate the brakes accordingly. This is usually achieved by connecting the controller to the trailer’s brake line or master cylinder.
- Power source: Similar to electric brake controllers, hydraulic brake controllers need a power source. It is recommended to connect the controller to the vehicle’s 12-volt battery or use a dedicated wiring harness.
- Ground connection: As with electric brake controllers, proper grounding is essential. Make sure to establish a solid ground connection between the controller and the vehicle’s metal frame.
- Wiring to trailer brakes: Hydraulic brake controllers typically require wiring connections to each brake on the trailer. This involves running wires from the controller to the hydraulic brake actuators or solenoids on the trailer.
Proportional Brake Controllers: Understanding The Wiring Setup For Proportional Brake Controllers
Proportional brake controllers are advanced devices that provide smooth and proportional braking based on the vehicle’s deceleration. These controllers offer a more intuitive braking experience, especially when towing heavy loads.
When it comes to wiring proportional brake controllers, here are the key points to know:
- Power source and ground connection: Similar to other types of brake controllers, proportional brake controllers require a power source and a solid ground connection. Connect the power wire to the vehicle’s battery and ground wire to the vehicle’s metal frame.
- Brake signal connection: Proportional brake controllers need a signal from the vehicle’s brake system to determine the level of braking required. This signal is typically obtained by connecting the controller’s brake signal wire to the vehicle’s brake switch wire or the stop lamp wire.
- Trailer brake wiring: Proportional brake controllers also require wiring connections to the trailer’s brakes. Ensure proper wiring from the controller to each brake on the trailer, allowing proportional braking based on the vehicle’s deceleration.
Time-Delay Brake Controllers: Wiring Guidelines For Time-Delay Brake Controllers
Time-delay brake controllers, also known as solid-state brake controllers, apply a predetermined amount of braking power to the trailer brakes with a set delay. These controllers are suitable for trailers with lighter loads.
Here are the wiring guidelines for time-delay brake controllers:
- Power source and ground connection: Connect the power wire of the time-delay brake controller to the vehicle’s battery or a suitable power source. Establish a solid ground connection between the controller and the vehicle’s metal frame.
- Brake signal connection: Time-delay brake controllers require a brake signal from the vehicle to initiate the braking process. Connect the controller’s brake signal wire to the vehicle’s brake switch wire or the stop lamp wire.
- Trailer brake wiring: Proper wiring connections are necessary to ensure the time-delay brake controller sends the appropriate braking power to the trailer brakes. Connect the wires from the controller to each brake on the trailer, allowing for effective braking control.
By understanding the wiring requirements for different types of trailer brake controllers, you can ensure safe and efficient braking while towing. Whether you have electric, hydraulic, proportional, or time-delay brake controllers, proper wiring connections are crucial for optimal performance.
Wiring Basics For Trailer Brake Controllers
Ensuring a solid connection: tips for securely wiring your brake controller to the trailer:
- To ensure a secure connection between your brake controller and trailer, follow these tips:
- Use the appropriate connectors and wiring harnesses for your specific brake controller model and trailer.
- Make sure all connections are tight and free from any loose or exposed wires.
- Use electrical tape or heat shrink tubing to secure and protect the connections from moisture and corrosion.
- Route the wiring away from any moving parts or heat sources to avoid damage.
- Regularly check the wiring for any signs of wear or damage and replace as necessary.
Choosing the right wire gauge: understanding the importance of wire gauge in brake controller installation:
- The wire gauge used in brake controller installation plays a crucial role in the overall efficiency and safety of the system. Consider the following key points:
- Selecting the appropriate wire gauge is essential to ensure the proper flow of current. A larger wire gauge (i.e., lower number) allows for the transmission of higher current without overheating or causing voltage drop.
- Consult the brake controller manufacturer’s guidelines to determine the recommended wire gauge for your specific setup.
- In general, a 12-gauge wire is suitable for most brake controller installations. However, larger trailers may require thicker wire gauges to handle the increased current load.
- Remember that using a wire gauge that is too small can lead to power loss, overheating, and potentially unsafe conditions.
Grounding your brake controller: proper techniques for grounding the brake controller wiring:
- Establishing a proper ground connection for your brake controller wiring is crucial for reliable operation. Consider the following techniques:
- Locate a clean, unpainted metal surface on the trailer frame or body as the grounding point for the brake controller.
- Remove any rust, paint, or debris from the chosen grounding surface to ensure a solid connection.
- Use a grounding strap or wire of sufficient gauge to connect the brake controller’s ground wire to the grounding point on the trailer.
- Securely fasten the grounding wire using appropriate connectors and ensure a tight connection.
- Regularly inspect the grounding connection for any signs of corrosion or damage and address any issues promptly.
Testing the wiring: how to verify the effectiveness of your trailer brake controller wiring:
- After completing the brake controller wiring, it is crucial to test its effectiveness. Consider the following steps:
- Connect your trailer to the towing vehicle and ensure the brake controller is properly connected and powered.
- Activate the brakes manually using the brake controller and observe the trailer’s response.
- The trailer brakes should engage smoothly and evenly without any delay or abruptness.
- Test the trailer brakes while driving at different speeds and adjust the brake controller settings if necessary.
- Regularly check the brake controller wiring for any signs of malfunction or loose connections and address any issues promptly.
By following these wiring basics for trailer brake controllers, you can ensure a secure and effective braking system for your trailer. Maintain regular inspections and testing to ensure the safety and reliability of your trailer brakes.
Wiring Diagrams For Common Trailer Brake Controller Installations
Single-Axle Trailers: Step-By-Step Wiring Instructions For Single-Axle Trailer Brake Controllers
When it comes to wiring a brake controller for a single-axle trailer, it’s essential to follow the correct steps to ensure proper functionality. Here are some key points to keep in mind:
- Start by locating the brake controller’s mounting bracket, usually situated under the dash of your vehicle.
- Connect the brake controller to your vehicle’s electrical system by splicing into the appropriate wires. Ensure that you match the corresponding colors.
- Once connected, mount the brake controller securely using the provided screws or brackets. Make sure it is easily accessible while driving.
- Run a 10-gauge wire from the brake controller to the trailer connector at the rear of the vehicle.
- Connect the wire to the brake output terminal on the trailer connector, ensuring a secure connection.
- Finally, connect the remaining wires from the brake controller to the appropriate pins on the trailer connector, matching the functions (e.g., brake/power, ground, and brake signal).
These step-by-step instructions will help you wire a brake controller for your single-axle trailer and ensure safe and reliable braking.
Tandem-Axle Trailers: A Comprehensive Guide To Wiring Brake Controllers For Tandem-Axle Trailers
Wiring brake controllers for tandem-axle trailers is slightly more complex than for single-axle trailers due to the additional brakes involved. Here’s what you need to know:
- Begin by installing the brake controller, following the manufacturer’s instructions, and mounting it securely within easy reach.
- Connect the ground wire of the brake controller to a solid, metal surface on your vehicle.
- Splice into the brake switch wire and connect it to the brake controller’s input terminal labeled “brake switch” or similar.
- Locate the appropriate wires for left and right turn/brake lights on your vehicle’s taillight assembly and tap into them, connecting them to the corresponding trailer brake wires.
- Run a 10-gauge wire from the brake controller to the trailer connector, ensuring a secure connection to the brake output terminal.
- Connect the remaining wires from the brake controller to the appropriate pins on the trailer connector, matching the functions (e.g., power, ground, and brake signal).
- Test the brake controller by connecting a trailer with tandem axles and ensuring the brakes engage when the vehicle’s brakes are applied.
By following these comprehensive wiring steps, you’ll be able to set up a brake controller for your tandem-axle trailer and enjoy safe towing experiences.
Electric Over Hydraulic Brake Systems: Wiring Considerations For Electric Over Hydraulic Brake Setups
If you have an electric over hydraulic (eoh) brake system on your trailer, wiring the brake controller requires some special considerations. Here are the key points to keep in mind:
- Electric over hydraulic brake systems use an electric brake controller to activate hydraulic brakes, providing superior braking performance.
- Before wiring, ensure that your vehicle can support an eoh brake system and that all necessary hydraulic components are in place on the trailer.
- Install the brake controller following the manufacturer’s instructions and mounting it securely within reach.
- Connect the brake controller’s power wire to the vehicle’s battery or a suitable power source, ensuring proper gauge wiring for the distance.
- Locate the hydraulic brake actuator’s brake signal wire and connect it to the brake controller’s brake output terminal, usually labeled “brake” or similar.
- Connect the ground wire from the brake controller to a solid, metal surface on the vehicle.
- Finally, ensure the trailer’s hydraulic brake system is properly bled and tested before towing.
Wiring an electric over hydraulic brake setup requires careful attention to detail, following the manufacturer’s instructions, and proper testing to ensure optimal performance while towing your trailer.
Troubleshooting Trailer Brake Controller Wiring Issues
Common Wiring Problems: Identifying And Resolving Common Issues With Trailer Brake Controller Wiring
Trailer brake controller wiring plays a crucial role in ensuring the safe operation of your trailer brakes. However, like any electrical system, wiring issues can arise, causing problems with your trailer brake controller. Here are some common wiring problems you may encounter and how to troubleshoot and resolve them:
- Loose or corroded connections: Loose or corroded connections can disrupt the flow of electrical current, resulting in malfunctioning trailer brakes. To address this issue, follow these steps:
- Inspect all wiring connections, ensuring they are secure and free from corrosion or dirt buildup.
- Clean any corrosion or dirt using a wire brush or contact cleaner.
- Tighten any loose connections using a screwdriver or appropriate tool.
- Damaged or frayed wires: Wires can become damaged or frayed over time, compromising their ability to transmit electrical signals effectively. If you suspect damaged or frayed wiring, follow these steps:
- Inspect the wiring harness for any visible signs of damage, such as cuts, abrasions, or exposed wires.
- Use electrical tape or wiring connectors to repair any minor damage.
- For extensive damage, consider replacing the entire wiring harness for optimal safety.
- Incorrect wiring installation: Incorrect installation of the trailer brake controller wiring can lead to various issues. To address this problem, follow these steps:
- Consult the wiring diagram provided by the trailer brake controller manufacturer to ensure proper installation.
- Double-check the wiring connections, ensuring they correspond correctly to the wiring diagram.
- If unsure, seek professional assistance to ensure the wiring is correctly installed.
Testing The Electrical Continuity: How To Check For Continuity In Your Brake Controller Wiring
Ensuring the continuity of your trailer brake controller wiring is vital for proper brake operation. By testing for electrical continuity, you can identify any breaks or interruptions in the wiring circuit. Here’s how to check for continuity:
- Gather the necessary tools: You will need a digital multimeter set to the continuity or resistance mode.
- Disconnect the power source: Before testing, make sure to disconnect the power source to ensure your safety.
- Set up the multimeter: Set the multimeter to continuity or resistance mode, following the manufacturer’s instructions.
- Test the wiring connections: Touch the multimeter probes to each end of the wiring connections or wires you want to test.
- If there is continuity, the multimeter will emit a tone or display a low resistance value.
- If there is no continuity, the multimeter will not emit a tone or display a high resistance value.
- Troubleshoot any discontinuity: If you discover a lack of continuity, follow these steps to troubleshoot the issue:
- Inspect the wiring connections for loose or corroded terminals, and repair or replace as necessary.
- Check for any damaged or frayed wires and repair or replace them.
- Ensure proper wiring installation by referring to the wiring diagram and correcting any errors.
- If the issue persists, consult a professional for further assistance.
Replacing Faulty Wiring: Steps To Replace Damaged Or Faulty Wiring In Your Trailer Brake Controller System
If your trailer brake controller wiring is extensively damaged or faulty, it is crucial to replace it to ensure reliable brake operation. Here are the steps to replace faulty wiring:
- Gather the necessary tools and materials: You will need a wiring harness suitable for your trailer brake controller system, wire cutters, electrical tape, and wiring connectors.
- Disconnect the power source: Disconnect the power source to avoid any electrical hazards while replacing the wiring.
- Remove the old wiring: Carefully disconnect the old wiring from the trailer brake controller, following the manufacturer’s instructions.
- Install the new wiring harness: Attach the new wiring harness to the appropriate terminals on the trailer brake controller, ensuring a secure and proper connection.
- Connect the wiring to the trailer brakes: Route the wiring to the trailer brakes and connect them using the appropriate wiring connectors or soldering.
- Secure the wiring: Use wire ties or zip ties to secure the new wiring along the trailer frame, keeping it away from moving parts or potential sources of damage.
- Test the brake controller: Reconnect the power source and test the brake controller functionality to ensure the new wiring is working correctly.
By addressing common wiring problems, testing for electrical continuity, and replacing faulty wiring, you can ensure the optimal performance and safety of your trailer brake controller system.
Maintenance And Upgrades For Trailer Brake Controller Wiring
Regular maintenance tasks:
- Inspect the brake controller wiring regularly to ensure it is in good condition and free from any damage.
- Clean the wiring connections and terminals to remove any dirt or corrosion that may affect the electrical connection.
- Check the brake controller for any signs of wear or malfunction, and replace it if necessary.
- Test the trailer brakes regularly to ensure they are functioning properly and adjust the brake controller settings as needed.
- Lubricate moving parts, such as the brake actuator, to ensure smooth operation and prevent rust or corrosion.
Upgrading to a newer brake controller:
- Consider the age and condition of your current brake controller and wiring. If they are outdated or showing signs of wear, it may be time for an upgrade.
- Look for a newer brake controller model that offers advanced features and improved performance, such as proportional braking, which delivers smoother and more responsive braking.
- Ensure compatibility between the new brake controller and your existing trailer wiring system. Check the wiring connectors and pin configurations to make sure they match.
- Follow the manufacturer’s instructions for installing the new brake controller, making sure to properly connect and secure the wiring to ensure optimal functionality.
- Test the new brake controller and adjust the settings accordingly to ensure it provides the desired braking performance.
Remember, regular maintenance and upgrades are essential for keeping your trailer brake controller wiring in top condition. By taking care of your wiring and considering upgrades when necessary, you can ensure safe and efficient braking while towing your trailer.
Frequently Asked Questions Of Trailer Brake Controller Wiring
What Is A Trailer Brake Controller And Why Do You Need It?
A trailer brake controller is a device that allows you to control and adjust the brakes on your trailer. It is essential for towing heavy loads and ensuring safe and smooth stops.
How Does A Trailer Brake Controller Work?
A trailer brake controller works by sending electric signals to the brakes of your trailer, which then apply the necessary braking force to match the braking of your towing vehicle. This ensures balanced and synchronized stopping power.
Are There Different Types Of Trailer Brake Controllers?
Yes, there are different types of trailer brake controllers available, including time-delayed controllers, proportional controllers, and hydraulic over electric controllers. Each type has its own unique features and benefits.
How Do You Install A Trailer Brake Controller?
To install a trailer brake controller, you need to locate the appropriate wires in your towing vehicle’s electrical system, connect them to the controller, mount the controller in a convenient location, and then make the necessary adjustments and calibrations.
Can I Install A Trailer Brake Controller Myself?
Yes, if you have basic knowledge of electrical systems and are comfortable working with tools, you can install a trailer brake controller yourself. However, it is always recommended to follow the manufacturer’s instructions and consult a professional if needed.
How Do I Test If My Trailer Brake Controller Is Working Properly?
To test if your trailer brake controller is working properly, you can perform a simple brake force test. Find a safe and open area, apply the brakes while towing the trailer, and observe if the trailer stops smoothly without any jerking or imbalance.
Can I Use A Trailer Brake Controller With Any Type Of Trailer?
Yes, a trailer brake controller can be used with various types of trailers, including utility trailers, camper trailers, horse trailers, and boat trailers. It is important to ensure that your trailer has a compatible braking system.
Do I Need A Trailer Brake Controller For Every Trailer?
Not necessarily. If you only tow one trailer, you can install a trailer brake controller in your towing vehicle and use it for that specific trailer. However, if you tow multiple trailers, each equipped with its own braking system, you may need a separate controller for each.
How Much Does A Trailer Brake Controller Cost?
The cost of a trailer brake controller can vary depending on the type, brand, and features. On average, you can expect to pay between $50 to $200 for a quality trailer brake controller.
Is A Trailer Brake Controller Necessary For All Towing Situations?
A trailer brake controller is highly recommended for towing heavy loads or trailers that exceed a certain weight limit. It helps to enhance safety, control, and overall braking performance, making it a valuable addition in most towing situations.
Conclusion
To sum it all up, trailer brake controller wiring is a crucial aspect of safe towing. It ensures that your trailer’s brakes are synchronized with your tow vehicle, allowing for efficient braking and preventing accidents. By connecting the brake controller to the electrical system of your vehicle and trailer, you can easily control and regulate the trailer brakes.
When installing the wiring, it is essential to follow the manufacturer’s instructions and use the appropriate gauge of wire. Proper grounding and secure connections are also vital to ensure optimal functionality. Regular maintenance and inspection of the wiring system can help prevent any potential issues, such as loose connections or frayed wires.
It’s important to check for any signs of wear and tear and address them promptly. Overall, investing in a quality trailer brake controller and ensuring proper wiring installation is a worthwhile investment that prioritizes safety and peace of mind while towing.
So, take the time to get it right, and happy towing!