How to Test Starter With Jumper Cables
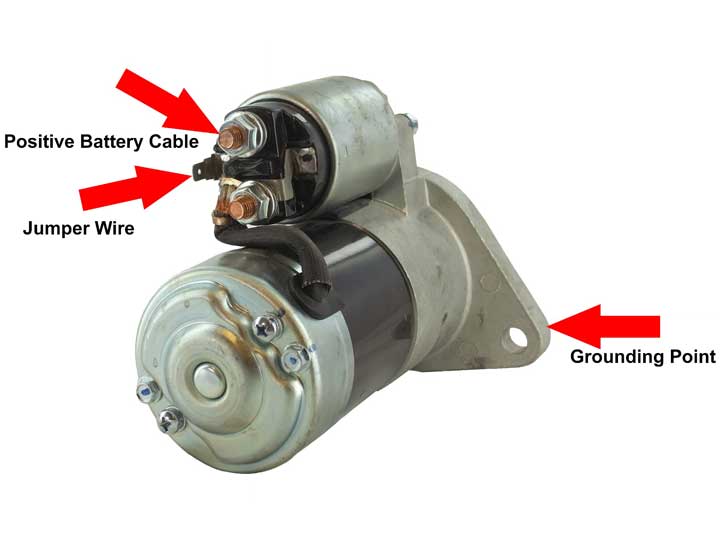
To test a starter with jumper cables, connect the red cable to the positive terminal. Then, attach the black cable to the engine block for grounding.
When diagnosing starter issues, proper testing ensures accurate results. By following these steps correctly, you can determine if the starter is functioning properly or needs replacement. The process of using jumper cables for testing allows you to verify the status of the starter quickly and efficiently.
Understanding the steps involved in this testing procedure can help you troubleshoot starting problems in your vehicle with ease. By knowing how to test your starter, you can address any potential issues promptly and ensure your vehicle starts reliably.
Credit: www.discountstarterandalternator.com
Preparing For The Test
Preparing for the test is crucial to ensure a safe and effective examination of your starter with jumper cables. Gathering the necessary materials and following safety precautions are essential steps before proceeding with the test.
Gather The Necessary Materials
Before you begin the test, make sure you have all the required materials ready. This includes a set of jumper cables, a multimeter or a voltmeter, a pair of safety gloves, and safety goggles. Ensure that the jumper cables are in good condition and not damaged.
Safety Precautions
When performing the test, safety should be your top priority. Make sure to park the vehicles on a flat surface and engage the parking brakes. Turn off the ignition and all electrical components in both vehicles. Wear safety gloves and goggles to protect yourself from potential sparks and battery acid. Keep the jumper cable connections away from moving parts and never stand directly above the batteries.

Credit: www.youtube.com
Testing The Starter
Testing the Starter: Ensuring your vehicle’s starter is in good working condition is crucial for a smooth driving experience. One way to test your car’s starter is with jumper cables. Follow these steps to easily test the starter and diagnose any issues.
Step 1: Park The Vehicle
Make sure your vehicle is parked in a safe and flat location before attempting to test the starter.
Step 2: Identify The Starter
Locate the starter motor under the hood of your car. Refer to your vehicle’s manual for assistance if needed.
Step 3: Connect The Jumper Cables
Connect one end of the jumper cable to the positive terminal of the car battery and the other end to the positive terminal of the starter motor.
Step 4: Test The Starter
Once the jumper cables are properly connected, try starting the engine. Listen for the sound of the starter engaging and observe if the engine cranks up smoothly.

Credit: www.wikihow.com
Frequently Asked Questions Of How To Test Starter With Jumper Cables
How Do You Test If A Starter Is Bad?
To test if a starter is bad, conduct a voltage drop test and check for unusual noises. If necessary, use a digital multimeter for accuracy.
Is There A Way To Test A Starter Without Removing It?
Yes, you can test a starter without removing it using a remote starter switch. Connect the switch to the starter solenoid and the battery to check if the starter engages.
How Do I Know If My Jump Starter Is Working?
To check if your jump starter is working, connect it to a dead battery and turn it on. If the engine starts, your jump starter is working.
Can You Hook Up Jumper Cables To A Starter?
Yes, you can connect jumper cables to a starter. It can help to jump-start a dead battery by providing power to the starter motor. However, it is crucial to follow the correct procedure to avoid damages and ensure safety.
How Do You Test A Starter Motor With Jumper Cables?
To test a starter motor with jumper cables, attach the positive cable to the starter’s positive terminal and the negative cable to a metal part of the engine block. Then, connect the other end of the negative cable to the negative terminal of the battery.
Turn the ignition key, and if the starter motor engages and the engine starts, it means the starter is functioning properly.
What Are The Signs Of A Bad Starter?
The signs of a bad starter include a clicking noise when you turn the key, a grinding sound, the engine cranking slowly, or the engine not cranking at all.
Can A Bad Starter Drain The Battery?
Yes, a bad starter can drain the battery. If the starter remains engaged or has an electrical short, it can draw excessive current from the battery, causing it to drain quickly.
Conclusion
Understanding how to test a starter with jumper cables is crucial for any car owner. By following the step-by-step process outlined in this blog post, you can confidently troubleshoot your car’s starter issues. Remember to prioritize safety and consult a professional if you encounter any difficulties.
With this knowledge, you can potentially avoid costly repairs and keep your vehicle running smoothly.
