Master the Trailer Brake Controller Installation Steps: A Foolproof Guide
Trailer brake controller installation involves several steps including mounting the controller, connecting it to the vehicle’s electrical system, and adjusting the settings for optimal braking performance. This article provides a detailed guide on how to install a trailer brake controller in a concise and easy-to-follow manner.
It covers the essential steps, tips, and precautions to ensure a successful installation. Whether you are a seasoned diyer or a first-time installer, this comprehensive guide will help you navigate through the process smoothly. So, let’s dive in and get your trailer brake controller installed, ensuring safer and more controlled towing experiences.
Credit: safedrivesystems.com
Types Of Trailer Brake Controllers
Electric Trailer Brake Controllers
Electric trailer brake controllers contribute to the safe towing of trailers by allowing the driver to control the brakes on the trailer from within the towing vehicle. These controllers connect to the vehicle’s electrical system and work in conjunction with the trailer’s electric brakes.
Here are some key points about electric trailer brake controllers:
- How they work:
- Electric trailer brake controllers use an electrical signal to activate the brakes on the trailer.
- When the driver applies the brakes in the towing vehicle, the controller sends a proportional amount of electric current to the trailer brakes, mimicking the action of the vehicle’s own brakes.
- Advantages:
- Provide better control over the trailer’s braking system, improving safety and reducing stopping distances.
- Can be adjusted to match the weight and braking requirements of different trailers.
- Offer proportional braking, meaning the trailer’s brakes respond in proportion to the severity of the braking in the vehicle.
- Disadvantages:
- Requires an electrical connection between the towing vehicle and the trailer.
- Installation may require professional assistance or advanced diy skills.
- Best applications:
- Electric trailer brake controllers are suitable for a wide range of trailers, including travel trailers, horse trailers, utility trailers, and larger recreational vehicles (rvs).
- Ideal for situations where precise trailer braking control is necessary, such as when towing heavy loads or traveling downhill.
Hydraulic Trailer Brake Controllers
Hydraulic trailer brake controllers operate differently from their electric counterparts, utilizing the trailer’s hydraulic braking system. Here’s what you need to know about hydraulic trailer brake controllers:
- How they work:
- Hydraulic trailer brake controllers work by using the hydraulic pressure already present in the towing vehicle’s braking system.
- When the driver applies the brakes, the controller activates a hydraulic pump that pressurizes the hydraulic fluid, which then activates the trailer’s brakes.
- Advantages:
- Provides smooth and proportional braking performance, similar to the vehicle’s own braking system.
- Requires no electrical connection between the towing vehicle and the trailer.
- Generally offers a simpler installation process compared to electric brake controllers.
- Disadvantages:
- Not suitable for trailers with electric braking systems.
- May require occasional maintenance, such as bleeding the hydraulic system, to ensure optimal performance.
- Best applications:
- Hydraulic trailer brake controllers are commonly used for trailers that have hydraulic braking systems, such as boat trailers, car haulers, and some larger utility trailers.
- Ideal for situations where a reliable and efficient braking system is needed, particularly for trailers carrying heavy loads or in specialized towing applications.
Choosing The Right Trailer Brake Controller
When it comes to ensuring the safety and efficiency of your trailer, selecting the right brake controller is crucial. A trailer brake controller is a device that allows you to operate the brakes on your trailer in tandem with your towing vehicle.
Whether you are towing a recreational vehicle or hauling heavy cargo, having a reliable and compatible brake controller is essential. Here are a few factors to consider when choosing the right trailer brake controller:
Factors To Consider When Selecting A Trailer Brake Controller:
- Type of brakes on your trailer: Determine whether your trailer has electric brakes, hydraulic surge brakes, or a combination of both. This will guide you in selecting the appropriate brake controller type.
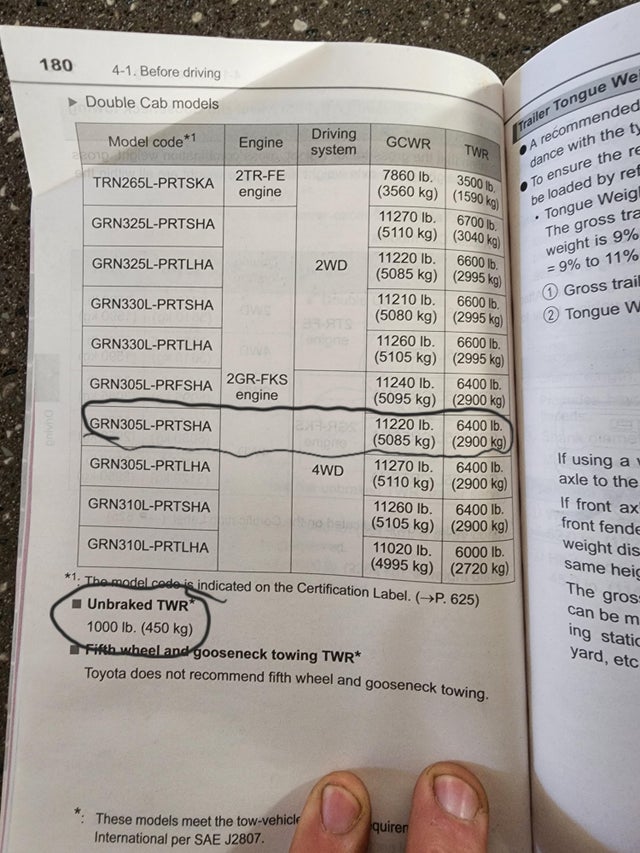
- Weight rating of your trailer: Check the weight rating of your trailer to ensure that the brake controller you choose is capable of handling the load. Different brake controllers have different weight capacity limits.
- Compatibility with your towing vehicle: It is crucial to ensure that the brake controller you select is compatible with your towing vehicle. Check the manufacturer’s specifications or consult with a professional to ensure a seamless integration.
- Installation method: Consider the installation options available for the brake controller. Some models require a simple plug-and-play installation, while others may need additional wiring or mounting. Choose a method that is convenient for you and suits your level of expertise.
- Brake controller features: Determine what additional features you require in a brake controller. Some models offer adjustable braking force, built-in diagnostics, or compatibility with abs (anti-lock braking system). Evaluate your needs and choose a controller that offers the features you desire.
Understanding Brake Controller Compatibility With Your Vehicle And Trailer:
- Electric brake controllers: Electric brake controllers operate by sending an electrical signal from the towing vehicle to the trailer brakes. They are compatible with trailers equipped with electric brakes and require proper wiring for installation.
- Hydraulic surge brake controllers: Hydraulic surge brake controllers are used for trailers equipped with hydraulic surge brakes. These controllers sense pressure changes in the towing vehicle’s brake line and apply the trailer brakes accordingly.
- Combination controllers: Some brake controllers are designed to work with both electric and hydraulic surge brakes, offering versatility and compatibility for trailers with different braking systems.
Recommended Brake Controller Brands And Models:
- Tekonsha brake controllers: Tekonsha is a renowned brand known for its reliable brake controllers. Their models, such as the tekonsha primus iq and tekonsha p3, offer advanced features and are highly recommended by towing enthusiasts.
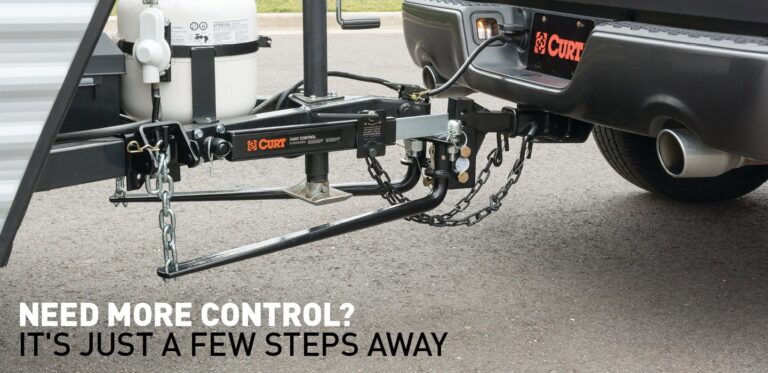
- Curt brake controllers: Curt offers a range of brake controllers, including the curt triflex and curt spectrum, known for their user-friendly design and easy installation process.
- Reese brake controllers: Reese brake controllers, such as the reese towpower brakeman iv, are popular among trailer owners for their affordability and reliable performance.
- Hayes brake controllers: Hayes manufactures brake controllers like the hayes genesis that are known for their durability and compatibility with various towing vehicles and trailers.
Choose a brake controller based on your specific needs, considering factors such as compatibility, installation method, and desired features. By selecting the right brake controller, you can ensure a safe and smooth towing experience for you and those sharing the road with you.
Gathering The Necessary Tools And Equipment
Essential Tools Needed For The Installation Process
To ensure a smooth and successful installation of your trailer brake controller, you’ll need the following tools:
- Multimeter: A multimeter is essential for testing electrical connections and ensuring proper voltage readings.
- Wire strippers: These will make it easier to strip the insulation off the wires for a secure connection.
- Electrical tape: Use electrical tape to secure connections and prevent any potential short circuits.
- Crimping tool: A crimping tool is necessary for creating secure crimp connections between wires.
- Screwdrivers: You’ll need both a flathead and a phillips screwdriver for removing and installing screws throughout the installation.
- Wire connectors: Use wire connectors to join wires together and ensure secure connections.
- Socket set: A socket set will come in handy for loosening and tightening nuts and bolts during the installation process.
- Drill and drill bits: If you need to mount your trailer brake controller, a drill and appropriate drill bits will be necessary.
- Zip ties: These will help organize and secure cables and wires, preventing any potential hazards.
Optional Equipment For A Smoother Installation Experience
While these tools are not essential, they can make the installation process easier and more convenient:
- Wire crimp connectors: Instead of using a crimping tool, you can opt for pre-insulated wire crimp connectors that eliminate the need for stripping wires.
- Heat shrink tubing: This tubing provides extra protection for wired connections by sealing them against moisture and corrosion.
- Wire loom: A wire loom can help organize and protect the wires, giving your installation a cleaner and more professional look.
- Mounting bracket: A mounting bracket can simplify the installation by providing a secure and convenient location for your trailer brake controller.
Safety Precautions To Take Before Starting The Installation
Before beginning the installation process, it’s essential to prioritize safety. Here are some precautions you should take:
- Disconnect the vehicle’s battery: This will prevent any accidental electrical shocks or short circuits during the installation.
- Read the manufacturer’s instructions: Familiarize yourself with the specific instructions provided by the trailer brake controller manufacturer to ensure a proper and safe installation.
- Wear protective gear: Use safety goggles and gloves to protect yourself from potential hazards such as loose wires or metal fragments.
- Work in a well-ventilated area: Ensure that the area where you are working has proper ventilation to avoid inhaling any harmful fumes.
- Follow proper wiring techniques: Make sure to properly insulate all connections and avoid any exposed wires that could potentially cause electric shocks or damage.
- Double-check your work: Perform a thorough inspection to ensure that all connections are secure and all wires are properly routed and protected.
By gathering the necessary tools, including optional equipment, and prioritizing safety precautions, you’ll be well-prepared to tackle the installation of your trailer brake controller.
Preparing Your Vehicle And Trailer
Ensuring The Vehicle And Trailer Are In A Safe And Stable Condition
Before installing a trailer brake controller, it is important to ensure that both your vehicle and trailer are in a safe and stable condition. This will not only allow for optimal braking performance but also promote overall safety on the road.
Here are the key steps to follow:
- Inspect the vehicle’s brake system: Check your vehicle’s brake pads, rotors, and brake fluid level to ensure they are in good working condition. Any signs of wear or damage should be addressed before installing a brake controller.
- Check for proper towing capacity: Review your vehicle’s towing capacity to ensure it is suitable for the weight of your trailer. Exceeding the recommended towing capacity can lead to dangerous situations on the road.
- Inspect the trailer’s brakes: Verify that the trailer’s brake system is functioning correctly. This includes inspecting the brake pads, rotors, and electrical connections. Any issues should be addressed before proceeding with the installation.
- Ensure all trailer lights are working: Test the trailer’s lights to ensure they are functioning properly. This includes brake lights, turn signals, and taillights. Proper lighting is crucial for safe towing.
- Check the trailer’s suspension: Inspect the trailer’s suspension components, including the springs and shocks, to ensure they are in good condition. Proper suspension will help promote stability during braking.
Properly Connecting The Trailer To The Vehicle
Once you have confirmed the safety and stability of both your vehicle and trailer, it is time to properly connect them. Follow these steps to ensure a secure connection:
- Align the trailer hitch: Position your vehicle so that the trailer hitch aligns with the receiver. Use a spotter if needed to guide you into the correct position.
- Engage the coupler: Lower the trailer’s coupler onto the vehicle’s hitch ball, making sure it is fully seated and locked into place. Secure the coupler latch to prevent accidental disconnection.
- Attach safety chains: Connect the trailer’s safety chains to the vehicle’s hitch, crossing them under the coupler. This will help prevent the trailer from separating in the event of a hitch failure.
- Plug in the electrical connector: Connect the trailer’s electrical connector to your vehicle’s wiring harness. This will enable the trailer’s lights and brake signals to function properly.
- Test the connection: Perform a visual inspection of the trailer and vehicle connection, ensuring that everything is securely fastened. Give the trailer a gentle push to check for any unusual movement or instability.
Adjusting Suspension And Tire Pressure For Optimal Braking Performance
To achieve optimal braking performance with a trailer brake controller, it is important to adjust the suspension and tire pressure accordingly. Follow these steps for optimal results:
- Adjust trailer suspension: If your trailer has adjustable suspension settings, consult the owner’s manual or manufacturer’s instructions to properly set it for towing. This will help ensure a stable and controlled ride.
- Check tire pressure: Inspect the trailer tires and adjust the tire pressure to the recommended levels specified by the manufacturer. Proper tire pressure promotes even wear and enhances braking efficiency.
- Balance the load: Distribute the load evenly throughout the trailer to maintain balance and stability. Avoid placing excessive weight on one side, as it can affect braking performance and handling.
- Secure loose items: Before towing, secure any loose items inside the trailer to prevent them from shifting during braking. Unsecured items can lead to unbalanced weight distribution and compromise braking performance.
By adhering to these steps and taking the necessary precautions, you can ensure that your vehicle and trailer are in an optimal condition for towing with a trailer brake controller. Always prioritize safety and follow any additional guidelines provided by the manufacturer for your specific vehicle and trailer combination.
Understanding The Wiring System
Overview Of The Various Wiring Components Involved In Trailer Brake Controller Installation
When it comes to installing a trailer brake controller, understanding the wiring system is crucial. This section will provide an overview of the different wiring components involved in the installation process. By familiarizing yourself with these components, you’ll be equipped to successfully install a trailer brake controller in your vehicle.
Here are the key points:
- The trailer brake controller: This essential component regulates the electric brakes on your trailer. It is usually mounted under the dashboard, within easy reach of the driver.
- Wiring harness: The wiring harness acts as the link between the brake controller and the vehicle’s electrical system. It connects the brake controller to the appropriate wires within the vehicle.
- Brake switch wire: This wire connects the brake controller to the brake switch, which sends a signal to the controller when the brake pedal is engaged. This signal triggers the trailer brakes to engage as well.
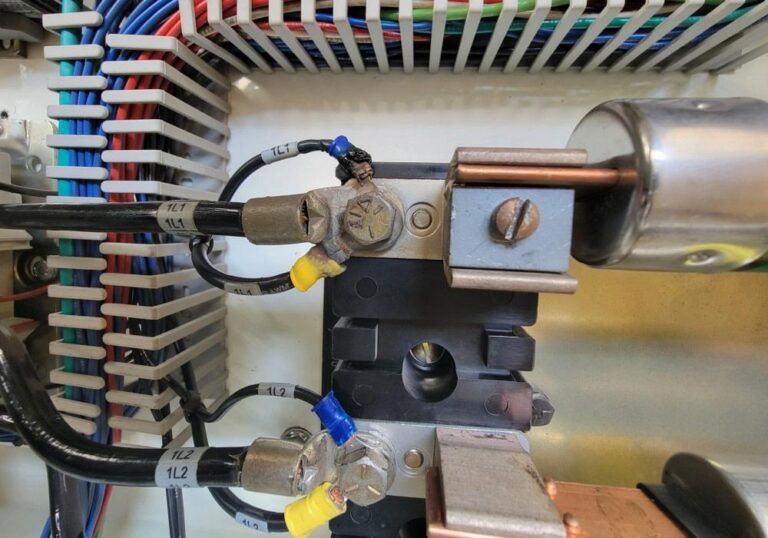
- Power wire: The power wire supplies the necessary voltage to the brake controller. It is typically connected directly to the vehicle’s battery and requires a fuse for protection.
- Ground wire: The ground wire provides a secure electrical connection to the vehicle’s chassis, ensuring reliable performance of the brake controller.
Identifying The Specific Wiring Diagram For Your Vehicle
Before you begin the installation process, it is crucial to identify the specific wiring diagram for your vehicle. This diagram will guide you through the necessary connections and ensure a successful installation. Here’s what you need to know:
- Consult the vehicle’s owner’s manual: The owner’s manual often contains a wiring diagram specific to your vehicle’s make and model. Look for the trailer wiring section or consult the electrical diagrams.
- Online resources: There are numerous online resources available that provide wiring diagrams for various vehicles. Websites or forums dedicated to trailer setups and brake controller installations can be valuable sources of information.
- Wiring kit compatibility: If you are using a wiring kit designed specifically for your vehicle, it may come with a wiring diagram. Check the documentation included in the kit to find the correct diagram.
Remember, it is essential to identify the correct wiring diagram to prevent any potential issues or damage to your vehicle’s electrical system during the installation process.
Testing The Existing Wiring System For Any Potential Issues Or Faults
Before installing the trailer brake controller, it is important to test the existing wiring system in your vehicle. This ensures that there are no faults or potential issues that could affect the performance of the brake controller. Consider the following steps:
- Visual inspection: Check the wiring connections for any signs of damage, such as frayed wires or loose connections. Ensure that all connections are secure and properly insulated.
- Testing the brake lights: Verify that the brake lights on your vehicle are functioning correctly. Press the brake pedal and observe whether the lights illuminate promptly and consistently.
- Testing the turn signals and hazard lights: Activate the turn signals and hazard lights, both on your vehicle and any attached trailer. Ensure that the lights blink at the correct speed and synchronize properly with the vehicle’s signals.
- Testing the trailer’s electrical connection: If you have access to a trailer, connect it to your vehicle and test its electrical connection. Check if all the lights, including brake lights and turn signals, function as expected.
By thoroughly testing the existing wiring system, you can identify any potential issues or faults that may require attention before proceeding with the installation of the trailer brake controller.
Wiring The Trailer Brake Controller
Step-By-Step Guide To Wiring The Brake Controller To Your Vehicle’S Electrical System
Wiring the trailer brake controller is crucial for ensuring proper functionality and control while towing. Follow this step-by-step guide to connect the brake controller to your vehicle’s electrical system:
Locating The Appropriate Wires In The Vehicle’S Wiring Harness
- Start by locating the vehicle’s wiring harness, usually found near the driver’s side kick panel or under the dashboard.
- Identify the necessary wires for the brake controller installation, which may include:
- Power wire: Supplies power to the brake controller from the vehicle’s battery.
- Ground wire: Provides a secure ground connection for the brake controller.
- Brake switch wire: Connects to the vehicle’s brake switch to activate the trailer brakes when the brake pedal is pressed.
- Trailer connection wires: Connect the brake controller to the trailer’s electrical system.
Connecting The Brake Controller To The Vehicle’S Power Source And Ground
- Strip the insulation off the power wire and ground wire, exposing the metal conductor.
- Connect the power wire to the vehicle’s positive battery terminal or an appropriate power source, ensuring a proper and secure connection.
- Connect the ground wire to a clean, bare-metal surface on the vehicle’s chassis, ensuring a solid ground connection.
Testing The Wiring Connections For Proper Functionality
- Before finalizing the wiring connections, test them for functionality to ensure proper operation of the brake controller.
- Turn on the vehicle’s engine and activate the brake pedal to verify if the brake controller receives power.
- Test the brake controller by connecting a trailer and verifying if the brakes are engaged when the vehicle’s brakes are applied.
Remember to review your vehicle’s specific wiring diagram and the brake controller manufacturer’s instructions for any additional steps or considerations. A professional installation may be recommended if you are unsure or uncomfortable performing these steps yourself.
By following these steps, you can effectively wire the trailer brake controller to your vehicle’s electrical system, ensuring a safe and controlled towing experience.
Mounting The Brake Controller
Different Mounting Options For The Brake Controller
Mounting the brake controller in your trailer is an essential step to ensure optimal performance and safety while towing. There are several mounting options available, and choosing the right one depends on your trailer’s specific requirements and your personal preferences.
Here are the different mounting options you can consider:
- Dash-mounted: This is a popular mounting option where the brake controller is installed on the dashboard of your vehicle. It provides easy accessibility and visibility, allowing you to monitor and control the trailer brakes without taking your eyes off the road.
- Pedal-mounted: Another common mounting option is attaching the brake controller to the floor, near the accelerator pedal. This placement offers convenience, as you can easily modulate the trailer brakes with your feet, similar to how you use the vehicle’s pedals.
- Under-dash mounted: Some brake controllers can be mounted underneath the dashboard, discreetly hidden from view. This option not only keeps the brake controller out of the way but also adds a clean and uncluttered look to your vehicle’s interior.
- Integrated with the vehicle’s system: In certain vehicles, the brake controller can be integrated into the onboard computer system. This option eliminates the need for a separate mounting location and seamlessly incorporates the trailer brake controls into the vehicle’s existing controls.
Locating The Ideal Position For Optimal Accessibility And Visibility
Once you’ve decided on the type of mounting option that suits your needs, the next step is to locate the ideal position for mounting the brake controller. Consider the following factors to ensure optimal accessibility and visibility:
- Proximity to the driver: Mount the brake controller within easy reach of the driver. This allows you to quickly and effortlessly adjust the brake settings while keeping your attention on the road ahead.
- Line of sight: Position the brake controller where it is visible to you without obstructing your view of the road. A clear line of sight ensures that you can monitor the trailer brake operation effectively.
- Comfortable angle: Mount the brake controller at an angle that is comfortable for you to operate. Ensure that it is easily readable and that the buttons or knobs can be manipulated without straining or contorting your hand or fingers.
Step-By-Step Installation Process For Mounting The Brake Controller Securely
Now that you have determined the mounting option and the ideal position for your brake controller, follow these step-by-step instructions to mount it securely:
- Identify the chosen mounting location, ensuring it meets the requirements mentioned above.
- Use a drill to create the necessary holes for mounting brackets or screws, if needed. Make sure to align the holes accurately according to the manufacturer’s instructions.
- Attach the mounting brackets or screws to the brake controller and position it in the chosen location.
- Securely tighten the brackets or screws to ensure the brake controller is firmly mounted.
- Test the stability of the brake controller by gently shaking it. If there is any movement, recheck the mounting and tighten any loose fittings.
- Connect the wiring harness to the brake controller following the manufacturer’s instructions. Ensure the connections are secure and protected from water and other elements.
- Route the wiring harness to the vehicle’s electrical system, making sure to avoid any moving parts or potential hazards.
- Connect the wiring harness to the appropriate wires in the vehicle’s electrical system. Refer to the brake controller’s manual or seek professional assistance for proper wire identification.
- Double-check all the connections and ensure that the brake controller is firmly mounted and secured.
- Test the brake controller by connecting your trailer and conducting a brake test. Adjust the brake settings as necessary to achieve optimal braking control.
By following these installation steps, you can mount your brake controller securely, ensuring ease of access, visibility, and optimal functionality while towing your trailer.
Adjusting Brake Controller Settings
Understanding The Different Brake Controller Settings And Their Impact On Braking Performance
Adjusting the brake controller settings is a crucial step in ensuring the optimal braking performance of your trailer. By understanding and properly setting the brake controller, you can match it to your trailer’s weight and braking requirements. This will help you achieve the right balance between effective braking and smooth operation.
Here’s a step-by-step guide to help you adjust the brake controller settings:
- Determine the braking system of your trailer: Before adjusting the settings, it’s important to know the type of braking system your trailer has. It can either be electric brakes or hydraulic brakes.
- Begin with the initial settings: Start by setting the gain or sensitivity level to its minimum or factory default setting. This will allow you to fine-tune the settings based on your specific trailer and driving conditions.
- Connect your trailer to the tow vehicle: Make sure your trailer is properly connected to the tow vehicle before starting the adjustment process. This will ensure that the brake controller receives accurate signals and enables you to measure the braking performance accurately.
- Find a safe and open area to test your adjustments: Look for a safe and open area, such as an empty parking lot, where you can drive your vehicle and trailer to test the brake controller adjustments. Ensure there is enough space to safely brake and observe the braking performance.
- Gradually increase the gain or sensitivity: Begin adjusting the brake controller by gradually increasing the gain or sensitivity level. This setting determines the amount of braking force applied to the trailer when the tow vehicle’s brakes are engaged. Start with a low gain setting and gradually increase it until you achieve the desired braking response from the trailer.
- Test the trailer’s braking response: Once the gain is set, test the trailer’s braking response by applying the tow vehicle’s brakes at different speeds. Observe how the trailer responds to the braking, ensuring it doesn’t skid or cause excessive weight transfer from the rear to the front of the trailer.
- Fine-tune the gain setting: If the trailer’s braking response is too aggressive, causing the wheels to lock up or skid, reduce the gain or sensitivity setting slightly. On the other hand, if the braking response is inadequate, increase the gain setting to provide stronger braking force.
- Adjust the time delay: Some brake controllers offer a time delay adjustment, which determines how quickly the brakes are applied after the tow vehicle’s brakes are engaged. If your brake controller has this feature, adjust it according to the trailer’s braking performance and the driving conditions.
- Continuously test and make adjustments: Repeat the testing process and make further adjustments as necessary until you achieve the desired braking performance. Remember that different driving conditions and trailer loads may require different brake controller settings.
- Regularly check and re-adjust as needed: It’s important to regularly check and re-adjust the brake controller settings, especially if you change trailers or encounter different driving conditions. Keeping the brake controller properly adjusted ensures safe and reliable braking performance.
Now that you have a clear understanding of the different brake controller settings and how to adjust them, you can confidently fine-tune your brake controller to match your trailer’s weight and braking requirements. With the right settings in place, you can enjoy safe and controlled braking, enhancing both your towing experience and overall road safety.
Testing And Calibration
Conducting A Thorough Test Of The Brake Controller Functionality
Before hitting the road, it is crucial to conduct a thorough test of the brake controller functionality to ensure its proper operation. Here are the key points to consider:
- Connect the trailer to the towing vehicle and ensure a secure connection.
- Start the vehicle and engage the trailer brakes using the brake controller.
- Apply the brakes gently and observe if the trailer brakes respond accordingly.
- Test the sensitivity of the brake controller by gradually increasing the brake pressure and checking if the braking force on the trailer is proportional to the towing vehicle.
- Check if the brake controller provides smooth and consistent braking performance.
- Verify if the brake controller achieves the desired brake force without locking up the trailer brakes.
- Conduct a test in various driving conditions, including different speeds, terrains, and weather conditions, to ensure the brake controller performs consistently.
- Pay attention to any unusual noises or vibrations during the test, as they may indicate malfunctioning components.
- Ensure that the brake controller meets the legal requirements and regulations for towing and braking.
Properly Calibrating The Brake Controller To Ensure Accurate And Proportional Braking
Accurate and proportional braking is essential for safe towing. To achieve this, proper calibration of the brake controller is necessary. Here are the steps to follow:
- Determine the type of brake system installed on the trailer, such as electric brakes, hydraulic brakes, or electric-over-hydraulic (eoh) brakes.
- Consult the brake controller’s manual for the specific calibration instructions that match the trailer’s brake system.
- Adjust the gain or sensitivity settings on the brake controller based on the manufacturer’s recommendations and the weight of the trailer.
- Test the braking performance after each adjustment to ensure it is proportional to the towing vehicle.
- Fine-tune the calibration by making small adjustments until the desired braking performance is achieved.
- Keep in mind that proper calibration may require multiple iterations of testing and adjustment.
- Take into account any additional factors that could affect the braking performance, such as cargo weight distribution and trailer condition.
Troubleshooting Common Issues And Solutions During The Testing And Calibration Process
While conducting the testing and calibration process, you may encounter common issues. Here are some troubleshooting tips to help you resolve them:
- If the trailer brakes are not engaging at all, check the connection between the towing vehicle and the trailer. Ensure the wiring is properly connected and is in good condition.
- If the trailer brakes are locking up or providing excessive braking force, decrease the gain or sensitivity settings on the brake controller.
- If the brake force is insufficient and the trailer is not braking adequately, increase the gain or sensitivity settings on the brake controller.
- In case of inconsistent braking performance, check for any loose connections or damaged wiring that may disrupt the electrical signal between the brake controller and the trailer brakes.
- If the brake controller is not responding or functioning erratically, check the power supply, fuse, and wiring of the brake controller for any issues.
- If all troubleshooting steps fail to resolve the problem, consult a professional for further assistance to avoid compromising safety.
Remember, properly testing and calibrating your trailer brake controller ensures safe and reliable towing. By following these steps and troubleshooting tips, you can improve your braking performance and have peace of mind on the road.
Safety Tips For Using A Trailer Brake Controller
Essential Safety Precautions To Follow When Using A Trailer Brake Controller
Before you hit the road with a trailer brake controller, it is crucial to prioritize safety. Here are some essential safety precautions to follow:
- Familiarize yourself with the brake controller’s user manual: Take the time to read and understand the instructions provided by the manufacturer. Knowing how to operate the controller properly will ensure a safe towing experience.
- Regularly inspect your trailer’s brakes: Before each trip, inspect the state of your trailer’s brakes. Look for any signs of wear or damage, such as worn brake pads or leaking brake fluid. If you notice any issues, address them promptly to maintain optimal performance.
- Adjust the brake controller settings: Each time you connect a trailer, ensure that the brake controller is adjusted to match the trailer’s weight and braking system. This adjustment will ensure proper braking force and prevent potential accidents caused by inadequate braking power.
- Test the brake controller before hitting the road: Engage the trailer brakes and test the brake controller’s functionality before starting your journey. This step ensures that the brakes are responsive and provides peace of mind that your towing setup is in good working order.
- Maintain safe following distances: When towing a trailer, it’s vital to increase your following distance. The added weight requires more time and distance to bring your vehicle to a stop. Give yourself ample room to react to sudden stops or emergencies.
Best Practices For Maintaining And Monitoring The Brake Controller’S Performance
To ensure your trailer brake controller operates optimally throughout its lifespan, here are some best practices for maintenance and monitoring:
- Regularly clean the brake controller: Dust and debris can accumulate on the controller’s surface, potentially affecting its performance. Use a soft cloth or brush to clean the controller periodically and keep it free from dirt and grime.
- Monitor brake controller indicators: Pay attention to any warning lights or indicators displayed on the controller. These indications may signal an issue with the trailer’s braking system or the controller itself. Address any concerns promptly to maintain safe towing conditions.
- Regularly inspect wiring and connections: Examine the wiring and connections between the brake controller and trailer to ensure they are secure and free from damage. Loose or damaged wiring can interfere with the brake controller’s functionality and compromise your safety.
- Test the brake controller’s response periodically: Perform periodic tests to ensure the brake controller is responding correctly. This can be done in an open space at a low speed, gradually applying the brakes and observing how the trailer responds. Adjust settings or seek professional assistance if any issues arise.
- Stay up-to-date with manufacturer updates: Keep an eye out for any updates or recalls from the brake controller manufacturer. Staying informed about potential issues or improvements can help you maintain the controller’s performance and ensure a safe towing experience.
How To Handle Emergency Situations While Towing A Trailer
Even with proper precautions in place, sometimes emergencies can occur while towing a trailer. Here are some tips for handling emergency situations:
- Maintain composure: In the event of an emergency, stay calm and composed. Panic can lead to poor decision-making, potentially exacerbating the situation.
- Activate hazard lights: If you encounter an emergency situation while towing, immediately activate your vehicle’s hazard lights to alert other drivers of the situation and indicate a need for caution.
- Gradually reduce speed: Slow down gradually when faced with an emergency situation, avoiding abrupt braking whenever possible. This reduces the risk of skidding or losing control of the trailer.
- Assess the cause of the emergency: Identify the cause of the emergency to determine the appropriate course of action. It could be a mechanical failure, road conditions, or external factors.
- Call for assistance if needed: If the emergency situation requires professional assistance, do not hesitate to call for help. Contact emergency services or a towing service for immediate support.
Remember, adequate preparation and adhering to safety guidelines are vital for a safe and enjoyable towing experience. By following these safety tips, maintaining the brake controller’s performance, and knowing how to handle emergency situations, you can ensure a smooth journey on the road.
Stay safe and happy towing!
Frequently Asked Questions For Trailer Brake Controller Installation Steps
How Do You Install A Trailer Brake Controller?
To install a trailer brake controller, begin by disconnecting the negative battery cable and mounting the controller. Then, connect the wires according to the manufacturer’s instructions and test the brakes to ensure proper installation.
What Tools Are Needed For Trailer Brake Controller Installation?
You will need basic tools such as a screwdriver, wire strippers, crimping tool, electrical tape, and a drill to complete the trailer brake controller installation.
Can I Install A Trailer Brake Controller Myself?
Yes, it is possible to install a trailer brake controller yourself, as long as you have some basic technical knowledge and follow the manufacturer’s instructions carefully.
How Long Does It Take To Install A Trailer Brake Controller?
On average, it takes about 1-2 hours to install a trailer brake controller, depending on your experience level and the complexity of the installation.
Do I Need A Professional For Trailer Brake Controller Installation?
While it is possible to install a trailer brake controller yourself, if you are not comfortable with electrical work or do not have experience in this area, it may be worthwhile to hire a professional to ensure proper installation and safety.
What Are The Benefits Of A Trailer Brake Controller?
A trailer brake controller allows you to have better control and stopping power when towing a trailer, improving safety and reducing wear on your vehicle’s brakes.
Can I Use A Trailer Brake Controller On Any Vehicle?
Trailer brake controllers can be used on most vehicles that have a towing capacity, as long as the vehicle is equipped with the necessary electrical connections and wiring harness.
Is A Trailer Brake Controller Necessary For Towing?
While it is not legally required in all jurisdictions, a trailer brake controller is highly recommended for towing heavy trailers, as it enhances safety and control while braking.
Conclusion
Installing a trailer brake controller is a crucial step in ensuring the safety and efficiency of your towing experience. By following the step-by-step process outlined in this blog post, you can confidently navigate through the installation with ease. Begin by gathering the necessary tools and materials and identifying the appropriate location for the controller.
Next, connect the necessary wires and ensure a secure and functional installation. Test the controller to ensure it is functioning properly and make any necessary adjustments. Finally, take the time to familiarize yourself with how the controller works and make any necessary adjustments to the settings.
With a properly installed trailer brake controller, you can have peace of mind knowing that you have a reliable and effective system in place to control your trailer’s brakes. Happy towing!