Illuminate Your Ride: Easy Bluetooth Wheel Light Installation Guide.
Installing bluetooth-controlled wheel lights is a simple process that requires a few steps. In this guide, we will provide a step-by-step instruction on how to do it.
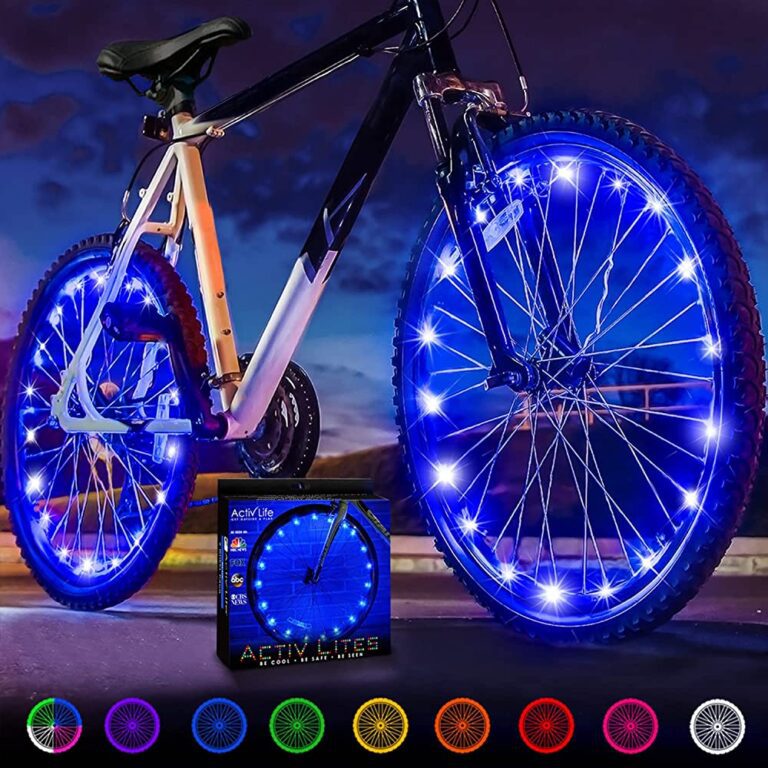
Wheel lights are a fantastic way to add a bit of fun to your bike and increase your visibility while cycling. Bluetooth controlled wheel lights take things one step further, offering greater flexibility and control over the lights’ color, intensity, and flashing rates.
Bluetooth wheel lights come with a control app that you can use to customize your lights to your liking. In this guide, we will show you everything you need to know to install bluetooth controlled wheel lights on your bike. From setting up the lights to using the control app, we’ve got you covered. So, let’s get started!

Credit: theelectricfuture.eu
Getting Started
Choosing The Right Bluetooth Wheel Lights For Your Bike
Are you excited about jazzing up your bike with bluetooth-controlled wheel lights? Great choice! But before diving into the installation process, the first step is selecting the right lights for your bike. Here are some things to consider:
- Size and compatibility with your bike’s wheels: Choose lights that fit securely along the circumference of your wheels without being too loose or tight. Check the size chart to make sure they’re compatible with your bike’s wheel size.
- Color options: If you want to add a personal touch to your bike, choose lights that come in different color options that match your style.
- Battery life: Ensure that the battery life is enough to last through long rides.
- Durability: Look for lights that can survive different weather conditions and rough terrain.
Checking The Compatibility Of Your Bike With Bluetooth Wheel Lights
Bluetooth wheel lights are designed for certain types of bicycles, so before purchasing, ensure that your bike is compatible. Here’s how to do it:
- Check the bike’s wheel size: Ensure that the wheel light manufacturer offers the product for your bike’s wheel size.
- Check the spoke configuration: Some bike wheels have a different spoke configuration that might not be compatible with some wheel lights.
- Check the bike frame clearance: Make sure there is enough clearance between the lights and your bike’s frame to avoid damage.
Setting Up The Necessary Tools For Installation
Before you start installing the lights, ensure you have the tools necessary to complete the installation process. Here’s what you’ll need:
- Wheel lights kit: Purchase a bluetooth wheel light kit that has easy-to-follow instructions and all the necessary parts.
- Scissors: You’ll need scissors to cut zip ties and trim excess wires.
- Screwdriver: A screwdriver will come in handy when fixing and tightening nuts and screws.
- Wire cutters/strippers: You’ll need these to strip off insulation from the wires or cut wires to the desired length.
- Zip ties: Zip ties will help you secure the lights and wires to the spokes and the bike’s frame.
By choosing the right lights, ensuring compatibility, and gathering the necessary tools, you’re now ready to start the installation process. Stay tuned for our next section, where we’ll walk you through the step-by-step process of installing bluetooth-controlled wheel lights on your bike!
Preparing Your Bike
Installing bluetooth-controlled wheel lights is a fun and easy way to add some personality to your bike while also enhancing your visibility at night. In this guide, we’ll take you through the process step-by-step to help you get started. Let’s begin with preparing your bike.
Cleaning Your Bike Tires
Before installing bluetooth-controlled wheel lights, it’s essential to ensure that your bike tires are clean. Here are a few things to keep in mind:
- Remove any dirt and debris from the tires with a dry cloth or brush.
- If your tires are particularly dirty, wash them with soap and water, then dry them with a clean towel.
- Make sure the tires are completely dry before proceeding with the installation.
Removing Any Existing Reflectors Or Lights
Next, you’ll want to remove any existing reflectors or lights on your bike to make way for the new bluetooth-controlled wheel lights. Here’s what you’ll need to do:
- Unscrew any reflectors or lights attached to your bike’s wheels and remove them.
- Make sure to keep any screws or bolts that you remove safe in a container or bag to avoid misplacing them.
- Wipe away any dirt or debris left behind after removing the reflectors or lights.
Measuring The Diameter Of Your Bike Tires
It’s important to measure your bike tires’ diameter to make sure you purchase the correct size bluetooth-controlled wheel lights. Here’s how to measure your tires:
- Use a tape measure or ruler to measure the distance across the widest part of the tire.
- Make a note of the measurement in millimeters or inches.
- Repeat the process for both front and rear tires, as they may have slightly different diameters.
Following these steps will help you prepare your bike for the installation of bluetooth-controlled wheel lights. By having clean tires, removing any existing reflectors or lights, and measuring your tire diameter, you’ll be ready for the next step in the process.
Stay tuned for the next installment of our step-by-step guide!
Installing The Bluetooth Wheel Lights
Attaching The Light Strips To Your Bike Rims
Before you start attaching the light strips to your bicycle rims, make sure that you have cleaned the rims thoroughly.
Here’s how you can attach the light strips to your bike rims using a few simple steps:
- Peel off the adhesive backing of the light strips to expose the adhesive layer.
- Carefully align the light strips to your bike rims, making sure that each strip extends from one end of the rim to the other end.
- Lightly press the light strips onto the bike rims to secure them in place.
- Use zip ties to further secure the light strips to the rims if necessary.
Connecting The Lights To The Power Source
Once the light strips are attached to your bike rims, you need to connect them to the power source to power them up.
To do this, follow the steps below:
- Locate the battery pack that comes with your bluetooth-controlled wheel lights.
- Connect the light strips to the battery pack by plugging them into the designated ports.
- Turn on the battery pack to start powering the light strips.
Pairing The Lights With Your Smartphone Via Bluetooth
Before you can start controlling the lights using your smartphone, you need to pair them with your phone.
Here’s how you can pair the lights with your smartphone via bluetooth:
- Turn on the bluetooth feature on your smartphone.
- Power on the bluetooth-controlled wheel lights.
- Open the bluetooth settings on your smartphone and select the option to pair a new device.
- Select your bluetooth-controlled wheel lights from the list of available devices.
- Follow the on-screen prompts to complete the pairing process.
Adjusting The Settings Of The Lights
Once you have successfully paired the lights with your smartphone, you can start adjusting their settings.
Here’s how you can adjust the settings of the lights:
- Open the bluetooth-controlled wheel lights app on your smartphone.
- Choose the setting you want to adjust, such as color, brightness, or flashing patterns.
- Use the sliders or drop-down menus to make your desired adjustments.
- Save your changes when you are happy with your settings.
Remember, before you ride your bike, test the lights to make sure they are working correctly. Now that you know how to install bluetooth-controlled wheel lights on your bike, you can ride confidently knowing that you’ll be seen in style!
Tips For Optimal Performance
Installing Bluetooth-Controlled Wheel Lights: A Step-By-Step Guide
Are you looking to add an extra flair to your bike or ramp up your safety during night rides? Bluetooth-controlled wheel lights might just be what you need! In this step-by-step guide, we will explain how you can easily install and make the most of your bluetooth-controlled wheel lights.
Additionally, we will equip you with tips to optimize the performance of your new bicycle accessory.
How To Maintain And Clean Your Bluetooth Wheel Lights
To keep your bluetooth-controlled wheel lights in tiptop condition, regular maintenance and cleaning are essential. Follow these steps to maintain and clean your bluetooth wheel lights:
- Use a soft, damp cloth to wipe down your wheel lights, ensuring they are dirt and dust-free. It is important to note that spraying chemicals or water directly on your wheel lights may damage them.
- Avoid washing your bicycle with your bluetooth wheel lights installed. Instead, remove them and wash your bicycle as normal before reinstalling them.
- Check your bluetooth wheel lights regularly for any visible damage or wear and tear. If you notice damage, remove your wheel lights and contact customer support immediately.
Setting The Optimal Brightness For Different Riding Conditions
Did you know that you can adjust the brightness levels of your bluetooth-controlled wheel lights? This feature can be particularly useful when riding in different times of the day or weather conditions. Here are a few tips for adjusting the brightness of your bluetooth wheel lights:
- Use a brighter setting during low light conditions such as early in the morning, late in the evening, or if you are riding in a shaded area with limited visibility.
- If you are riding during daylight hours, consider using a lower brightness setting. Not only will this help enhance the appearance of your bike, but it may also extend the battery life of your bluetooth wheel lights.
- Remember, setting the optimal brightness is all about prioritizing your safety and visibility. Make sure to adjust according to your riding conditions.
Using The Wheel Lights For Safety During Night Rides
One of the significant advantages of bluetooth-controlled wheel lights is their ability to work as a safety device when riding at night. As a rider, you can take advantage of the versatile light settings to grab other road users’ attention and improve your visibility.
Here are some tips for utilizing your bluetooth wheel lights for safety during night rides:
- Avoid flashing modes if you want to use your wheel lights for safety purposes. Instead, use a steady glow mode. Flashing modes can be distracting and may not grab the attention of other road users as effectively as a steady glow.
- Consider installing additional lighting for the back of your bike. A rear light and reflective vest will make you more visible to oncoming traffic.
Maximizing Battery Life
Bluetooth-controlled wheel lights typically come with rechargeable batteries that can last up to 20 hours on a single charge. However, it is essential to know how to maximize the battery life of your bluetooth wheel lights. Here are some tips for getting the most out of your bluetooth wheel lights:
- Make sure that you turn off your bike lights when not in use. This will help you avoid draining the battery unnecessarily.
- Only charge your bluetooth wheel lights when they are running low on power. Charging too frequently can reduce the battery life.
- Store your bluetooth wheel lights in a cool dry place when not in use. Avoid leaving them exposed to extreme temperatures or direct sunlight.
Bluetooth-controlled wheel lights are an excellent bike accessory that can enhance your riding experience while increasing your visibility and safety on the road. By following these simple tips, you can keep your bluetooth wheel lights in tip-top shape and get the most out of your investment.
Happy riding!
Frequently Asked Questions (Faqs)
What Is The Average Lifespan Of Bluetooth Wheel Lights?
Bluetooth wheel lights typically last between 200-300 hours of use, or around 3-6 months depending on usage frequency. However, the actual lifespan will vary depending on the quality of the product and how it’s used.
Can Bluetooth Wheel Lights Be Used In Wet Weather Conditions?
Most bluetooth wheel lights are waterproof and can be used in wet weather conditions. Look for products that offer ip65 or higher protection ratings, which means they can withstand intense rain and dust. However, it’s always best to check the product specifications before use.
How Do I Know If My Bike Is Compatible With Bluetooth Wheel Lights?
As long as your bike has standard spoke wheels, it should be compatible with most bluetooth wheel lights. However, it’s important to check the product specifications to ensure compatibility before making your purchase. Also, make sure that the diameter of your wheel matches the product’s specifications.
What Are The Best Bluetooth Wheel Lights Available In The Market?
There are numerous bluetooth wheel lights in the market, but here are some of the best ones:
- Monkey light m210: This light is durable, waterproof and easy to install. It offers high-quality graphics and hundreds of fun designs that can be customized according to your preferences.
- Tinana bike wheel lights: These lights are high-tech, waterproof, and come with 14 led beads that offer a unique and smooth effect. They are also easy to install and offer multiple colors that can be controlled with a smartphone app.
- Nite ize spokelit led wheel lights: These are simple to install and come with various colors and styles. They are also waterproof and offer a battery life of up to 20 hours.
- Activ life bike wheel lights: With easy installation and multiple colors to choose from, these lights are a great option. They are also waterproof, durable, and offer a long battery life.
- Oricycle rechargeable bike wheel lights: These are easy to set up and come with bright led lights that enhance your safety while riding. The lights are waterproof and offer multiple lighting modes, including a customizable gradient.
Frequently Asked Questions On Installing Bluetooth-Controlled Wheel Lights: A Step-By-Step Guide
How Do I Install Bluetooth-Controlled Wheel Lights?
To install bluetooth-controlled wheel lights, you will need to attach them to your bike wheels and connect them to your phone via bluetooth. Follow the step-by-step instructions in the guide for a successful installation.
What Are The Benefits Of Bluetooth-Controlled Wheel Lights?
Bluetooth-controlled wheel lights add an extra element of safety and visibility while cycling at night. They also provide a fun and creative way to personalize your bike.
Can I Control My Bluetooth Wheel Lights With A Mobile Phone?
Yes, you can control your bluetooth wheel lights with a mobile phone. The lights are connected via bluetooth to an app on your phone, which allows you to choose from different colors and patterns and turn the lights on and off.
How Long Do The Batteries Last In Bluetooth Wheel Lights?
The battery life of bluetooth wheel lights varies depending on the brand and model. Typically, they can last anywhere from 6 to 20 hours before needing to be recharged.
Are Bluetooth Wheel Lights Waterproof?
Not all bluetooth wheel lights are waterproof, so it’s important to check the product specifications before purchasing. However, many models are water-resistant and should hold up well in wet conditions.
Can I Install Bluetooth Wheel Lights On Any Type Of Bike?
Yes, bluetooth wheel lights can be installed on most types of bikes, including road bikes, mountain bikes, and cruisers. However, it’s important to make sure that the lights are compatible with your bike’s wheel size before purchasing.
Do Bluetooth Wheel Lights Require Any Maintenance?
Bluetooth wheel lights require minimal maintenance. It’s a good idea to clean them after use and make sure they are charged before each ride. Check the product specifications for any additional maintenance instructions.
Conclusion
Overall, installing bluetooth-controlled wheel lights is a fun and easy way to enhance the look of your ride and stay safer while cycling in low-light conditions. With the right tools and equipment, anyone can complete this diy project in just a few hours.
By following the step-by-step guide discussed in this blog post, you can enjoy the benefits of customizing your bike with colorful, eye-catching lights that are controlled effortlessly through your smartphone. Whether you’re an experienced cyclist or just starting out, adding wheel lights to your bicycle will not only make you stand out from the crowd, but also help keep you visible and safe on the road.
So, what are you waiting for? Gather your tools and get started on this exciting and rewarding project today!