how to replace a catalytic converter
Introduction to Catalytic Converters
Catalytic converters are an essential part of a vehicle’s exhaust system, responsible for reducing the emissions of harmful pollutants. They were first widely introduced in American production cars in 1975 due to EPA regulations on toxic emissions reductions. This device plays a crucial role in converting toxic by-products of fuel combustion, such as nitrogen oxides, carbon monoxide, and hydrocarbons, into less hazardous substances like carbon dioxide, water vapor, and nitrogen gas.
What is a catalytic converter and why is it important
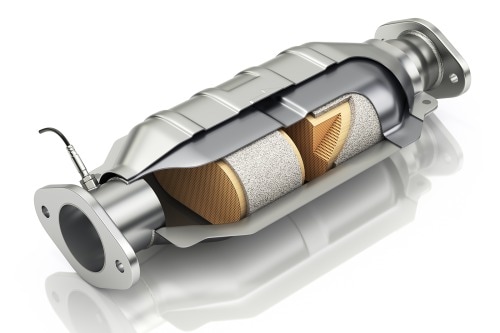
A catalytic converter is a device placed in most cars since the 1970s to improve air quality by transforming harmful exhaust gases into less toxic substances. It consists of a metal housing with a ceramic honeycomb-like interior coated with precious metals like platinum, palladium, and rhodium. These metals act as catalysts to facilitate chemical reactions and convert the harmful emissions into more environmentally friendly gases.
The importance of a catalytic converter lies in its role in reducing air pollution and promoting cleaner air for everyone to breathe. By converting harmful exhaust gases into less toxic substances, it contributes to environmental protection and public health. Catalytic converters are crucial in meeting emissions standards set by regulatory bodies and ensuring compliance with environmental regulations.
Signs of a faulty catalytic converter
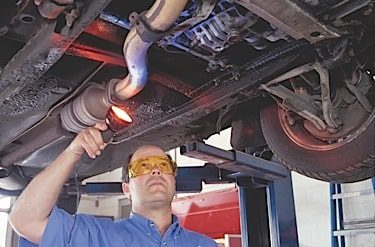
Over time, a catalytic converter may become clogged or damaged, affecting its performance and efficiency. It is important to be aware of the signs indicating a faulty catalytic converter, as ignoring the issue can lead to further damage to your vehicle and potential health risks. Some common signs of a failing catalytic converter include:
1. **Check Engine Light:** A glowing check engine light on your dashboard may indicate a problem with the catalytic converter. It is advised to have your vehicle inspected by a qualified technician to diagnose the issue accurately.
2. **Reduced Engine Performance:** A malfunctioning catalytic converter can lead to reduced engine power and performance. You may experience decreased acceleration, difficulty in starting the engine, or poor fuel efficiency.
3. **Unusual Exhaust Odors:** If you notice a strong sulfur or rotten egg smell coming from your vehicle’s exhaust, it could be a sign of a failing catalytic converter. This odor is caused by sulfur compounds in the exhaust not being converted properly.
4. **Excessive Emissions:** A failing catalytic converter may cause increased emissions, which can result in a failed emissions test. If you notice black smoke or a strong smell of gasoline from your exhaust, it is essential to have your vehicle inspected promptly.
5. **Rattling Noise:** A damaged catalytic converter can produce a rattling or metallic noise coming from underneath the vehicle. This noise is usually a sign that the internal structure of the catalytic converter has deteriorated.
It is important to address any signs of a faulty catalytic converter promptly to prevent further damage to your vehicle and ensure compliance with emissions standards. Consulting with a professional technician is recommended to accurately diagnose and repair any issues with your catalytic converter.
In conclusion, catalytic converters play a significant role in reducing harmful emissions and promoting cleaner air. Understanding their importance and recognizing signs of a faulty converter can help ensure the optimal performance of your vehicle and protect the environment.
Gather necessary tools and materials
When preparing for a catalytic converter replacement, it is important to gather all the necessary tools and materials beforehand. This will help ensure a smooth and efficient replacement process. Here are some essential items you will need:
– New catalytic converter: Make sure to purchase the correct catalytic converter for your specific vehicle make and model.
– Round gaskets: Some converters may come with small round gaskets that provide a more secure fit. If your replacement converter includes these gaskets, follow the provided instructions for installation.
– Wrench or socket set: You will need these tools to loosen and remove the bolts securing the old catalytic converter in place.
– Mallet: Performing a mallet test on the old converter can help identify if it is clogged or damaged. This test involves tapping the converter with a mallet and listening for any rattling or loose debris.
– Safety equipment: It is always important to prioritize your safety when working on your vehicle. Wear gloves, safety glasses, and a mask to protect yourself from any potential hazards.
Safety precautions before starting the replacement process
Before beginning the catalytic converter replacement, it is crucial to take some safety precautions to ensure your well-being and the proper installation of the new converter. Follow these guidelines:
– Park your vehicle on a level surface: This will provide stability and make it easier to work underneath the vehicle.
– Allow the exhaust system to cool down: Catalytic converters can become extremely hot during vehicle operation. To prevent burns, wait for the system to cool down before starting the replacement process.
– Use jack stands: If you need to lift the vehicle to gain access to the catalytic converter, always use jack stands to securely support the weight of the car. This will prevent any accidents or injuries.
– Disconnect the battery: Before working on any electrical components or sensors near the catalytic converter, disconnect the negative terminal of the battery to avoid any electrical shocks or damage.
– Read and follow manufacturer instructions: Every catalytic converter is unique, so it is important to carefully read and follow the specific installation instructions provided by the manufacturer. This will ensure that the replacement process is done correctly and efficiently.
Taking the time to gather the necessary tools and materials, as well as observing safety precautions, will help make the catalytic converter replacement process smoother and less stressful. By following these steps, you can ensure the proper installation of the new converter, promoting vehicle performance and reducing harmful emissions. Remember to check your vehicle’s emissions after the replacement to ensure compliance with safety and environmental regulations.
Removing the Old Catalytic Converter
Disconnecting the oxygen sensor
1. Begin by locating the oxygen sensor, which is typically located near the top of the catalytic converter.
2. Use a wrench or socket set to carefully remove the oxygen sensor from the converter.
3. Set the oxygen sensor aside in a safe place to avoid damage.
Removing the engine support bracket
1. Locate the engine support bracket, which is typically located near the catalytic converter.
2. Use a wrench or socket set to remove the nuts securing the engine support bracket.
3. Carefully remove the engine support bracket and set it aside.
Installing the New Catalytic Converter
Lining up the new catalytic converter
1. Take the new catalytic converter and align it with the exhaust system, making sure it is positioned correctly.
2. Ensure that the converter is properly aligned and aligned with the manufacturer’s specifications.
Tightening the converter bolts
1. Use a wrench or socket set to tighten the bolts securing the new catalytic converter in place.
2. Follow the manufacturer’s torque specifications to ensure the bolts are tightened to the correct level.
Reinstalling the oxygen sensor
1. Take the oxygen sensor that was removed earlier and carefully reinstall it into the new catalytic converter.
2. Use a wrench or socket set to securely tighten the oxygen sensor.
Reinstalling the engine support bracket
1. Before reinstalling the engine support bracket, ensure that it is clean and free of any debris.
2. Use a wrench or socket set to reinstall the nuts that secure the engine support bracket.
Testing and Finishing Up
Reinstalling the heat shield and engine cover
1. Carefully reinstall the heat shield and ensure that it is securely in place.
2. Reinstall the engine cover, making sure all the bolts or clips are properly fastened.
Checking for leaks or issues
1. Start the vehicle and let it run for a few minutes to ensure that there are no leaks or abnormalities.
2. Check for any exhaust odors or unusual sounds that may indicate a problem.
Post-replacement emissions check
1. After installing the new catalytic converter, it is important to have the vehicle’s emissions checked.
2. Take the vehicle to a qualified emissions testing facility to ensure that it meets safety and environmental regulations.
Remember, the process of replacing a catalytic converter may vary depending on the make and model of your vehicle. It is always recommended to consult the manufacturer’s instructions or seek the assistance of a professional mechanic if you are unsure about any steps in the replacement process. By following these guidelines, you can ensure the proper installation of a new catalytic converter, improving engine performance and reducing harmful emissions.
Gather necessary tools and materials
When preparing for a catalytic converter replacement, it is important to gather all the necessary tools and materials beforehand. This will help ensure a smooth and efficient replacement process. Here are some essential items you will need:
– **New catalytic converter**: Make sure to purchase the correct catalytic converter for your specific vehicle make and model.
– **Round gaskets**: Some converters may come with small round gaskets that provide a more secure fit. If your replacement converter includes these gaskets, follow the provided instructions for installation.
– **Wrench or socket set**: You will need these tools to loosen and remove the bolts securing the old catalytic converter in place.
– **Mallet**: Performing a mallet test on the old converter can help identify if it is clogged or damaged. This test involves tapping the converter with a mallet and listening for any rattling or loose debris.
– **Safety equipment**: It is always important to prioritize your safety when working on your vehicle. Wear gloves, safety glasses, and a mask to protect yourself from any potential hazards.
Safety precautions before starting the replacement process
Before beginning the catalytic converter replacement, it is crucial to take some safety precautions to ensure your well-being and the proper installation of the new converter. Follow these guidelines:
– **Park your vehicle on a level surface**: This will provide stability and make it easier to work underneath the vehicle.
– **Allow the exhaust system to cool down**: Catalytic converters can become extremely hot during vehicle operation. To prevent burns, wait for the system to cool down before starting the replacement process.
– **Use jack stands**: If you need to lift the vehicle to gain access to the catalytic converter, always use jack stands to securely support the weight of the car. This will prevent any accidents or injuries.
– **Disconnect the battery**: Before working on any electrical components or sensors near the catalytic converter, disconnect the negative terminal of the battery to avoid any electrical shocks or damage.
– **Read and follow manufacturer instructions**: Every catalytic converter is unique, so it is important to carefully read and follow the specific installation instructions provided by the manufacturer. This will ensure that the replacement process is done correctly and efficiently.
Installing the New Catalytic Converter
Properly aligning the new converter
1. Put the new catalytic converter in place.
2. Hold the catalytic converter in the position where it will eventually be installed.
3. Double-check to make sure it is aligned correctly.
4. Line up the new catalytic converter with the pipes connected to it.
Securing the converter with top nut and bracket
1. Loosely install one top nut to secure the catalytic converter.
2. Check the manufacturer’s instructions for the specific torque specifications for tightening the nut.
3. Use a wrench or socket set to tighten the nut to the recommended torque.
4. Install additional nuts and bolts, if required, to secure the converter firmly in place.
5. Install any gaskets supplied with the new catalytic converter according to the manufacturer’s instructions.
6. Ensure that the converter is securely fastened and aligned properly.
Remember to always consult the instructions provided by the manufacturer of your replacement catalytic converter for specific installation steps and torque specifications. Following these guidelines will help ensure a successful and safe installation of your new catalytic converter.
Reattaching the Downstream Oxygen Sensor
Importance of the downstream oxygen sensor
The downstream oxygen sensor plays a crucial role in monitoring the output and health of the catalytic converter. It is located in the exhaust pipe behind the converter. This sensor measures the oxygen content in the exhaust gases after they have passed through the catalytic converter. It provides valuable information to the engine control unit (ECU) about the efficiency of the converter and helps ensure that the vehicle is operating within acceptable emissions levels.
Correct reinstallation of the sensor
When replacing the catalytic converter, it is important to also reattach the downstream oxygen sensor properly. Here are the steps to ensure a correct installation:
1. Carefully remove the electrical connector from the old sensor. Do not forcefully pull or twist it, as it may cause damage.
2. Inspect the connections and ensure that the pigtail and electrical connector are in good condition.
3. Clean the sensor mounting area on the exhaust pipe to ensure a secure connection.
4. Apply a small amount of anti-seize compound to the threads of the new sensor. This will help prevent the sensor from seizing in the future.
5. Carefully thread the new sensor into the mounting hole on the exhaust pipe. Use a wrench or socket set to tighten it to the manufacturer’s recommended torque specifications. Do not overtighten, as it can cause damage to the sensor or exhaust pipe.
6. Reattach the electrical connector to the new sensor, making sure it is securely connected.
7. Double-check all connections to ensure they are tight and properly aligned.
By reattaching the downstream oxygen sensor correctly, you can ensure that it continues to perform its vital function of monitoring the catalytic converter and maintaining optimal engine performance.
In conclusion, replacing the catalytic converter and reattaching the downstream oxygen sensor are important tasks that require careful attention to detail. By following the correct procedures and using the appropriate tools and materials, you can successfully complete these tasks and ensure the proper functioning of your vehicle’s emissions control system. As always, if you are unsure or uncomfortable with performing these tasks yourself, it is recommended to consult a professional mechanic for assistance.
Additional Steps for Welded Converters
Seeking professional assistance for welded converters
If your vehicle has a welded catalytic converter, the replacement process may be more complex and require professional assistance. Welded converters are typically welded directly to the exhaust system, making it difficult to remove and replace them without specialized tools and expertise. In these cases, it is recommended to seek the help of a professional mechanic or exhaust specialist who can safely and efficiently handle the replacement.
Replacement options for welded converters
When dealing with welded catalytic converters, there are a few different replacement options available:
– **Complete exhaust system replacement**: In some cases, it may be more cost-effective and practical to replace the entire exhaust system, including the welded catalytic converter. This option is usually chosen if the exhaust system is old, rusted, or otherwise damaged.
– **Cutting and welding**: If your welded converter is the only component in the exhaust system that needs replacement, it is possible to cut out the old converter and weld in a new one in its place. This process requires specialized equipment and should only be undertaken by professionals with experience in exhaust system repairs.
– **Universal converters**: Universal catalytic converters are designed to be compatible with a wide range of vehicles. These converters typically come with flanges or welding adapters that can be modified to fit the specific exhaust system of your vehicle. However, it should be noted that using a universal converter may require additional modifications and adjustments to ensure proper fitment and functionality.
Conclusion
Determining whether a catalytic converter needs replacement requires a thorough inspection and diagnostic process. Following the recommended steps, such as retrieving and repairing diagnostic trouble codes, checking for contamination, and inspecting the entire exhaust system, can help identify the root cause of any issues and determine if a replacement is necessary.
When preparing for a catalytic converter replacement, gather all the necessary tools and materials and take proper safety precautions. Proper alignment, securing the new converter, and following manufacturer instructions are crucial for a successful installation.
In the case of welded catalytic converters, professional assistance may be required due to the complexity of the replacement process. Consider options such as complete exhaust system replacement, cutting and welding, or using universal converters, depending on the specific situation.
Remember, consulting a professional mechanic or exhaust specialist can provide expert guidance and ensure that the replacement process is done correctly and efficiently.**Finalizing the Installation**
Once the new catalytic converter is in place, there are a few final steps to complete the installation and ensure everything is properly secured and functioning correctly.
Tightening all bolts for secure fit
To ensure a secure fit and prevent any potential leaks or issues, it is important to tighten all bolts according to the manufacturer’s specifications. This includes the converter inlet flange nuts, converter bolts, and any other hardware that was removed or loosened during the installation process. Proper torque is crucial to maintain the integrity of the exhaust system and prevent any leaks that could affect performance and emissions.
Checking for any leaks or issues
After tightening all bolts, it is essential to carefully inspect the newly installed catalytic converter and the surrounding area for any signs of leaks or issues. Check for any visible gaps or loose connections that could indicate a problem. Additionally, it is recommended to start the vehicle and listen for any unusual sounds or vibrations that could be a sign of a faulty installation.
It is also important to address any diagnostic trouble codes that may have been present before the replacement process. Clearing these codes and ensuring that the vehicle’s computer system is properly calibrated to the new catalytic converter can help prevent further issues down the line.
Before considering the installation complete, it is important to reinstall any components that were removed, such as the heat shield and oxygen sensor. These components play a crucial role in the proper functioning of the exhaust system and should be securely put back in place.
**Conclusion**
Installing a new catalytic converter is an important part of maintaining a vehicle’s exhaust system and ensuring optimal performance and reduced emissions. Following the recommended steps, taking necessary safety precautions, and using the right tools and materials are all crucial for a successful installation.
In the case of welded catalytic converters, it is advisable to seek professional assistance due to the complexity of the replacement process. Options such as complete exhaust system replacement, cutting and welding, or using universal converters should be considered based on the specific situation and requirements.
Performing a thorough inspection, checking for any leaks or issues, and tightening all bolts for a secure fit are vital steps to finalize the installation. By taking these precautions, you can ensure that the new catalytic converter is properly installed and functioning as intended.
Remember, if you have any doubts or concerns about the installation process, it is always best to consult a professional mechanic or exhaust specialist. Their expertise and guidance can help ensure that the replacement is done correctly and efficiently, maximizing the performance and longevity of your vehicle’s exhaust system.
Testing and Verifying Functionality
Starting the engine and checking for proper operation
After installing a new catalytic converter, it is important to start the engine and verify that everything is working correctly. Follow these steps to ensure proper functionality:
1. **Listen for unusual noises**: Pay attention to any strange sounds coming from the exhaust system. Unusual noises like rattling or hissing could indicate an installation issue or a problem with the new converter.
2. **Check for exhaust leaks**: Inspect all connections and joints in the exhaust system for leaks. Use your hand or a piece of paper to feel for any air escaping from the connections. If you detect a leak, it should be addressed immediately to avoid any further damage to the converter.
3. **Observe exhaust emissions**: Look at the color and consistency of the exhaust emissions. A properly functioning converter should produce clear and odorless emissions. If you notice black smoke, excessive soot, or a strong smell, it could indicate a problem with the new converter.
Diagnostic steps to ensure the new converter is working correctly
To ensure that the new catalytic converter is functioning properly, perform these diagnostic steps:
1. **Retrieve and clear any diagnostic trouble codes**: Use a diagnostic tool to retrieve any trouble codes stored in the vehicle’s engine control module. Clear the codes and start the engine again to see if any new codes are generated. If the new converter is working correctly, no converter-related codes should appear.
2. **Monitor oxygen sensor readings**: Use a scan tool or multimeter to monitor the oxygen sensor readings before and after the new converter. The readings should indicate a proper reduction in emissions and a healthy functioning converter.
3. **Perform a drive cycle test**: Take the vehicle for a test drive under various driving conditions, including city and highway speeds. Monitor the vehicle’s performance and any changes in the exhaust system. If the new converter is working correctly, the vehicle should run smoothly and without any issues.
4. **Check for proper temperature**: Use a non-contact infrared thermometer to measure the temperature of the new converter during operation. The temperature should rise steadily as the engine warms up and reach a stable level within the recommended operating range.
5. **Inspect the exhaust system regularly**: After installing a new converter, it is important to regularly inspect the entire exhaust system for any signs of damage or issues. Look for leaks, loose connections, or any abnormalities that could affect the converter’s performance.
By following these testing and diagnostic steps, you can ensure that the new catalytic converter is functioning correctly and effectively reducing emissions. If any issues or concerns arise during the testing process, it is recommended to seek the assistance of a professional mechanic or exhaust specialist for further inspection and troubleshooting.
Conclusion
After installing a new catalytic converter, it is crucial to test and verify its functionality to ensure proper operation. This involves checking for unusual noises, inspecting for exhaust leaks, observing exhaust emissions, retrieving and clearing any diagnostic trouble codes, monitoring oxygen sensor readings, performing a drive cycle test, checking for proper temperature, and regularly inspecting the exhaust system. By following these steps, you can ensure that the new converter is working correctly and effectively reducing emissions.
Importance of proper catalytic converter replacement
Properly replacing a catalytic converter is important for several reasons:
1. **Environmental impact**: Catalytic converters play a crucial role in reducing harmful emissions from vehicles. By ensuring that the new converter is functioning correctly, you are helping to minimize pollution and protect the environment.
2. **Vehicle performance**: A faulty or improperly installed converter can negatively impact the performance of your vehicle. By replacing it correctly, you can maintain the optimal performance and efficiency of your engine.
3. **Compliance with regulations**: Catalytic converters are required by law in many regions to comply with emissions standards. By replacing the converter properly, you can ensure that your vehicle meets these regulations and avoid legal issues.
Helpful tips and reminders for future maintenance
To prolong the lifespan and effectiveness of your catalytic converter, it is important to follow these tips and reminders:
1. **Regular maintenance**: Schedule regular inspections and maintenance for your vehicle, including checking the exhaust system and ensuring proper engine performance. This can help identify any issues with the converter early on and prevent further damage.
2. **Drive responsibly**: Avoid aggressive driving behaviors, such as excessive acceleration and sudden braking, as these can increase the stress on the converter and shorten its lifespan.
3. **Avoid fuel contamination**: Use high-quality fuel and avoid fueling up at stations with questionable fuel quality. Contaminated fuel can damage the converter and reduce its efficiency.
4. **Address engine issues promptly**: If you notice any engine issues, such as a misfire or engine warning light, address them promptly. Ignoring these issues can lead to further damage to the converter and other components of your vehicle.
5. **Follow manufacturer recommendations**: Refer to your vehicle’s manufacturer guidelines for recommended maintenance schedules and replacement intervals. Following these recommendations can help ensure the proper functioning and longevity of your catalytic converter.
By following these helpful tips and reminders, you can maintain the functionality and efficiency of your catalytic converter, ultimately contributing to a cleaner and greener environment.