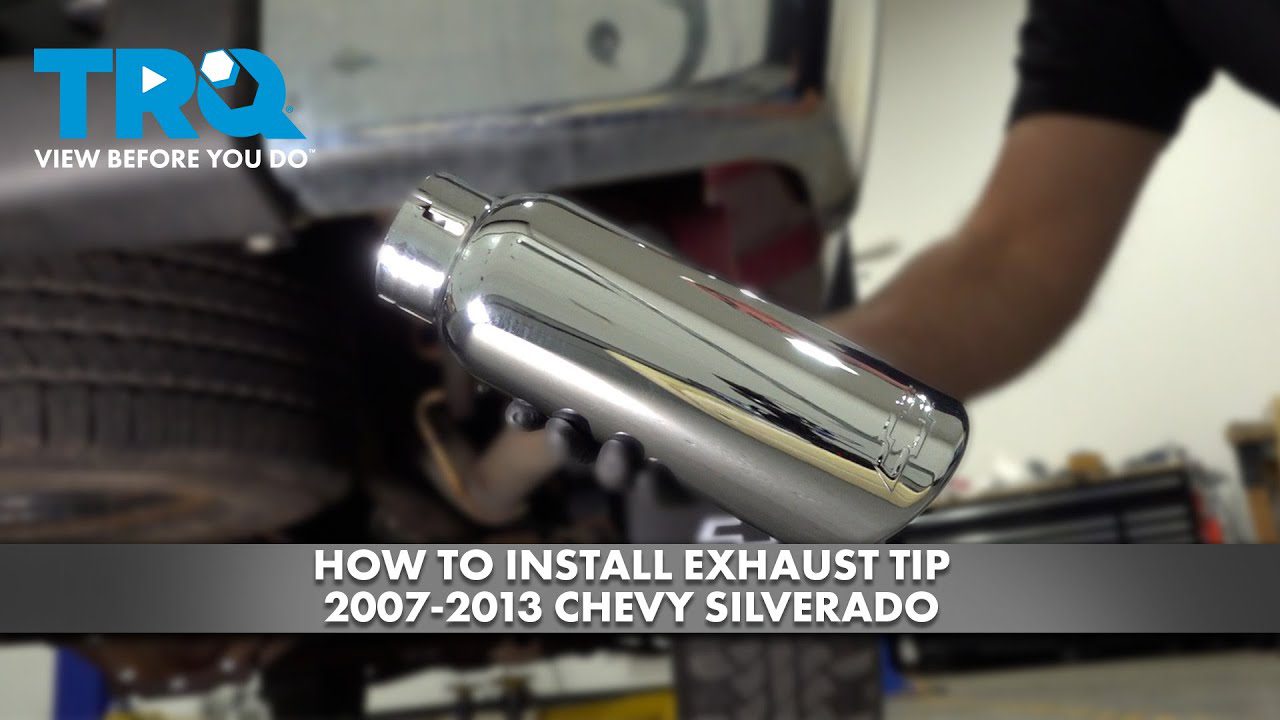
how to put on a exhaust tip

Introduction
Exhaust tips are accessories that are installed on a vehicle’s tailpipe to enhance its appearance. They can greatly improve the overall look of a vehicle, whether it has a bare pipe or old rusty tips. Exhaust tips come in a wide variety of styles, with each type providing a slightly different look and some even adding other effects to the vehicle.
What is an Exhaust Tip?
An exhaust tip is a type of accessory that welds or clamps onto a vehicle’s tailpipe. It is made of metal tubing and can be a single layer or have multiple layers of tubing. The most common types of exhaust tips include straight cut, angle cut, intercooled, rolled edge, single wall, dual wall, and turndown exit. Exhaust tips are often finished in chrome, but they are also available in different finishes and stainless steel.
Importance of Installing an Exhaust Tip Properly
Installing an exhaust tip properly is essential to ensure its functionality and longevity. It is recommended to follow the installation instructions provided by the manufacturer. Here are some key points to consider:
– Lubricate the exhaust tip with WD-40 before fitting it onto the tailpipe. This will make the installation process smoother and prevent any potential damage.
– Make sure to tighten the provided screws or weld the tip to the pipe securely. If you are using a screw-on tip, remember to check and re-tighten the screws after a few weeks to ensure a secure fit.
– Proper installation is important not only for the visual appeal but also for the overall performance and sound of the exhaust system. An improperly installed exhaust tip may result in leaks or changes in the exhaust sound.
Types of Exhaust Tips
Exhaust tips come in various styles, each offering a unique look and sometimes additional effects. Here are a few common types of exhaust tips:
Dual Wall Tip
This type of exhaust tip features two layers of tubing that run out of one connector tip. It provides a sleek and stylish appearance to the vehicle’s tailpipe. Additionally, it can modify the exhaust sound, giving it a deeper and more aggressive tone.
Turndown Exit Tip
The turndown exit tip resembles a faucet and is sometimes referred to as a dump-out tip. The exit of this style of exhaust tip is pointed towards the ground. It not only enhances the visual appeal of the vehicle but can also modify the exhaust sound. The downward angle of the tip helps in reducing noise and directing the exhaust gases away from the car’s body.
Cost of Exhaust Tips
The price range for exhaust tips varies depending on the style, material, and brand. Basic metal single wall tips can be found at a relatively lower price point, typically in the range of $40 or less. However, more advanced and premium exhaust tips, such as dual wall or specialty designs, can cost over $100.
It is important to note that the price of an exhaust tip is not solely determined by its appearance but also by its functionality and performance enhancements. Therefore, it is advisable to consider your budget and requirements when choosing an exhaust tip for your vehicle.
In conclusion, exhaust tips are accessories that can greatly enhance the look of a vehicle’s tailpipe. Proper installation is crucial to ensure a secure fit and optimum performance. With a wide range of styles and finishes available, you can choose an exhaust tip that best suits your vehicle’s aesthetics and performance needs.
Tools and Materials Needed
List of Tools Required
To install an exhaust system, you will need the following tools:
– Disposable gloves
– Vehicle jack or ramps
– Jack stands
– Penetrating fluid
– Ratchet
– Wire cleaning brush
– Exhaust gasket
– Exhaust clamps (if needed)
Type of Exhaust Tips Available in the Market
Exhaust tips are accessories that can greatly enhance the appearance of your vehicle’s tailpipe. There are different types of exhaust tips available in the market, and choosing the right one depends on the make, model, and year of your vehicle.
If you have a stock tailpipe, you can narrow down your choices by selecting an exhaust tip that matches the make, model, and year of your vehicle. However, if you have an aftermarket exhaust system, you will need to take actual measurements to ensure a proper fit.
Some common sizes for exhaust tips include 2.5 inches, 3 inches, and 4 inches. It is important to select an exhaust tip that is compatible with the size of your tailpipe to ensure a secure and proper installation.
Additionally, you will also need to consider the clearance between the exhaust tip and your vehicle’s bumper cutouts. Ensure that there is enough space for the exhaust tip to fit without any obstructions.
When it comes to cleaning and maintaining your exhaust tip, the method may vary depending on the material. If you have a heavy buildup of soot, you may need to use automotive steel wool to remove it.
For chrome or stainless steel tips, the best way to clean them is to use a dedicated exhaust cleaner, followed by steel wool. Finally, apply a metal polish using a microfiber towel for a shiny finish.
In conclusion, installing an exhaust system and selecting the right exhaust tip for your vehicle can greatly improve its appearance. Remember to gather all the necessary tools and materials before starting the installation process.
Preparation
Safety Precautions
Before starting the installation process, it is important to take certain safety precautions to ensure your well-being. Here are some safety tips to keep in mind:
– Always wear disposable gloves and safety glasses when working under the car to protect your hands and eyes from any potential harm.
– Make sure the car’s engine is cool before working on the exhaust system to avoid the risk of burns.
– Use a vehicle jack or ramps to elevate the car safely and securely. Additionally, ensure that the car is supported by jack stands or blocks to prevent accidents.
– Follow all manufacturer’s instructions and guidelines for proper installation to avoid any errors or damage to the vehicle.
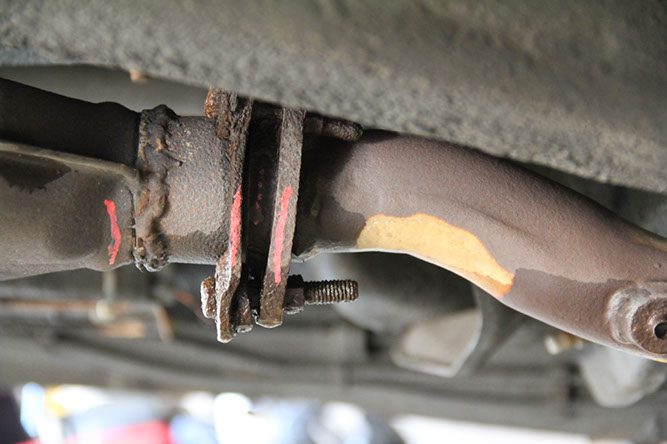
Cleaning the Exhaust Pipe
To prepare the exhaust pipe for the installation of the exhaust tip, it is important to clean the surface thoroughly. Follow these steps to clean the exhaust pipe:
1. Apply a degreaser or rubbing alcohol to the surface of the exhaust pipe to remove any dirt or grime. This will ensure a clean surface for the proper installation of the exhaust tip.
2. Use a wire cleaning brush to scrub the surface of the pipe and remove any stubborn residue. Make sure to reach all areas and corners of the pipe for a thorough cleaning.
3. Rinse the exhaust pipe with water to remove any remaining cleaner or debris.
4. Dry the surface of the pipe completely before moving on to the next step. This will ensure a proper and secure fit of the exhaust tip.
Once the exhaust pipe is cleaned and dry, you can proceed with the installation of the exhaust tip. Remember to follow the manufacturer’s instructions and guidelines for a successful installation. Take your time and ensure that the exhaust tip is level and straight before tightening any screws or clamps.
After the installation is complete, it is recommended to test the exhaust system by starting the car and listening for any unusual sounds or vibrations. Additionally, visually inspect the exhaust system for any leaks or gaps that may have formed during installation. If everything seems to be in order, take your car for a short drive to see how it performs.
Remember to regularly clean and maintain the exhaust tip to prevent rust and corrosion. Depending on the material of the tip, you may need to use specific cleaning methods and products. Follow the manufacturer’s instructions for cleaning and maintenance to ensure the longevity and appearance of your exhaust tip.
In conclusion, installing an exhaust tip is a relatively simple process that can greatly enhance the appearance of your vehicle’s exhaust system. By taking the necessary precautions, cleaning the exhaust pipe properly, and following the manufacturer’s guidelines, you can achieve a successful installation. Enjoy the sporty look and improved performance of your vehicle with a new exhaust tip!
Removing the Old Exhaust Tip
Methods to Remove the Old Exhaust Tip
There are a few different methods you can use to remove the old exhaust tip from your vehicle. Here are a couple of the most common ones:
1. **Cutting**: If the old exhaust tip is welded or otherwise difficult to remove, you may need to cut it off. To do this, you will need a reciprocating saw or a hacksaw. Carefully cut through the old exhaust tip, making sure to avoid damaging the surrounding parts. Take your time and be cautious during this step to prevent any accidents or injuries.
2. **Heat and Lubrication**: In some cases, the old exhaust tip may be stuck due to rust or corrosion. To loosen it, you can use heat and lubrication. Start by using a propane torch to heat the area where the old exhaust tip meets the tailpipe. This will help expand the metal and make it easier to remove. Once the metal is heated, apply a penetrating fluid such as WD-40 or PB Blaster to further loosen the connection. Allow the fluid to penetrate for a few minutes before attempting to remove the exhaust tip.
Tips for Smooth Removal
Removing the old exhaust tip can be a bit challenging, but with the right approach, it can be done smoothly. Here are a few tips to help you along the way:
– **Take Safety Precautions**: Before starting the removal process, make sure to wear disposable gloves to protect your hands from any sharp edges or debris. Additionally, use a vehicle jack or ramps to elevate the car safely and support it with jack stands for added stability.
– **Inspect and Clean the Area**: Before installing the new exhaust tip, take a moment to inspect the tailpipe and surrounding area. Remove any dirt or rust build-up that may interfere with the installation process. Use a wire cleaning brush to scrub away any loose debris and ensure a clean surface for the new exhaust tip.
– **Follow Proper Installation Guidelines**: When it comes time to install the new exhaust tip, refer to the manufacturer’s instructions for the specific model you have chosen. Make sure to use the correct size exhaust tip that matches your tailpipe diameter for a secure and proper fit.
– **Secure the Exhaust Tip**: Once the new exhaust tip is installed, double-check that it is securely fastened. Use exhaust clamps if necessary to ensure a tight connection between the tailpipe and the new tip. This will help prevent any rattling or movement while driving.
By following these tips and using the appropriate tools and methods, you can successfully remove the old exhaust tip and prepare your vehicle for the installation of a new and stylish replacement. Remember to take your time, work carefully, and prioritize safety throughout the process.
Installing the New Exhaust Tip
Aligning the Exhaust Tip
When it comes to installing the new exhaust tip, proper alignment is essential for both aesthetic appeal and functionality. Here are a few techniques to help you align the tip correctly:
– **Visual Alignment**: Start by visually aligning the new exhaust tip with the tailpipe. Make sure it is centered and straight, following the same angle as the original tip. Take a step back and assess the alignment from different angles to ensure it looks symmetrical and in line with the vehicle’s design.
– **Trial and Error Method**: If visual alignment alone is not sufficient, you can use a trial and error approach. Loosen the bolt on the exhaust tip slightly, allowing it to move. Then, gently adjust the tip until it aligns with the desired position. Tighten the bolt gradually while making small adjustments until the tip stays in the desired alignment.
– **Seek Professional Assistance**: If you are unsure about aligning the exhaust tip yourself, it is always a good idea to seek professional assistance. A mechanic or auto body specialist will have the expertise and tools needed to ensure the proper alignment of the new exhaust tip. They can also provide guidance on any additional steps or adjustments required for a secure installation.
Techniques for Secure Installation
To ensure a secure and long-lasting installation of the new exhaust tip, follow these techniques:
– **Proper Fastening**: When installing the new exhaust tip, make sure to tighten the bolt securely. A loose or improperly fastened tip can cause rattling and may even detach while driving. Use a torque wrench or ratchet to tighten the bolt to the recommended tightness specified by the manufacturer.
– **Use Exhaust Clamps**: In some cases, using exhaust clamps can provide additional stability and support. These clamps can be placed around the connection between the tailpipe and the new exhaust tip, ensuring a tight and secure fit. Follow the manufacturer’s instructions for the clamps and ensure they are properly tightened.
– **Regular Maintenance**: Once the new exhaust tip is installed, it is important to maintain it properly. Regularly inspect the tip for any signs of damage or looseness. If any issues are detected, promptly address them to prevent further damage and ensure a safe driving experience.
Taking the time to align the new exhaust tip correctly and following proper installation techniques will result in a finished look that enhances the overall appearance of your vehicle. Additionally, it will provide you with peace of mind knowing that the tip is securely fastened and will function properly.
Remember, if you are unsure or uncomfortable with the installation process, it is always best to seek professional help to ensure a smooth and successful installation.
Adjusting and Straightening the Exhaust Tip
Aligning the Tip for Proper Fit
After removing the old exhaust tip, it’s important to align and adjust the new one for a proper fit. Here are some tips and tricks to help you with this process:
1. **Loosen the Hangers**: Begin by loosening the hangers that hold the exhaust system in place. However, be careful not to loosen them too much, as you want to maintain some resistance to keep the exhaust securely in position.
2. **Use a Jack and Jack Stand**: To adjust the exhaust tip, you can use a vehicle jack and jack stands. Begin by raising one side of the car at a time using the jack and then secure it in place with the jack stand for added stability.
3. **Align and Adjust**: With the car elevated, you can now use the jack to push the muffler up and align the exhaust tip properly. Take your time and make any necessary adjustments to ensure the tip is positioned correctly.
4. **Tighten the Hangers**: Once you have aligned the exhaust tip, tighten the hangers for that side of the car. This will secure the exhaust in place, preventing any unnecessary movement or vibrations.
Straightening Any Misalignment
Sometimes, even after aligning the exhaust tip, you may notice some minor misalignment. Here are a few tips to help you straighten it out:
1. **Apply Hand Pressure**: Gently apply hand pressure to the misaligned section of the exhaust tip, pushing or pulling it in the desired direction. Be careful not to use excessive force, as this could damage the exhaust system.
2. **Use a Rubber Mallet**: If hand pressure alone doesn’t do the trick, you can use a rubber mallet to lightly tap on the misaligned section. This can help adjust the position and straighten out any minor misalignment.
3. **Seek Professional Help**: In some cases, misalignment may be more severe or require specialized tools and expertise. If you are unsure or uncomfortable making adjustments yourself, it’s best to seek professional assistance from a qualified mechanic or exhaust specialist.
By following these steps and tips, you can align and adjust the new exhaust tip for a proper fit and appearance. However, it’s important to note that aligning the exhaust tip is a subjective process, as the desired position may vary from person to person. Ultimately, the goal is to achieve a visually pleasing alignment while ensuring the exhaust functions properly and securely on your vehicle.
Adjusting and Straightening the Exhaust Tip
Aligning the Tip for Proper Fit
When installing a new exhaust tip, it is crucial to align and adjust it properly for a secure fit. Here are some steps to help you in this process:
1. **Loosen the Hangers**: Begin by loosening the hangers that hold the exhaust system in place. However, ensure that you do not loosen them too much, as you want to maintain some resistance to keep the exhaust securely positioned.
2. **Use a Jack and Jack Stand**: To adjust the exhaust tip, you can utilize a vehicle jack and jack stands. Raise one side of the car at a time using the jack and secure it with the jack stand for added stability.
3. **Align and Adjust**: With the car elevated, use the jack to push the muffler up and align the exhaust tip properly. Take your time and make necessary adjustments to ensure that the tip is positioned correctly.
4. **Tighten the Hangers**: Once the exhaust tip is aligned, tighten the hangers for that side of the car. This will secure the exhaust in place, preventing any unnecessary movement or vibrations.
Straightening Any Misalignment
In some cases, there may still be minor misalignment after aligning the exhaust tip. Here are a few techniques to help you straighten it out:
1. **Apply Hand Pressure**: Gently apply hand pressure to the misaligned section of the exhaust tip, pushing or pulling it in the desired direction. It is important not to use excessive force, as this could damage the exhaust system.
2. **Use a Rubber Mallet**: If hand pressure alone does not fix the misalignment, you can use a rubber mallet to lightly tap on the misaligned section. This can help adjust the position and straighten out any minor misalignment.
3. **Seek Professional Help**: If the misalignment is severe or requires specialized tools and expertise, it is best to seek assistance from a qualified mechanic or exhaust specialist. They can ensure that the exhaust tip is properly aligned without causing any damage to the system.
Testing and Finalizing
Checking for Secure Fitment
After aligning and adjusting the exhaust tip, it is crucial to test for secure fitment. Here are a few ways to ensure that the exhaust tip is securely attached:
– **Visual Inspection**: Carefully inspect the exhaust tip to ensure that it is properly aligned with the tailpipe and securely attached to the hangers. Look for any signs of loose connections or misalignment.
– **Test Drive**: Take your vehicle for a test drive and listen for any unusual noises or vibrations. These can be indicators of a loose or poorly fitted exhaust tip.
– **Recheck Tightness**: Periodically recheck the tightness of the hangers and connections to ensure that they remain secure. Vibrations and movement during driving can sometimes cause fittings to loosen over time.
Final Touches for a Finished Look
Once the exhaust tip is securely fitted, you can focus on adding the final touches for a polished appearance. Here are some suggestions:
– **Cleaning and Polishing**: Clean the exhaust tip using an appropriate cleaner, and consider polishing it to restore its shine. This will enhance the visual appeal of your vehicle’s exhaust system.
– **Regular Maintenance**: Maintain the appearance of the exhaust tip by cleaning it regularly during each car wash. This will prevent dirt and debris buildup and help prolong the tip’s longevity.
– **Consider Polishing Both Inside and Out**: If you want to take the appearance of your exhaust tip to the next level, consider polishing both the inside and outside. This will further enhance its overall look.
By following these steps and suggestions, you can ensure that your new exhaust tip is properly aligned, securely fitted, and visually appealing. Whether you do it yourself or seek professional help, taking the time to adjust and straighten the exhaust tip will result in a finished look that adds flair to your vehicle.
Troubleshooting and Tips
Common Installation Issues
During the process of adjusting and straightening the exhaust tip, there are some common issues that you may encounter. Here are a few to be aware of:
1. **Excessive Resistance**: If you find that the hangers are too tight or difficult to loosen, it may be due to rust or corrosion. In this case, applying a lubricant or penetrating oil can help loosen the hangers and make adjustments easier.
2. **Misaligned Hangers**: Sometimes, the hangers themselves may be misaligned, causing difficulty in aligning the exhaust tip properly. In such cases, you may need to reposition the hangers or replace them altogether for a better fit.
3. **Exhaust System Damage**: In some instances, you may discover damage or cracks in the exhaust system while inspecting the tip. If this is the case, it’s essential to address the underlying issue and repair or replace any damaged components before installing a new exhaust tip.
Tips for a Successful Installation
To ensure a successful installation and alignment of your new exhaust tip, here are a few tips to keep in mind:
1. **Measurements**: Before purchasing a new exhaust tip, take accurate measurements of your current exhaust system to ensure the replacement will fit properly. Consider factors such as the outer diameter of the existing tip and the length required for a secure fit.
2. **Quality Materials**: Opt for high-quality materials when selecting an exhaust tip. Stainless steel or chrome-plated tips are known for their durability and resistance to rust and corrosion, ensuring a long-lasting installation.
3. **Safety First**: Always prioritize safety during the installation process. Use appropriate safety equipment, such as gloves and safety glasses, to protect yourself from any potential hazards. If you encounter any difficulties or have concerns about the installation, it’s best to seek professional assistance.
4. **Regular Maintenance**: After successfully installing the new exhaust tip, make it a habit to regularly inspect and maintain your exhaust system. Check for any loose hangers or signs of wear and address any issues promptly to prevent further damage.
Remember, adjusting and straightening the exhaust tip is a task that requires attention to detail and patience. If you are unsure or uncomfortable performing the installation yourself, it’s best to consult a professional mechanic or exhaust specialist who can ensure a proper fit and alignment.
By following these troubleshooting tips and taking the necessary precautions, you can successfully adjust and straighten your exhaust tip for optimal performance and appearance. Happy motoring!
Troubleshooting and Tips
Common Installation Issues
During the process of adjusting and straightening the exhaust tip, there are some common issues that one may encounter. Here are a few to be aware of:
1. **Excessive Resistance**: If the hangers are too tight or difficult to loosen, it may be due to rust or corrosion. In such cases, applying a lubricant or penetrating oil can help loosen the hangers and make adjustments easier.
2. **Misaligned Hangers**: Sometimes, the hangers themselves may be misaligned, making it challenging to align the exhaust tip properly. In these instances, repositioning the hangers or replacing them for a better fit may be necessary.
3. **Exhaust System Damage**: During the inspection of the exhaust tip, it is possible to discover damage or cracks in the exhaust system. It is crucial to address these underlying issues by repairing or replacing any damaged components before installing a new exhaust tip.
Tips for a Successful Installation
To ensure a successful installation and alignment of a new exhaust tip, here are a few tips to keep in mind:
1. **Measurements**: Accurately measure the current exhaust system before purchasing a new exhaust tip. Consider factors such as the outer diameter of the existing tip and the length required for a secure fit.
2. **Quality Materials**: Opt for high-quality materials, such as stainless steel or chrome-plated tips, known for their durability and resistance to rust and corrosion. This ensures a long-lasting installation.
3. **Safety First**: Prioritize safety during the installation process by using appropriate safety equipment, such as gloves and safety glasses. If there are any difficulties or concerns, seek professional assistance.
4. **Regular Maintenance**: After installing the new exhaust tip, regularly inspect and maintain the exhaust system. Check for any loose hangers or signs of wear and address issues promptly to prevent further damage.
Conclusion
Proper installation and alignment of an exhaust tip are essential for both the performance and appearance of a vehicle. By troubleshooting common installation issues and following the tips provided, one can achieve an optimal fit and alignment.
Importance of Properly Installed Exhaust Tip
A properly installed exhaust tip not only contributes to the overall aesthetics of a vehicle but also ensures efficient exhaust flow. An aligned and secure exhaust tip minimizes the risk of leaks, reduces noise, and allows the engine to function optimally. Additionally, a well-maintained exhaust system can prolong its lifespan and prevent further damage.
Final Thoughts and Recommendations
Adjusting and straightening an exhaust tip may seem like a straightforward task, but it requires attention to detail and patience. If one is unsure or uncomfortable performing the installation themselves, it is recommended to consult a professional mechanic or exhaust specialist. They have the expertise to ensure a proper fit, alignment, and overall functionality of the exhaust system.
By following the troubleshooting tips and taking necessary precautions during installation, one can enjoy the benefits of an adequately installed exhaust tip. Regular maintenance and prompt addressing of any issues will further enhance the performance and longevity of the exhaust system. Drive safely and enjoy the improved appearance and functionality of your vehicle’s exhaust system!