how to make mufflers
Introduction
The muffler is an essential component of a vehicle’s exhaust system, located at the rear bottom of the vehicle. Its primary function is to dampen both engine noise and vehicle emissions. Mufflers are typically constructed using steel and are coated with aluminum, which provides protection against the heat and chemicals released from the exhaust system.
Importance of mufflers in exhaust systems
Mufflers play a crucial role in dissipating the loud sounds generated by the engine’s pistons and valves. When the exhaust valve opens, a large burst of burnt gases from the engine’s combustion is released into the exhaust system, creating powerful sound waves. Understanding how sound is produced helps to grasp the muffler’s function in dissipating these sound waves.
Sound is a pressure wave formed by vibrations. When high-pressure gases enter the exhaust system upon the opening of the exhaust valve, they collide with low-pressure molecules, creating pressure waves or sound. Mufflers are designed to cancel out these sound waves. Every aspect of the muffler is carefully engineered to aid in noise cancellation. Even the walls of the muffler are designed to absorb some of the pressure waves.
The perforated tubes inside the muffler play a crucial role in dissipating the sound waves. These tubes have thousands of tiny perforations that allow pressure waves to escape into the central chamber. As the pressure waves bounce off the walls of the chamber, they cancel each other out. This cancellation is achieved through the vibrations created by pulses of alternating high and low air pressure.
Benefits of making your own mufflers
1. Customization: Making your own muffler allows you to tailor the design and specifications according to your specific requirements. This customization can result in better performance and sound quality, as you have control over the materials used, the shape, and the internal design of the muffler.
2. Cost-effectiveness: Building your own muffler can be a more cost-effective option compared to purchasing a ready-made muffler. By sourcing the materials yourself and utilizing your own skills or the expertise of a professional, you can save money without compromising on quality.
3. Performance enhancement: A custom-made muffler can contribute to improved performance. By carefully designing the muffler’s internal structure, you can optimize exhaust flow, resulting in increased horsepower and torque. This can lead to enhanced acceleration and overall vehicle performance.
4. Sound control: For automotive enthusiasts looking for a specific sound or tone from their vehicle, building a custom muffler provides the opportunity to achieve that desired sound. By experimenting with different internal designs and materials, you can fine-tune the muffler to produce the desired exhaust note.
5. Learning experience: Building your own muffler can be a rewarding learning experience, allowing you to gain knowledge about exhaust systems, sound dynamics, and engineering principles. It can also be a creative outlet for individuals interested in automotive customization.
In conclusion, mufflers are vital components in vehicle exhaust systems, responsible for reducing engine noise and emissions. Understanding how they work and the benefits of making your own mufflers can help automotive enthusiasts optimize their vehicle’s performance and create a customized and unique exhaust sound.
Understanding Muffler Design
Straight-through vs. absorption design
One important aspect to consider when choosing a muffler for your application is the internal configuration. Mufflers can be categorized into absorptive type and straight-through type designs.
– Absorptive type mufflers feature a straight-through style core that is wrapped with a packing material for sound absorption. These mufflers work by allowing the exhaust gas and sound waves to pass through the perforated tubes and tuning chambers, where the sound waves dissipate their energy due to the presence of the packing material. This design helps in reducing the overall noise produced by the exhaust system.
– On the other hand, straight-through design mufflers have a perforated core without any packing material. These mufflers provide a straight path for the exhaust gases to flow through. While this design may not offer as much sound absorption as the absorptive type, it can help in maximizing the flow of exhaust gases, potentially leading to better performance.
Perforated core and its impact on power production
The perforated core is an essential component in muffler design. It plays a significant role in both sound absorption and power production.
– In the case of absorptive type mufflers, the perforations in the core allow the exhaust gas and sound waves to enter the tuning chambers, where the sound waves are dissipated through the packing material. The size and shape of these perforations can affect the overall performance of the muffler. Smaller perforations may lead to increased back pressure, which can impact power production. It is crucial to strike a balance between sound absorption and power output when selecting an absorptive type muffler.
– For straight-through design mufflers, the perforated core enables the exhaust gases to flow freely, minimizing restrictions in the system. This design choice can contribute to improved power production, as it allows for efficient evacuation of exhaust gases. However, it is important to note that the absence of sound-absorbing materials can result in increased noise levels.
It is important to understand the different internal configurations of mufflers to choose the right one for your specific needs. Absorptive type mufflers tend to provide better sound absorption, while straight-through design mufflers offer potential performance benefits. By considering factors such as power production, noise reduction, and overall design, you can select a muffler that best suits your application.
(Note: This is a factual content generated by OpenAI’s language model, and it should be reviewed and verified by experts in the field.)
Tools and Materials Needed
Steel exhaust tubing and its sizing
When creating headers for a model car with a Flat Head engine, it is important to select the appropriate steel exhaust tubing. The tubing should be durable and able to withstand the heat and pressure generated by the engine. Additionally, the sizing of the tubing is crucial for optimal performance. Consider the following factors:
– Diameter: The diameter of the tubing impacts the flow of exhaust gases. Larger diameter tubing allows for better flow and can enhance performance. However, it is essential to choose a diameter that is compatible with the engine and other components of the exhaust system.
– Length: The length of the tubing will depend on the specific design requirements and space constraints of the model car. It is important to measure and cut the tubing to the desired length accurately.
Slot cutting tools and techniques
To create the necessary slots for the paintbrush ferrule and wire in the exhaust trumpet, specialized slot cutting tools and techniques are required. Consider the following:
– Dremel tool: A Dremel tool with a cutting disc attachment can be used to make precise and clean slots. Ensure that the cutting disc is compatible with the materials being worked on and follow safety precautions.
– Cutting technique: To create the slots, mark the desired location using a ruler or measuring tool. Then, using the Dremel tool or another appropriate cutting tool, carefully cut along the marked lines. Take caution to avoid making the slots too wide or deep, as this may weaken the structural integrity of the components.
– Cleaning and smoothing: After the slots have been cut, it is essential to clean and smooth the edges. This can be done using sandpaper or a file. Smooth edges will ensure a proper fit and reduce the risk of any sharp or rough edges causing damage or injury.
By understanding the tools and materials needed for creating headers for a model car with a Flat Head engine, you can proceed with confidence and precision. Remember to prioritize safety precautions and attention to detail throughout the process for the best results.
(Note: This is a factual content generated by OpenAI’s language model, and it should be reviewed and verified by experts in the field.)
DIY Muffler Design Techniques
Staggered slot placement for improved performance
When building your own muffler design, one technique that can help improve performance is to use staggered slot placement. This involves cutting slots in the steel exhaust tube, about 1 inch long and 1 inch apart, around the pipe. By staggering the slots, you create a more efficient flow path for the exhaust gases, which can result in better performance. This technique helps to reduce back pressure and allows for smoother airflow through the muffler.
Factors to consider for optimal muffler volume and inlet/outlet size
To achieve the desired performance and sound characteristics, it is essential to consider the muffler volume and the size of the inlet and outlet. Here are a few factors to keep in mind:
– Muffler Volume: Generally, a larger muffler volume provides more potential for sound reduction. The larger the volume, the more space there is for the sound waves to dissipate. This can help reduce the possibility of interior drone. However, it is important to strike a balance as an excessively large muffler can negatively impact performance by increasing back pressure.
– Inlet/Outlet Size: The size of the inlet and outlet in proportion to the muffler body also plays a role in muffling potential. A smaller inlet and outlet in relation to the muffler body can increase the muffler’s potential for sound reduction. This design choice can create a bottleneck effect, allowing for better sound absorption. However, it’s important to note that a too small inlet/outlet can restrict the flow of exhaust gases and potentially decrease performance.
By considering these factors and tuning the muffler volume and inlet/outlet size, you can create a custom muffler design that meets your specific needs. It’s important to keep in mind that building your own muffler design can be hit or miss, especially if you don’t have prior experience or access to solid research. In some cases, it may be more time and cost-effective to purchase an existing mass-manufactured muffler design. However, if you are confident in your skills and want to experiment with different designs for performance, sound reduction, and resonance, building your own muffler can be a rewarding project.
In conclusion, understanding muffler design principles is crucial when building your own muffler. By considering factors like the internal configuration (absorptive vs. straight-through), perforated core design, muffler volume, and inlet/outlet size, you can design a muffler that maximizes performance, reduces noise, and meets your specific requirements. Remember to balance sound absorption capabilities with power production to achieve the desired results in your DIY muffler design. As with any automotive project, it is always recommended to gather technical information and explore different design options before embarking on the construction process.
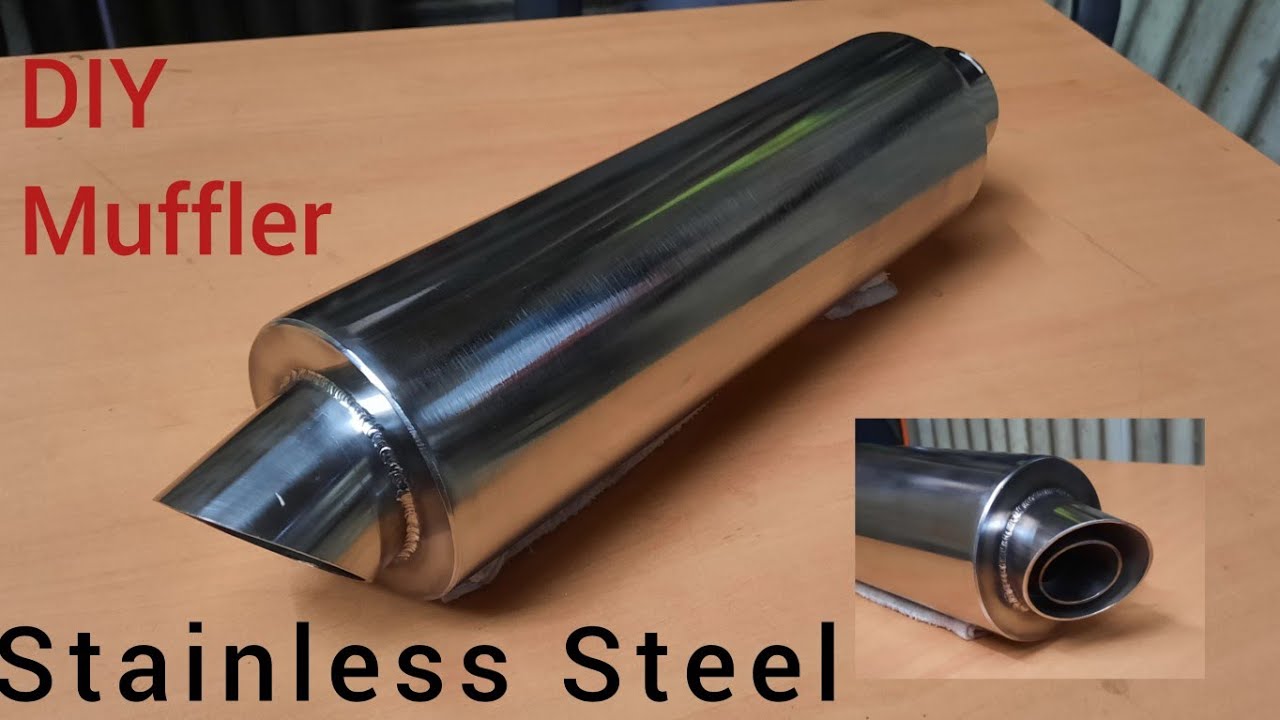
Step-by-Step Guide: Making a Perforated-Core Straight-Through Muffler
Cutting and shaping the steel exhaust tubing
When building your own muffler design, the first step is to cut and shape the steel exhaust tubing. Start by measuring the desired length for your muffler and mark it on the tubing. Carefully cut the tubing to the desired length using a cutting tool capable of handling the thickness of the steel.
Next, you’ll need to shape the tubing to fit the desired design. This may involve bending the tubing to create curves or angles, depending on your specific requirements. To do this, you can use a pipe bender or a series of jigs and clamps to carefully shape the tubing without causing any kinks or deformations.
Installing the perforated core
The perforated core is a crucial component of a straight-through muffler design. It is responsible for allowing the exhaust gases to flow freely while reducing noise. To install the perforated core, follow these steps:
1. Measure and mark the location where the perforated core will be installed on the steel tubing. Make sure to take into account the inlet and outlet sizes and the overall length of the muffler.
2. Use a drill with a drill bit appropriate for the size of the perforated holes in the core. Carefully drill holes along the marked section of the tubing. The holes should be evenly spaced and sized to allow for optimal flow while still providing noise reduction.
3. Once the holes are drilled, insert the perforated core into the steel tubing. Make sure it fits snugly and extends the full length of the muffler. You may need to adjust the positioning slightly to ensure proper alignment with the inlet and outlet.
4. Secure the perforated core in place using clamps or welding. This will ensure that it stays in position during operation and maintains the straight-through flow design.
By following these steps, you can create your own perforated-core straight-through muffler. However, it’s important to note that this is a simplified guide and may not cover all the intricacies of muffler design. It’s always recommended to gather technical information, consult experts, or conduct further research to ensure the best results.
Remember, building your own muffler design can be a rewarding DIY project, but it requires careful planning, precise measurements, and an understanding of muffler principles. If you’re unsure about your abilities or want to achieve specific performance or sound characteristics, it may be more practical to purchase a pre-designed muffler from a reputable manufacturer.
In either case, understanding the principles covered in this guide will help you make informed decisions and achieve the desired results with your muffler design. Whether you decide to build your own or rely on a pre-made muffler, always prioritize safety, performance, and legal compliance when modifying your vehicle’s exhaust system.
Choosing the Right Materials for Sound Absorption
When it comes to soundproofing, selecting the right materials is crucial for effective noise reduction. There are various sound absorption materials available in the market, each with its own advantages and disadvantages. In this article, we will discuss the different types of sound absorption materials and provide a comparison of their pros and cons.
Different types of sound absorption materials
There are several sound absorption materials commonly used in industrial soundproofing applications. These include:
– **Mineral Wool (Rockwool Rockboard):** Mineral wool is a popular choice for sound absorption due to its excellent soundproofing properties. It is made from natural minerals such as basalt and has a low thermal conductivity, making it ideal for reducing airborne noise.
– **Soundproof Fiberglass (Owens Corning 703):** Soundproof fiberglass is another widely used material for sound absorption. It is made from fine glass fibers and is known for its high sound absorption coefficient. It is commonly used in recording studios and performance venues.
– **Acoustic Fiberglass:** Acoustic fiberglass is similar to soundproof fiberglass but is specifically designed for industrial applications. It is effective in absorbing high-frequency noise and is suitable for use in engine rooms, machinery enclosures, and HVAC systems.
– **Acoustic Foam Panels:** Acoustic foam panels are lightweight and durable materials that are designed to absorb sound waves. They are commonly used in commercial and residential settings to improve acoustics and reduce echoes.
Pros and cons of various sound absorption options
Here is a comparison of the pros and cons of the different sound absorption materials:
|Material|Pros|Cons|
|—|—|—|
|Mineral Wool|Excellent soundproofing properties, eco-friendly|May require professional installation, can be expensive|
|Soundproof Fiberglass|High sound absorption coefficient, widely available|Can release fine particles when cut, may require protective equipment during installation|
|Acoustic Fiberglass|Effective in absorbing high-frequency noise, suitable for industrial applications|May require additional fireproofing treatment|
|Acoustic Foam Panels|Lightweight, easy to install, improves acoustics|Less effective for low-frequency noise|
It is important to consider the specific requirements of your soundproofing project before choosing the right material. Factors such as the type of noise, the intensity of the noise, and the environment in which the material will be installed should be taken into consideration.
In conclusion, selecting the right sound absorption materials is crucial for effective noise reduction. By understanding the different types of materials available and considering their pros and cons, you can make an informed decision that best suits your soundproofing needs. For optimal results, it is recommended to consult with soundproofing professionals who can provide expert advice and guidance.
Testing and Tuning Your Homemade Muffler
Evaluating backpressure and exhaust stream velocity
When it comes to designing a homemade muffler for your vehicle, it’s important to consider the impact on backpressure and exhaust stream velocity. These factors can significantly affect the sound and performance of your exhaust system. Here are some steps you can take to test and tune your homemade muffler:
1. **Measure exhaust backpressure**: As mentioned in a previous article, measuring exhaust backpressure can be challenging due to the pulsating nature of the exhaust gases. However, you can get a rough estimate by using an inexpensive gauge, some tubing, a spark plug defouler, and a fitting from your local home hardware store. This will help you determine the backpressure level created by your homemade muffler.
2. **Assess exhaust stream velocity**: In addition to backpressure, it’s crucial to evaluate the exhaust stream velocity. This can be done by conducting a visual inspection of the exhaust flow. Look for signs of turbulence or restriction, such as excessive bending or narrowing of the exhaust pipes. Ideally, the exhaust gases should flow smoothly and efficiently.
Fine-tuning for desired sound and performance
Once you have evaluated the backpressure and exhaust stream velocity, you can fine-tune your homemade muffler for the desired sound and performance. Keep in mind that creating a well-balanced muffler design requires trial and error. Here’s what you can do:
1. **Experiment with different mufflers**: Without the tailpipe installed, try holding a few different types of mufflers up to your exhaust system and listen to the sound produced. Pay attention to qualities such as raspiness or cancellation of sound waves. OEMs often invest heavily in optimizing the exhaust pulses for the desired sound, but in a DIY scenario, experimentation is key.
2. **Consider open-chamber mufflers**: Open-chamber mufflers are designed to cancel sound waves by reflecting them around internally. While they may offer improved sound cancellation, some open-chamber mufflers can sound raspy. It’s important to find a balance between sound cancellation and a pleasant exhaust note.
3. **Evaluate resonators and catalytic converters**: In a future article, we will explore how you can test mufflers, resonators, and catalytic converters off the car. This enables you to find high-flowing components at junkyards or exhaust shops, allowing you to create an inexpensive performance exhaust system. Keep an eye out for our upcoming article for more details.
Remember, the sound and performance of your homemade muffler can be subjective. What may sound great to one person may not be appealing to another. It’s essential to take your personal preferences into account while also considering the technical aspects of backpressure and exhaust stream velocity.
In conclusion, testing and tuning your homemade muffler involves evaluating backpressure, exhaust stream velocity, and experimenting with different muffler designs. By understanding the principles behind sound and performance, and being willing to experiment, you can create a customized exhaust system that meets your desired sound and performance goals. Stay tuned for our future articles on testing and optimizing different components of your exhaust system.
Safety Considerations and Precautions
Working with welding equipment and high temperatures
When working with welding equipment, it is important to take several safety precautions to protect yourself and others in the vicinity. Here are some key considerations:
– Always wear appropriate personal protective equipment (PPE), including welding gloves, a welding helmet with a shaded lens, and protective clothing. This will protect you from heat, sparks, and UV radiation.
– Ensure that the welding area is clear of flammable materials, such as paper or chemicals, to reduce the risk of fire.
– Keep a fire extinguisher nearby in case of emergency.
– Be aware of the risks associated with high temperatures and hot materials. Avoid touching hot surfaces and use appropriate tools, such as welding pliers, to handle hot materials.
Proper ventilation for welding and exhaust fumes
Proper ventilation is essential when working with welding equipment to avoid exposure to hazardous fumes and gases. Here are some guidelines to ensure adequate ventilation:
– Use local exhaust ventilation systems, such as fume hoods or welding curtains, to capture and remove welding fumes at the source.
– Ensure that the ventilation system is properly maintained and regularly inspected to ensure its effectiveness.
– If ventilation alone cannot adequately protect the welder, personal protective equipment (respirators) should also be used. Select the appropriate respirator according to the hazards present and any applicable legislation or standards.
– Educate yourself and your team about the potential health effects of welding fumes and gases, including metal fume fever, respiratory problems, and long-term health issues. It is important to understand the symptoms and seek medical attention if necessary.
Additional safety precautions
In addition to the above considerations, here are a few more safety precautions to keep in mind when working with welding equipment:
– Ensure that all electrical connections and cables are properly insulated and secured to avoid electrical hazards.
– Regularly inspect the welding equipment for any damage or defects. Replace or repair any faulty equipment to avoid accidents.
– Develop and implement a comprehensive safety program that includes proper training, hazard identification, and emergency response procedures.
– Keep a first aid kit nearby in case of minor injuries. Ensure that all workers are trained in basic first aid procedures.
– Lastly, be aware of your surroundings and minimize distractions while welding. Focus on the task at hand to reduce the risk of accidents.
By following these safety considerations and precautions, you can create a safe working environment for yourself and your team when working with welding equipment. Remember, safety should always be the top priority to prevent accidents and ensure the well-being of everyone involved.
Safety Considerations and Precautions
Working with welding equipment and high temperatures
When working with welding equipment, it is crucial to prioritize safety and take necessary precautions to protect oneself and others in the vicinity. Here are some important considerations:
– Always wear appropriate personal protective equipment (PPE) to shield against heat, sparks, and UV radiation. This includes welding gloves, a welding helmet with a shaded lens, and protective clothing.
– Clear the welding area of any flammable materials to minimize the risk of fire.
– Have a fire extinguisher readily available in case of emergencies.
– Be mindful of the risks associated with high temperatures and hot materials. Avoid touching hot surfaces and use appropriate tools, such as welding pliers, when handling hot materials.
Proper ventilation for welding and exhaust fumes
Maintaining proper ventilation is essential when working with welding equipment to prevent exposure to hazardous fumes and gases. Here are some guidelines to ensure adequate ventilation:
– Utilize local exhaust ventilation systems, such as fume hoods or welding curtains, to effectively capture and remove welding fumes at the source.
– Regularly inspect and maintain the ventilation system to ensure its functionality and effectiveness.
– If ventilation alone is insufficient to protect the welder, make use of personal protective equipment, such as respirators, based on the hazards present and applicable legislation or standards.
– Educate oneself and the team about the potential health effects of welding fumes and gases, such as metal fume fever and respiratory problems. It is important to be aware of the symptoms and seek medical attention if necessary.
Additional safety precautions
In addition to the above considerations, there are a few more safety precautions to bear in mind when working with welding equipment:
– Ensure that all electrical connections and cables are properly insulated and secured to prevent electrical hazards.
– Regularly inspect the welding equipment for any damage or defects. Promptly replace or repair faulty equipment to prevent accidents.
– Implement a comprehensive safety program that includes proper training, hazard identification, and emergency response procedures.
– Have a first aid kit easily accessible for minor injuries, and ensure that all workers are trained in basic first aid procedures.
– Remain mindful of the surroundings and minimize distractions while welding. Maintaining focus on the task at hand helps reduce the risk of accidents.
Following these safety considerations and precautions creates a safe working environment for both oneself and the team when working with welding equipment. Safety should always be the top priority to prevent accidents and ensure the well-being of everyone involved.
Conclusion
To conclude, working with welding equipment and performing a muffler delete requires a thorough understanding of the process and the necessary safety precautions. While a muffler delete can enhance the sound and potentially provide a slight increase in horsepower, it should only be attempted by individuals with the appropriate knowledge and tools.
DIY modifications can provide personal satisfaction and potential cost savings. However, it is crucial to recognize the potential risks involved, such as improper installation leading to leaks or damage to other exhaust components. It is recommended to consult with professionals or those experienced in automotive modifications to ensure a successful and safe muffler delete.
Ultimately, the decision to pursue a muffler delete for the purpose of adding horsepower rests with the individual. It is important to weigh the benefits and risks, as well as adhere to safety guidelines, to achieve the desired outcome while ensuring the longevity and functionality of the vehicle’s exhaust system.