how to fix exhaust leak at flange

Introduction
Explaining the importance of fixing an exhaust leak at the flange
Fixing an exhaust leak at the flange is crucial for maintaining optimal vehicle performance and safety. The exhaust system plays a vital role in removing harmful gases and reducing engine noise. When there is an unintended gap or hole in the exhaust system, exhaust gases can escape before reaching the muffler. This can lead to several issues, including reduced engine power, increased fuel consumption, excessive noise, and most importantly, the potential for toxic fumes to enter the vehicle cabin.
By promptly repairing the exhaust leak, you can prevent these problems and ensure that the exhaust gases are properly directed and filtered. Additionally, a well-maintained exhaust system can also contribute to a quieter and more efficient driving experience.
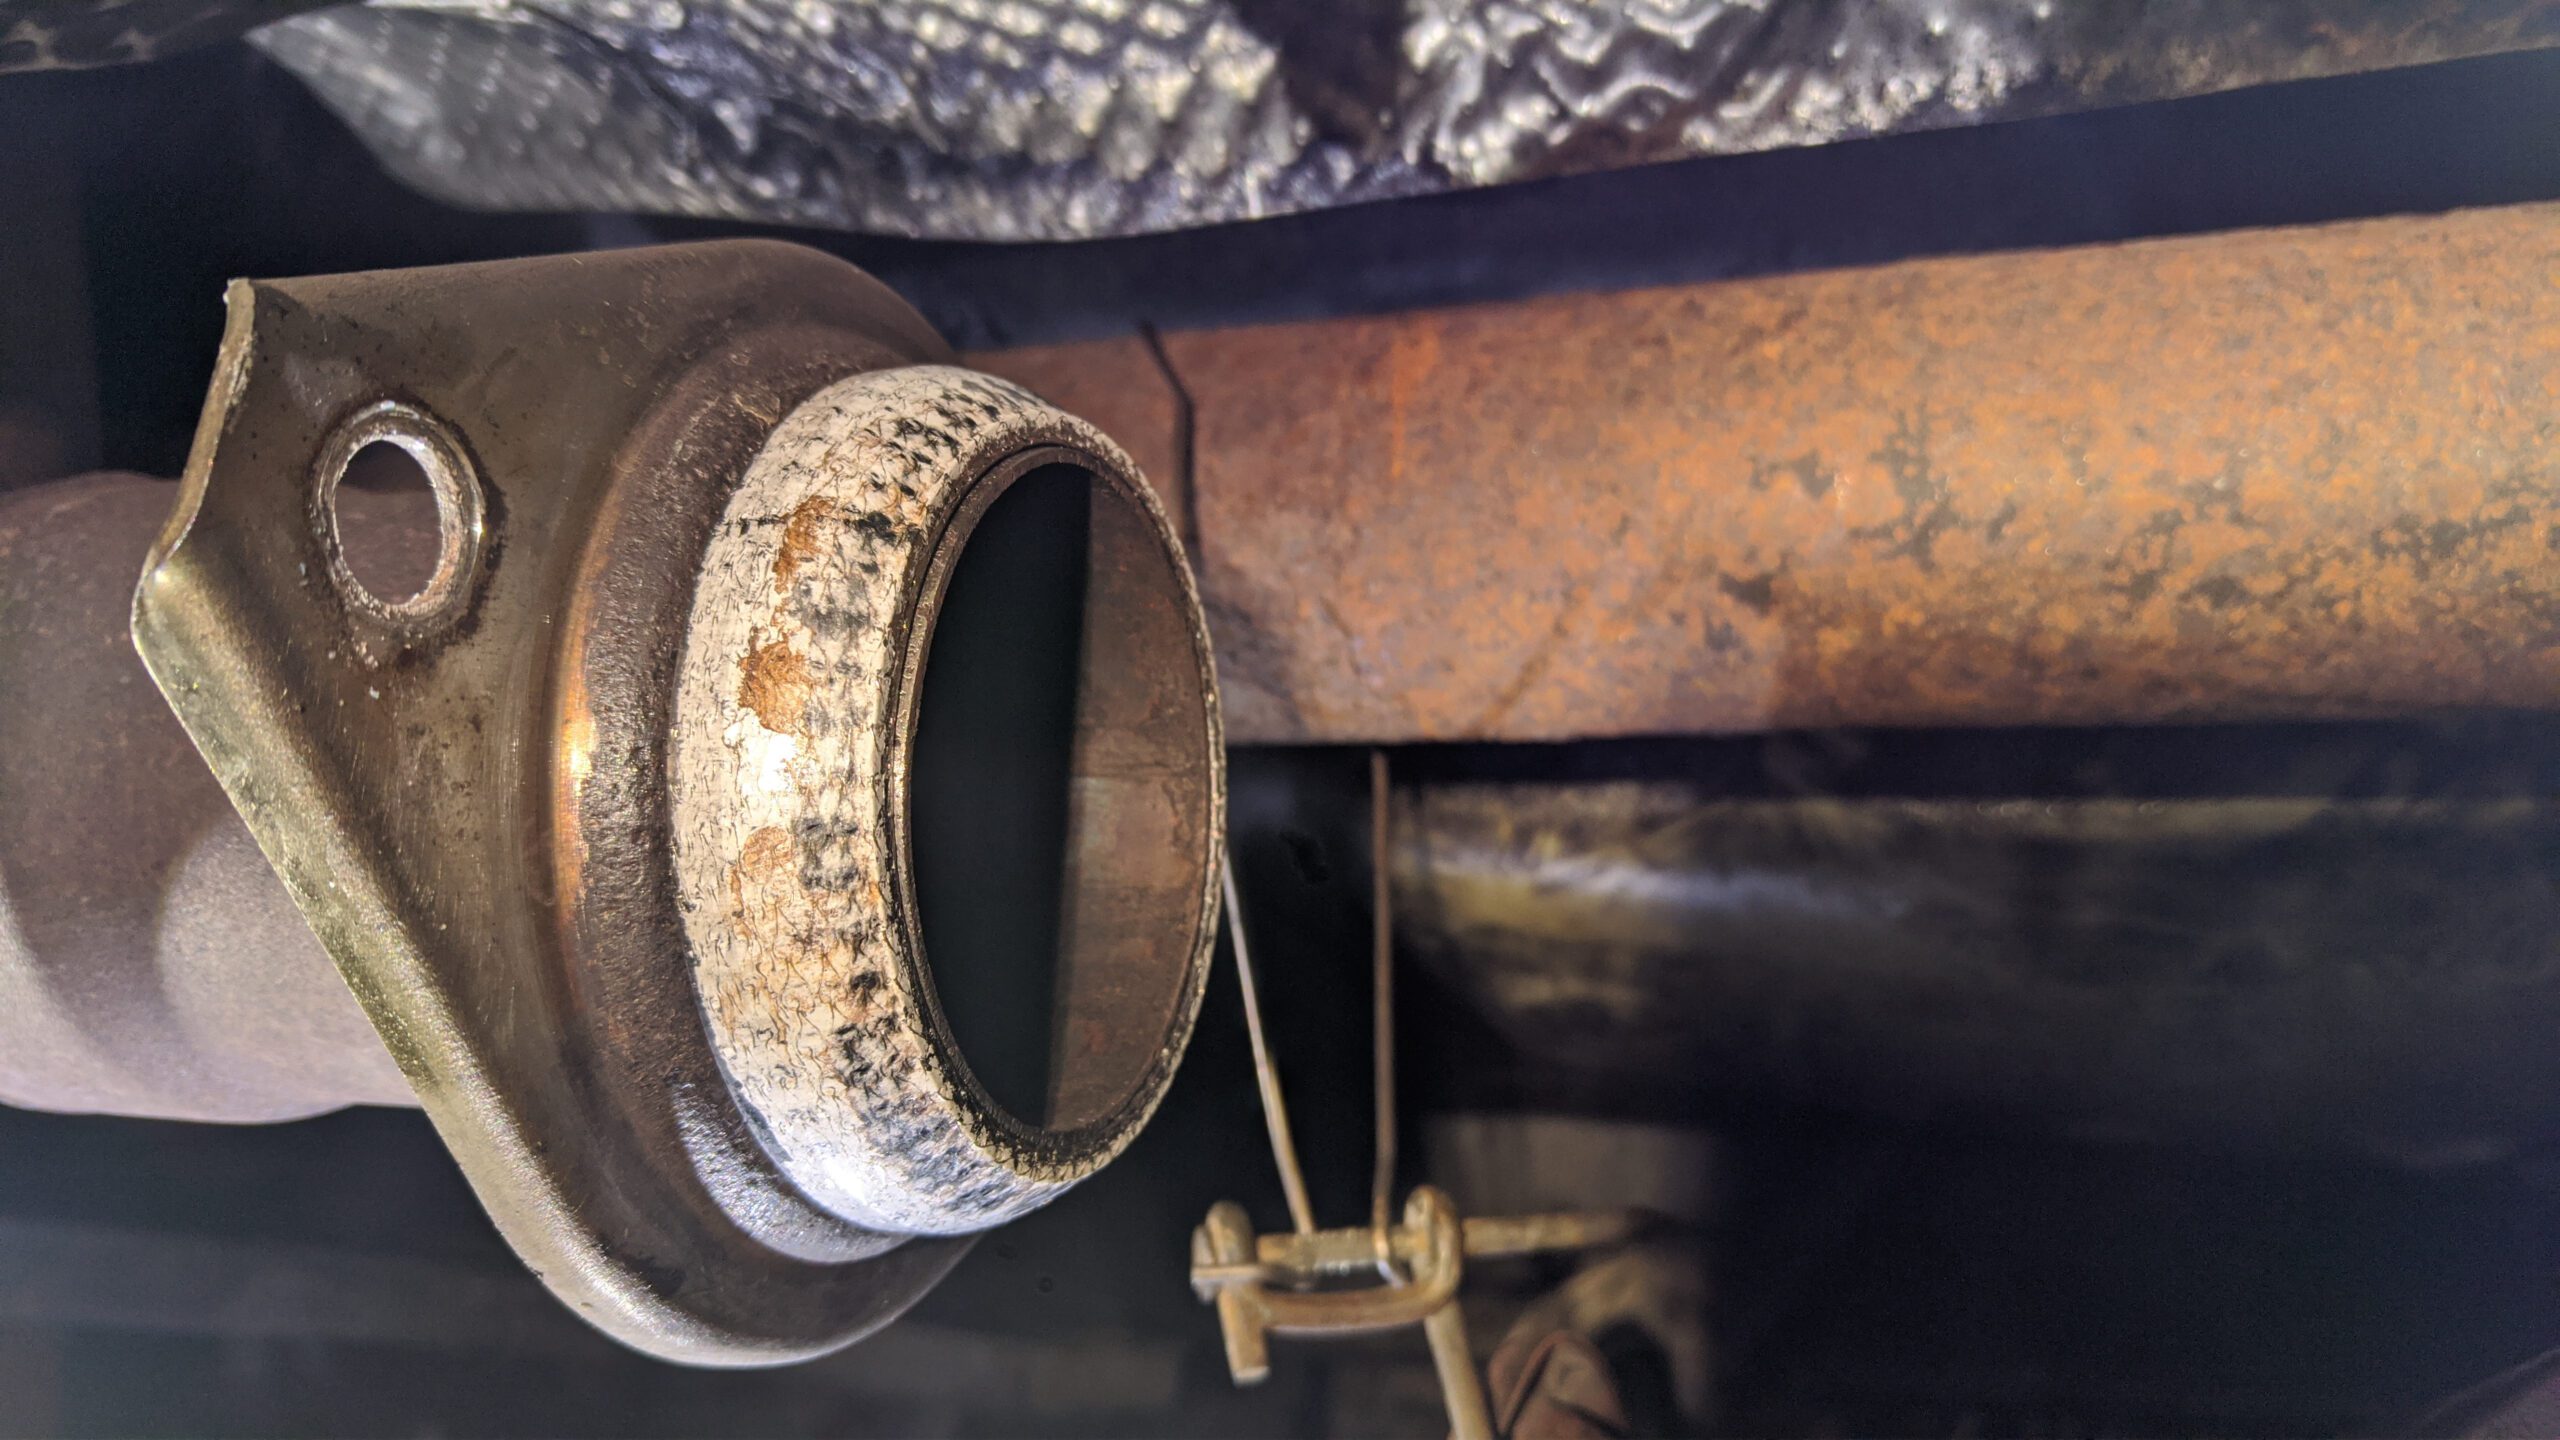
Common signs of an exhaust leak at the flange
Identifying an exhaust leak at the flange is crucial in order to initiate the necessary repairs. Here are some common signs that indicate the presence of a leak:
– Visual inspection: Carefully examine the exhaust system near the flange area for any signs of damage, gaps, or soot accumulation. Look for any noticeable holes or cracks in the flange itself.
– Abnormal sounds: Start the engine and listen for hissing, popping, or loud hissing sounds. These sounds can indicate that exhaust gases are escaping through a leak in the flange.
– Smell of exhaust fumes: If you notice a strong smell of exhaust fumes inside the vehicle cabin, it may indicate a leak in the flange or elsewhere in the exhaust system.
– Poor engine performance: An exhaust leak can disrupt the proper flow of exhaust gases, leading to reduced engine power, decreased acceleration, and increased fuel consumption.
If you observe any of these signs, it is important to take immediate action and proceed with repairing the exhaust leak to prevent further damage to the vehicle and ensure safety on the road.
Step-by-step instructions to fix the exhaust leak at the flange
Here, we provide step-by-step instructions and essential tips to help you successfully repair an exhaust leak at the flange:
1. **Step 1: Locate the flange where the leak is occurring.** Inspect the exhaust system and identify the specific flange that is causing the leak. This may require crawling underneath the vehicle or using a jack to lift it for better access.
2. **Step 2: Remove any debris or rust from the flange and surrounding area.** Use a wire brush or sandpaper to clean the flange and ensure a smooth surface for proper sealing.
3. **Step 3: Inspect the gasket and replace if necessary.** Check the condition of the gasket located between the flange and the adjoining exhaust component. If the gasket is damaged, worn, or not sealing properly, replace it with a new one.
4. **Step 4: Apply a thin layer of exhaust system sealant on both sides of the gasket.** This will help to create a tight seal and prevent any exhaust gases from escaping. Make sure to use a high-temperature sealant that is compatible with the materials used in the exhaust system.
5. **Step 5: Align the exhaust components properly and secure them together using the bolts or clamps.** Ensure that the flange and the adjoining exhaust component are aligned properly before tightening the bolts or clamps. This will help to maintain a proper seal and prevent any further leaks.
Protecting flanges from corrosion
To prevent future leaks and extend the lifespan of the flanges, it is recommended to take preventive measures against corrosion. Here are a few tips:
– Apply a high-temperature paint or anti-corrosion coating to the flanges. This will create a protective barrier and prevent rust or corrosion from forming.
– Regularly inspect and clean the flanges. Remove any debris or rust buildup and keep them dry to avoid moisture retention.
– Consider investing in stainless steel flanges, as they are more resistant to rust and corrosion compared to other materials.
By taking these protective measures, you can significantly reduce the risk of exhaust leaks and prolong the lifespan of the flanges in your vehicle’s exhaust system.
Conclusion
Fixing an exhaust leak at the flange is a necessary task to ensure optimal vehicle performance and safety. By following the step-by-step instructions provided in this article and taking the necessary precautions, you can successfully repair the leak and enjoy a quieter and more efficient exhaust system. Regular inspection and maintenance of the exhaust system can help prevent future leaks and prolong the lifespan of the flanges. If you suspect an exhaust leak, it is crucial to address the issue promptly to avoid further damage to the vehicle and potential health hazards.**Gather the Necessary Tools and Materials**
One of the essential steps before diving into the repair process of an exhaust leak at the flange is to gather all the required tools and materials. Having the right equipment ensures a smooth and efficient repair process. Here’s a list of items you’ll likely need:
1. Socket set and wrenches: These tools are necessary for removing and tightening bolts or clamps.
2. Screwdriver: Used for removing screws or clips that may be holding the components together.
3. Wire brush: Useful for cleaning debris or rust from the flange and surrounding area.
4. Exhaust system sealant: A high-temperature sealant specifically designed for exhaust systems.
5. Replacement gasket: Check the condition of the existing gasket and replace it if damaged or worn.
6. Safety gloves and goggles: It’s always important to prioritize safety during repair work.
**List of tools and materials needed to fix an exhaust leak at the flange:**
– Socket set
– Wrenches
– Screwdriver
– Wire brush
– Exhaust system sealant
– Replacement gasket
– Safety gloves
– Safety goggles
**Step-by-step instructions on gathering the required items:**
1. Start by ensuring you have a socket set and wrenches in different sizes. These will be used to loosen and tighten bolts or clamps during the repair process.
2. A screwdriver is essential for removing any screws or clips that may be holding the components together.
3. Obtain a wire brush to clean any debris or rust from the flange and the surrounding area. Proper cleaning ensures a better seal.
4. Purchase an exhaust system sealant. Look for one that is designed for high temperatures and specifically meant for use in exhaust systems.
5. Check the condition of the existing gasket. If it is damaged or worn, it will need to be replaced. Make sure to obtain a new gasket that matches the specifications of your exhaust system.
6. Prioritize your safety by wearing gloves and goggles during the repair process. This will protect you from any potential hazards.
By gathering all the necessary tools and materials, you will be well-prepared to fix an exhaust leak at the flange. These items will help you achieve optimal performance and ensure a successful repair.
Identify the Source of the Leak
Understanding how to locate the exact location of the exhaust leak at the flange
To effectively fix an exhaust leak, it is crucial to identify the exact location of the leak. Here are some steps to help you locate the source of the problem:
1. Inspect the exhaust flange: The exhaust flange is the connection point between the exhaust manifold and the rest of the exhaust system. Look for any signs of damage or wear around this area, such as cracks or holes.
2. Listen for unusual noises: Start the engine and listen for any hissing or blowing sounds coming from the exhaust system. The sound can help guide you in the right direction of the leak.
3. Feel for air blowing out: With the engine running, place your hands a few inches away from the exhaust flange and feel for any air blowing out. This can indicate the presence of a leak.
4. Use a smoke machine: If you are unable to locate the leak visually or through sound, you can use a smoke machine to help identify the source. The smoke will be pulled out of the exhaust system where the leak is present, making it easier to pinpoint.
Inspecting the flange and surrounding areas for signs of damage or wear
Once you have identified the general area of the leak, it’s essential to inspect the flange and surrounding areas for any signs of damage or wear. Here’s what you should do:
1. Clean the area: Use a wire brush to remove any debris or rust from the flange and the surrounding pipe. This will ensure a better seal and prevent future leaks.
2. Check for cracks or holes: Carefully inspect the flange for any cracks, holes, or other visible damage. These can be indicators of a leak and may require repairs or replacement.
3. Examine the gasket: Take a close look at the gasket between the flange and the exhaust manifold. Check for any signs of wear, such as tears or deterioration. If the gasket is damaged, it will need to be replaced.
4. Tighten the bolts or clamps: If the leak is due to loose connections, use a socket set or wrench to tighten the bolts or clamps holding the flange in place. Be careful not to overtighten, as this can cause further damage.
By thoroughly inspecting the flange and surrounding areas, you can determine the extent of the damage and take appropriate measures to fix the exhaust leak. Remember to follow proper safety precautions and consult a professional if you are unsure about any aspect of the repair process. Fixing an exhaust leak promptly can help ensure the optimal performance and longevity of your vehicle’s exhaust system.
Preparing the Flange for Repair
Cleaning the flange and removing any debris or rust
Before starting the repair process, it is important to ensure that the flange and the surrounding area are clean and free from any debris or rust. This step is crucial as it helps to create a better seal and ensures the effectiveness of the repair. Follow these steps to clean the flange:
1. Use a wire brush to scrub off any loose debris or rust from the flange and the surrounding area. Pay close attention to the edges of the flange and any grooves where the gasket sits.
2. If there is excessive rust buildup that is difficult to remove, you can also use a penetrating oil to loosen stubborn bolts or nuts. Apply the oil and let it sit for a few minutes before attempting to remove them.
3. Once the flange and the surrounding area are clean and free from debris, make sure to wipe them dry to prevent moisture from interfering with the seal.
Applying penetrating oil to stubborn bolts or nuts
In some cases, the bolts or nuts on the flange may be stuck due to rust or corrosion. To loosen them and make the repair process smoother, you can apply a penetrating oil. Here’s how:
1. Identify the bolts or nuts that are difficult to remove or seem to be stuck.
2. Apply a generous amount of penetrating oil to each of the stubborn bolts or nuts.
3. Allow the oil to penetrate and work its way into the rust or corrosion. This may take a few minutes or even up to an hour, depending on the severity of the rust.
4. After sufficient time has passed, use a socket set or wrench to attempt to loosen the bolts or nuts again. The penetrating oil should have made it easier to break them free.
5. If the bolts or nuts still refuse to budge, repeat the process by applying more penetrating oil and giving it additional time to work.
By cleaning the flange and removing any debris or rust, as well as applying penetrating oil to stubborn bolts or nuts, you are preparing the flange for the repair process. This will ensure that the repair is effective and that the components are properly secured, leading to optimal performance and longevity of your exhaust system.
Repair Methods
Exploring different repair methods for fixing an exhaust leak at the flange
When it comes to repairing an exhaust flange leak, there are several methods that can be employed based on the extent of the damage and the available resources. Here are some common repair methods that you can consider:
1. Using Gaskets: Gaskets are widely used to create a tight seal between the exhaust flange and the pipe. They are typically made of metal or composite materials and are designed to withstand high temperatures and pressures. To use a gasket for repair, follow these steps:
– Remove the old gasket and clean the flange surface.
– Place the new gasket onto the flange, ensuring a proper fit and alignment.
– Secure the flange and pipe together using bolts or clamps, tightening them evenly.
Gaskets are a cost-effective and relatively easy repair method, especially for minor leaks. However, they might need to be replaced periodically as they can wear out over time.
2. Using Sealants: Sealants, such as high-temperature silicone or exhaust putty, can be used to fill small gaps or cracks in the flange or pipe. Here’s how to apply a sealant:
– Clean the flange and the surrounding area thoroughly.
– Apply the sealant generously to the leaking area, ensuring complete coverage.
– Allow the sealant to dry or cure according to the manufacturer’s instructions.
Sealants provide a temporary fix and may not be suitable for larger or more severe leaks. They can also degrade over time due to heat and exposure to exhaust gases.
3. Replacing Damaged Parts: In cases where the flange or pipe is severely damaged, it may be necessary to replace the affected component entirely. This typically involves cutting out the damaged section and installing a new flange or pipe. Here are the steps to follow:
– Determine the extent of the damage and identify the section that needs to be replaced.
– Use appropriate tools, such as cutting torches or saws, to remove the damaged part.
– Install the new flange or pipe, ensuring a proper fit and alignment.
– Secure the components together using bolts, clamps, or welding, depending on the specific repair requirements.
Replacing damaged parts provides a more permanent solution and ensures the structural integrity of the exhaust system. However, it can be more costly and time-consuming compared to other repair methods.
It is important to carefully evaluate the extent of the leak and consider the available resources before choosing the appropriate repair method for your exhaust flange. However, in some cases, it may be necessary to seek professional help, especially when dealing with complex repairs or if DIY methods are not viable.
Techniques such as using gaskets, sealants, or replacing damaged parts
Let’s take a closer look at each of these techniques:
1. Gaskets: Gaskets are commonly used to create a tight seal between the flange and the pipe. They are available in various materials, such as metal, composite, or graphite, each offering different levels of durability and heat resistance. Gaskets can be easily installed and provide a reliable seal to prevent exhaust leaks. However, it is important to choose a gasket that is compatible with the specific exhaust system and follow the manufacturer’s instructions for installation.
2. Sealants: Sealants, such as high-temperature silicone or exhaust putty, are applied directly to the flange or pipe to fill small gaps or cracks. They can provide a temporary fix for minor leaks and are relatively easy to apply. However, sealants may not be suitable for larger or more severe leaks, and their effectiveness can diminish over time due to heat and exposure to exhaust gases. It is important to choose a high-quality sealant that is compatible with the exhaust system and follow the manufacturer’s instructions for application.
3. Replacing Damaged Parts: If the flange or pipe is severely damaged or corroded, it may be necessary to replace the affected component entirely. This involves cutting out the damaged section and installing a new flange or pipe. It is important to use high-quality replacement parts that are specifically designed for the make and model of the vehicle. Additionally, proper alignment and secure installation are crucial to ensure a reliable seal and prevent future leaks.
Each of these techniques has its advantages and considerations. The choice of repair method depends on factors such as the severity of the leak, the available resources, and personal skill level. In some cases, it may be necessary to seek professional help from a mechanic or exhaust specialist to ensure a proper and long-lasting repair.
Here are some frequently asked questions related to fixing an exhaust flange leak:
1. How do I locate the exhaust flange leak? Locating the exact location of the exhaust flange leak can be done by visually inspecting the exhaust system for signs of rust, damage, or soot. You can also use soapy water or a smoke test to identify the area where the leak is occurring.
2. Can I use a temporary repair method for an exhaust flange leak? Temporary repair methods, such as using sealants or gaskets, can provide a temporary fix for minor leaks. However, it is important to keep in mind that these methods may not provide a long-lasting solution and should be considered temporary measures until a permanent repair can be made.
3. When should I consider seeking professional help for an exhaust flange leak? If you are not confident in your ability to repair the exhaust flange leak or if the damage is extensive, it is recommended to seek professional help. A mechanic or exhaust specialist will have the expertise and tools necessary to properly diagnose the issue and perform the necessary repairs.
When it comes to fixing an exhaust flange leak, it is important to choose the right repair method based on the extent of the damage and available resources. Whether you choose to use gaskets, sealants, or replace damaged parts, following a precise procedure and ensuring a proper seal are essential for a successful repair. Regularly checking for leaks and addressing them promptly can help prevent further damage and ensure the optimal performance of your exhaust system.
Tightening the Flange
Proper techniques for tightening the flange to ensure a secure fit
After preparing the flange for repair by cleaning it and removing any debris or rust, the next step is to properly tighten the flange to create a secure fit. Here are some techniques you can follow:
1. Align the flanges: Before tightening the bolts, make sure to align the flanges so that they are parallel and flush with each other. This will ensure a proper seal and prevent leaks.
2. Gradually tighten the bolts: It is important to tighten the bolts evenly and gradually to avoid over-tightening or under-tightening. This can cause damage, leaks, or warping. Start by tightening the bolts to a lower torque and gradually increase the torque until the desired level is reached.
3. Use a torque wrench: To ensure accurate and consistent tightening, it is recommended to use a torque wrench. A torque wrench allows you to measure the amount of force applied to the bolts, ensuring that they are tightened to the specified torque.
Using torque wrench and following specific torque specifications
When tightening the flange, it is crucial to follow the specific torque specifications provided by the manufacturer. These torque specifications determine the amount of force that should be applied to the bolts. Here are the general steps to follow:
1. Refer to the torque specifications: Consult the manufacturer’s instructions or service manual to determine the specific torque specifications for your flange. These specifications may vary depending on the size and type of flange.
2. Set the torque wrench: Set the torque wrench to the specified torque value. Make sure that the torque wrench is properly calibrated and adjusted for accurate readings.
3. Tighten the bolts: Starting from one side of the flange, gradually tighten each bolt in a progressive pattern. This pattern ensures equal distribution of force and prevents the flange from warping.
4. Verify torque: After tightening all the bolts, go back and verify the torque by reapplying the torque wrench to each bolt. This ensures that all bolts are evenly tightened and will prevent any potential leaks.
By following these proper techniques and using a torque wrench with specific torque specifications, you can ensure a secure fit and minimize the risk of leaks or damage to the flange. This will contribute to better performance, improved efficiency, and longer lifespan of your exhaust system.
Remember to always refer to the manufacturer’s instructions and guidelines for your specific flange to ensure proper installation and tightening. Regular maintenance and cleaning of the flanges will also help in preserving their performance and preventing issues in the future.
Testing for Leaks
Steps to test if the exhaust leak at the flange has been successfully fixed
After completing the repair and tightening the flange, it is important to test whether the exhaust leak has been successfully fixed. This will ensure that the repair was effective and that there are no remaining issues with the exhaust system. Here are the steps to follow when testing for leaks:
1. Start the engine and let it idle for a few minutes: This will allow the exhaust system to warm up and enable any potential leaks to become more noticeable.
2. Carefully inspect the repaired flange area for signs of leakage: After the engine has been running for a few minutes, visually inspect the repaired flange area for any signs of leakage. Look for smoke, soot, or any visible exhaust gas escaping from the repaired area. If you notice any of these signs, it indicates that the repair was not successful, and further action might be required.
Checking for any remaining signs of leaks or unusual noises
In addition to the visual inspection, you can also use other methods to check for any remaining signs of leaks or unusual noises. Here are some additional steps you can take:
1. Visual inspection: Carefully examine the entire exhaust system, including the flange area, for any signs of damage, gaps, or loose fittings. Look for any signs of soot, corrosion, or rust that could indicate a leak.
2. Listening for abnormal sounds: Start the engine and listen for any hissing or popping sounds coming from the exhaust system. These abnormal sounds can indicate an exhaust leak.
3. Testing with soapy water: Mix some soapy water and spray it onto the flange area while the engine is running. If you notice any bubbles forming, it indicates that there is still a leak at the flange.
By following these steps and performing the necessary tests, you can ensure that the exhaust leak at the flange has been successfully fixed. If you discover any remaining signs of leaks or unusual noises, it is important to address them promptly to avoid further damage or complications with your exhaust system.
Regular maintenance and inspections of the exhaust system can help identify any potential issues early on, allowing for timely repairs and ensuring the longevity and efficiency of your vehicle’s exhaust system. It is also recommended to use high-quality gaskets and sealants during the repair process to ensure a reliable and long-lasting fix.
Remember, if you are unsure about any aspect of the repair or testing process, it is always recommended to consult a professional mechanic or exhaust specialist for assistance. They will have the knowledge and expertise to guide you through the repair and ensure that it is done correctly.
Troubleshooting Common Issues
Addressing common problems that may arise during the repair process
During the repair process of fixing an exhaust leak, some common issues may arise. Here are a few of these issues and tips on how to address them:
1. Stubborn rusted bolts: It is not uncommon for the nuts and bolts that hold the exhaust system together to become rusty over time. This can make it difficult to remove them when attempting to replace a gasket or fix a leak. To address this issue, you can try using penetrating oil to loosen the rust and make the bolts easier to remove. Applying heat using a torch can also help in breaking the rust and loosening the bolts.
2. Misaligned flanges: Sometimes, when tightening the flanges after a repair, they may not align properly. This can lead to an improper seal and potential leaks. To rectify this issue, you can use a rubber mallet or a soft-faced hammer to gently tap the flanges into alignment. This may require some trial and error, but it will ensure a proper fit and seal.
3. Damaged or worn gaskets: Gaskets can become damaged or worn out over time, leading to an exhaust leak. If you discover that a gasket needs to be replaced, it is essential to choose the right type and size for your specific exhaust system. Installing a new gasket should resolve the leak issue and restore proper functionality.
Tips and solutions for overcoming challenges
Here are some additional tips and solutions to overcome challenges that may arise when fixing an exhaust leak:
1. Seek professional help: If you are unsure or uncomfortable with performing the repair yourself, it is always a good idea to seek the assistance of a professional. An experienced mechanic will have the necessary tools, knowledge, and expertise to properly diagnose and fix exhaust leaks.
2. Regular maintenance: Conducting regular maintenance on your exhaust system can help prevent and identify leaks earlier. This includes inspecting for any signs of damage, checking the condition of gaskets and fittings, and addressing any issues promptly.
3. Use quality parts: When replacing gaskets or other components of your exhaust system, it is important to use high-quality parts. This will help ensure a proper fit, durability, and longevity of the repair.
4. Follow proper safety precautions: When working on your exhaust system, make sure to follow proper safety precautions such as wearing gloves, eye protection, and working in a well-ventilated area. Exhaust gases can be harmful, so it is important to take necessary precautions to protect yourself.
In conclusion, fixing an exhaust leak requires identifying the source of the problem, tightening the flange using proper techniques, and addressing any common issues that may arise. By following these steps and seeking professional help if needed, you can successfully fix an exhaust leak and restore the functionality of your exhaust system. Regular maintenance and using quality parts will help prevent future leaks and ensure optimal performance.
Troubleshooting Common Issues
Addressing common problems that may arise during the repair process
During the repair process, it is not uncommon for a few issues to arise when fixing an exhaust leak at the flange. Here are a few common problems that might occur and some tips on how to address them:
1. Stubborn rusted bolts: Over time, the nuts and bolts that hold the exhaust system together can become rusty and difficult to remove. To deal with this issue, you can try applying penetrating oil to loosen the rust and make it easier to remove the bolts. Using a torch to apply heat can also help break the rust and loosen the bolts.
2. Misaligned flanges: Sometimes, when tightening the flanges after a repair, they may not align properly. This misalignment can result in an improper seal and potential leaks. To fix this problem, you can use a rubber mallet or a soft-faced hammer to gently tap the flanges into alignment. It may require some trial and error, but it will ensure a proper fit and seal.
3. Damaged or worn gaskets: Gaskets can become damaged or worn out over time, leading to an exhaust leak. If you find that a gasket needs to be replaced, it is crucial to choose the correct type and size for your specific exhaust system. Installing a new gasket should resolve the leak issue and restore proper functionality.
Tips and solutions for overcoming challenges
Here are some additional tips and solutions to overcome challenges that may arise when fixing an exhaust leak at the flange:
1. Seek professional help: If you are unsure or uncomfortable with performing the repair yourself, it is always a good idea to seek the assistance of a professional mechanic. An experienced mechanic will have the necessary tools, knowledge, and expertise to properly diagnose and fix exhaust leaks.
2. Regular maintenance: Conducting regular maintenance on your exhaust system can help prevent and identify leaks earlier. This includes inspecting for any signs of damage, checking the condition of gaskets and fittings, and addressing any issues promptly.
3. Use quality parts: When replacing gaskets or other components of your exhaust system, it is important to use high-quality parts. Using cheap or inferior quality parts can lead to premature failure and the recurrence of leaks. Opting for quality parts will ensure a proper fit, durability, and longevity of the repair.
4. Follow proper safety precautions: When working on your exhaust system, it is vital to follow proper safety precautions. These include wearing gloves, eye protection, and working in a well-ventilated area. Exhaust gases can be harmful, so it is crucial to take necessary precautions to protect yourself.
Conclusion
Fixing an exhaust leak at the flange requires identifying the source of the problem, tightening the flanges using proper techniques, and addressing any common issues that may arise. By following these steps and seeking professional help if needed, you can successfully fix an exhaust leak and restore the functionality of your exhaust system.
Final thoughts on fixing an exhaust leak at the flange
It is important to note that fixing an exhaust leak is not just a matter of tightening bolts. Addressing the underlying cause, such as misaligned flanges or damaged gaskets, is crucial to ensure a proper and lasting repair. Regular maintenance and monitoring of your exhaust system will help prevent future leaks and ensure optimal performance.
Taking proper safety precautions and using quality parts are essential for a successful repair. When in doubt, it is always best to consult with a professional mechanic who can guide you through the process and ensure a correct and long-lasting fix.
By addressing common issues during the repair process and following the tips provided, you can troubleshoot and fix an exhaust leak at the flange effectively. Remember, a well-maintained exhaust system is crucial for the overall performance and safety of your vehicle.