how to fix a exhaust manifold leak

Introduction
Finding an exhaust manifold leak is crucial before attempting any repairs to ensure the correct component is replaced. This is because leaks elsewhere in the exhaust system can present similar symptoms as a leaking exhaust manifold. In this blog, we will discuss the importance of fixing an exhaust manifold leak and the symptoms to look out for.
Importance of fixing an exhaust manifold leak
The exhaust system and its various components, including the exhaust manifold, play a vital role in keeping your car on the road. Ignoring an exhaust manifold leak can lead to worsening symptoms and potential damage to other components. Here are a few reasons why fixing an exhaust manifold leak is important:
– Performance: A leaking exhaust manifold can result in reduced engine performance, leading to poor fuel efficiency and overall vehicle performance. Getting it repaired promptly will ensure optimal engine performance.
– Safety: Carbon monoxide, a toxic gas, is a byproduct of combustion and is expelled through the exhaust system. An exhaust manifold leak can cause carbon monoxide to enter the cabin of the vehicle, posing a serious health risk to the occupants. Repairing the leak will prevent this potential hazard.
– Environmental Impact: A leaking exhaust manifold can release harmful emissions into the environment, contributing to air pollution. Fixing the leak helps reduce your vehicle’s impact on the environment.
Symptoms of an exhaust manifold leak
Identifying the symptoms of an exhaust manifold leak is crucial in diagnosing the issue accurately. Here are some common symptoms to look out for:
1. Ticking Noises: A leaking exhaust manifold can cause ticking or tapping noises, especially during acceleration or idle. These noises may be louder near the engine compartment and can indicate a cracked or damaged manifold.
2. Check Engine Light: If the leak is significant or causing issues with the engine’s sensors, the check engine light may illuminate. It is important not to ignore this warning and have the vehicle diagnosed by a professional.
3. Odors in the Exhaust: A leaking exhaust manifold can result in unpleasant smells coming from the exhaust. These smells may be more noticeable inside the vehicle or when standing near the tailpipe.
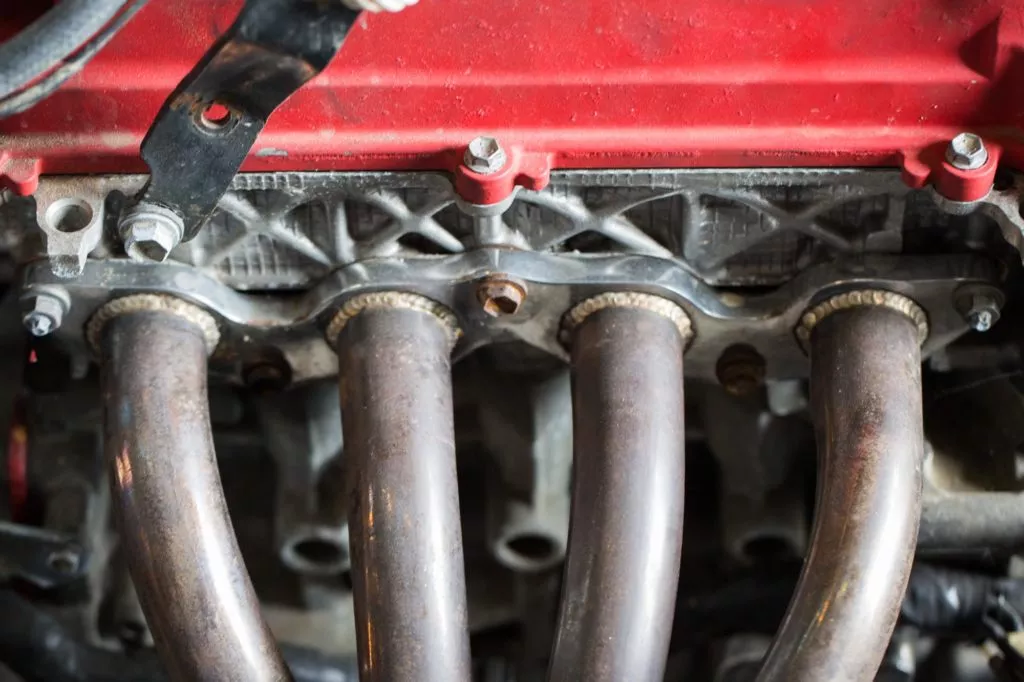
4. Visual Damage: Inspecting the exhaust manifold visually can reveal clear signs of damage, such as cracks, rust, or visible leaks. If you notice any visible damage, it is likely that the manifold is leaking and requires immediate attention.
In conclusion, finding an exhaust manifold leak is crucial to avoid replacing the wrong component and wasting time and money on unnecessary repairs. Understanding the importance of fixing an exhaust manifold leak, as well as recognizing the symptoms, can help you take timely action and prevent further damage to your vehicle. If you suspect an exhaust manifold leak, it is recommended to book an appointment with a qualified professional or consider reaching out to a certified mobile mechanic for convenient repair services.
Inspecting the Exhaust Manifold
Steps to visually inspect the exhaust manifold
– Start by visually inspecting the exhaust manifold for any visible signs of cracks, warping, or damage.
– Look for exhaust leaks, carbon deposits, or any other visible issues.
– Carefully monitor the engine while it is running to check for abnormal noises or irregularities in performance.
– Perform additional checks and tests, such as exhaust leak tests or system inspections, to verify the repair.
Indications of a leak in the exhaust manifold
– Soot deposits: Look for black marks or sooty deposits around the exhaust manifold, which can indicate a leak.
– Unusual noise: Listen for any unusual noises coming from the engine, such as a hissing or blowing sound, which may suggest an exhaust leak.
– Poor engine performance: If there is a leak in the exhaust manifold, it can lead to poor engine performance, such as decreased power or a rough idle.
It is important to note that the exact steps and procedures for inspecting the exhaust manifold can vary significantly depending on the specific engine model, manufacturer, and other factors. Therefore, it is recommended to consult the engine manufacturer’s service manual or seek guidance from a qualified technician for precise instructions.
To check for an exhaust leak, it is best to get underneath the vehicle and perform a visual and auditory inspection. Look for any signs of exhaust leaks, such as soot deposits, black marks, or unusual noise. In addition, you can also perform an exhaust leak test using a smoke machine or approved leak detection solution to confirm the presence of leaks along the manifold.
Monitoring the engine’s performance during operation is crucial to ensure that any issues with the exhaust manifold are properly diagnosed and repaired. Pay attention to any changes in engine sound, power, or overall performance, as these may indicate a problem with the exhaust system.
Remember, the exhaust manifold plays a critical role in the proper functioning of the engine and the overall performance of the vehicle. Regular inspections and maintenance can help to identify and resolve any issues before they lead to more significant problems.
Penetrating Oil Application
Why using penetrating oil is helpful
Using penetrating oil on exhaust manifold bolts can be a helpful technique when it comes to removing them. The bolts on the exhaust manifold can become corroded over time due to exposure to heat and moisture. This corrosion can make it difficult to remove the bolts, potentially leading to stripped threads or broken bolts. Applying penetrating oil to the bolts can help to loosen the corrosion and make it easier to remove them without causing damage.
Techniques to apply penetrating oil to the exhaust manifold bolts
There are several techniques to effectively apply penetrating oil to the exhaust manifold bolts. Here are some recommended methods:
1. Spray directly: Use a penetrating oil spray and spray it directly onto the exhaust manifold bolts. Make sure to cover the bolts fully for maximum effectiveness. Allow the oil to penetrate the threads for a few minutes before attempting to remove the bolts.
2. Soak in a container: If the bolts are particularly stubborn, you can try soaking them in a container filled with penetrating oil. Remove the bolts from the exhaust manifold and place them in the container, fully submerging them in the oil. Let them sit for a few hours or overnight to allow the oil to penetrate and loosen the corrosion.
3. Use a brush or applicator: If the exhaust manifold bolts are in a hard-to-reach area or if you need to apply the oil more precisely, you can use a brush or applicator. Dip the brush or applicator into the penetrating oil and carefully apply it to the bolts, making sure to cover all areas.
4. Heat and oil combination: For extremely stubborn bolts, you can combine the use of penetrating oil with heat. Use a heat gun or torch to heat the area around the bolts, and then apply the penetrating oil. The heat helps to expand the metal, allowing the oil to penetrate deeper and further loosen the corrosion.
Remember to follow any safety guidelines provided by the manufacturer when using heat tools and penetrating oil. Always use caution and protection equipment when working with heated components.
Applying penetrating oil to the exhaust manifold bolts can greatly improve your chances of successfully removing them without causing damage. Take your time and ensure that the oil has enough time to penetrate before attempting to remove the bolts. If you encounter any difficulties or are unsure of the proper procedures, it is always recommended to consult the manufacturer’s service manual or seek assistance from a qualified technician.
Removing the Manifold Bolts
Tools required to remove the manifold bolts
– Socket wrench set
– Penetrating oil
– Vise-grip pliers
Step-by-step process to remove the manifold bolts
1. Inspect the bolts and exhaust system for obvious damage before proceeding.
2. If any additional parts are needed, it is advised to order them before beginning the removal process.
3. Before attempting to remove the bolts, apply a quality penetrating spray to soak all of the exhaust bolts. This will help prevent them from snapping during removal.
4. Using the appropriate socket wrench size, carefully loosen and remove each of the manifold bolts. In some cases, the exhaust manifold bolts may come out without any issues.
5. However, if the collector nuts have rusted away or are damaged, it may require additional steps to remove the manifold collector bolts. In such cases, vise-grip pliers can be used to hold the nut tightly while removing the bolts.
6. Once all the bolts are removed, the manifold and gasket can be taken out, revealing any broken studs in the cylinder head. In some cases, the snapped stud may have come out with the manifold itself.
7. It is important to note that the number of studs and bolts may vary depending on the specific vehicle and exhaust system.
8. If any of the studs or bolts are damaged or broken, they should be replaced before reinstalling the manifold.
It is worth noting that the process of removing the manifold bolts may differ depending on the vehicle make and model. Therefore, it is recommended to refer to the vehicle’s service manual or seek guidance from a qualified technician for the precise instructions.
By following these steps, the manifold bolts can be properly removed without causing further damage to the exhaust system. This allows for easier access to inspect and repair any issues with the manifold or other components of the exhaust system.
Remember to exercise caution when working with the manifold bolts and ensure that all necessary safety precautions are taken. It is also advisable to wear protective gloves and eyewear while performing any repairs or maintenance tasks on the vehicle.
Overall, proper inspection, maintenance, and timely replacement of exhaust manifold bolts are essential to ensure the optimal performance and longevity of the vehicle’s exhaust system.
Assessing the Gasket Condition
When dealing with an exhaust manifold leak, it is crucial to assess the condition of the gasket. The gasket plays a vital role in sealing the space between the exhaust manifold and the engine block, preventing any gasses from leaking out. Over time, the temperature changes can cause the gasket to wear out, leading to leaks and potential engine damage. Here are the important steps to assess the gasket condition:
1. Inspecting the gasket for damage
Start by visually inspecting the gasket for any signs of damage or deterioration. Look for cracks, breaks, or visible wear on the gasket surface. It is worth mentioning that the gasket may not be easily accessible, and the removal of certain components may be necessary for a thorough inspection.
2. Identifying signs of a bad gasket
Apart from the visual inspection, there are several signs that can indicate a deteriorating or faulty gasket. These signs include:
– Exhaust leaks: If you notice any gas or fumes escaping from the area around the exhaust manifold, it is a clear indication of a faulty gasket.
– Engine misfires: A leaking gasket can disrupt the proper combustion process, leading to engine misfires and decreased performance.
– Reduced fuel efficiency: A gasket leak can result in the engine wasting fuel, leading to reduced fuel efficiency and increased fuel consumption.
– Engine overheating: A failing gasket can cause coolant leaks, leading to engine overheating. Keep an eye on the temperature gauge for any abnormal readings.
– White smoke from the exhaust: If you notice white smoke coming from the exhaust, it could be a sign of coolant leaking into the combustion chamber through a faulty gasket.
If you notice any of these signs, it is essential to address the issue promptly to prevent further damage to the engine and ensure optimal performance of your vehicle.
In case the gasket is found to be damaged or worn out during the assessment, it is recommended to replace it with a new one. Gasket replacement should be done by a qualified technician or a professional mechanic who can ensure proper installation and a secure seal.
By assessing the gasket condition and promptly addressing any issues, you can prevent further damage to your vehicle and ensure a safe driving experience. Regular maintenance and inspections play a crucial role in identifying and resolving exhaust manifold and gasket-related problems before they escalate into more significant issues.
Remember, if you are unsure about the condition of the gasket or if you lack the necessary skills and tools, it is always best to consult with a professional to avoid any potential complications or safety hazards.
Repairing the Exhaust Manifold Leak:
Options for repairing the leak without removing the manifold:
There are a few options available to repair an exhaust manifold leak without removing the manifold itself. These methods involve using various sealants or gaskets to create a temporary seal and prevent exhaust gases from escaping.
– Gasket replacement: The best solution for a long-lasting fix is to replace the gaskets between the exhaust manifold and the cylinder head. This requires removing the manifold bolts and carefully slipping in new gaskets. It may be necessary to order the gaskets beforehand to ensure the correct fitment.
– Exhaust sealant: Another option is to use an exhaust sealant or high-temperature adhesive. These products are designed to create a seal between metal surfaces and can withstand the heat and pressure of the exhaust system. The sealant should be applied to the area where the leak is occurring and allowed to cure as per the manufacturer’s instructions.
– Exhaust tape: In some cases, using exhaust tape can provide a temporary fix for small leaks. The tape is applied over the area of the leak and is designed to withstand high temperatures. However, it is important to note that this is not a long-term solution and may only provide temporary relief.
Alternative methods to fix the leak temporarily:
If a permanent fix is not feasible at the moment, there are temporary methods that can help mitigate the issue until a proper repair can be carried out.
– Duct tape and wire: Using silver foil duct tape and wire can be a temporary fix for small exhaust manifold leaks. The tape is applied over the leaking area, and the wire is used to secure it in place. While this method may provide temporary relief, it is not recommended as a long-term solution.
– Penetrating oil: Before attempting any repairs, applying a quality penetrating oil to the exhaust manifold bolts can help loosen them and prevent breakage. This should be done prior to any repair attempts to make the process of removing the manifold bolts easier.
It is important to note that these temporary methods should only be used as a short-term solution and proper repairs should be carried out as soon as possible to avoid further damage to the exhaust system.
In conclusion, while there are temporary methods available to fix an exhaust manifold leak without removing the manifold, it is always recommended to address the issue properly by replacing the gaskets or performing a permanent repair. This will ensure the optimal performance and longevity of the exhaust system and prevent any potential risks or complications. It is advisable to consult a qualified technician or refer to the vehicle’s service manual for precise instructions and to ensure a proper repair is carried out.
Replacing the Exhaust Manifold Gasket
Importance of replacing a faulty gasket
The exhaust manifold gasket plays a crucial role in sealing the connection between the exhaust manifold and the cylinder head. It prevents any leaks of exhaust gases, which can lead to a decrease in engine performance, increased fuel consumption, and even potential damage to engine components. Therefore, it is essential to replace a faulty gasket promptly to maintain the proper functioning of the exhaust system and prevent any further complications.
Step-by-step guide to replacing the gasket
Replacing the exhaust manifold gasket requires careful attention to detail and the use of the right tools. Here is a step-by-step guide to help you through the process:
1. Disconnect the vehicle’s battery: Before starting any work, disconnect the vehicle’s battery by removing the positive and negative cables. This will ensure your safety and prevent any electrical accidents.
2. Remove the engine cover: Depending on your vehicle model, you may need to remove the engine cover to gain access to the exhaust manifold. Refer to your vehicle’s service manual for the exact steps on how to remove the cover.
3. Access the exhaust manifold: Locate the exhaust manifold and identify the bolts securing it to the cylinder head. Use the appropriate tools, such as a ratchet wrench or impact wrench and sockets, to loosen and remove these bolts carefully.
4. Remove the old gasket: Once the manifold is detached, remove the old gasket. Ensure that all remnants of the old gasket are thoroughly cleaned from both the manifold and the cylinder head surfaces. Use carb cleaner, steel wool, and grit sandpaper to ensure a clean and smooth surface for the new gasket.
5. Install the new gasket: Place the new exhaust manifold gasket onto the cylinder head, aligning it with the corresponding ports on the manifold. Take care to position it correctly to ensure a proper seal.
6. Reattach the exhaust manifold: Carefully reattach the exhaust manifold to the cylinder head, aligning the bolt holes. Start by hand-tightening the bolts and then use the appropriate tools to torque them to the manufacturer’s specifications.
7. Reassemble and test: Once the manifold is securely attached, reassemble any components that were removed, such as the engine cover. Reconnect the vehicle’s battery and start the engine to test for any exhaust leaks. If all is well, the replacement process is complete.
Remember, these steps are general guidelines, and it is crucial to refer to your vehicle’s service manual for specific instructions tailored to your make, model, and year. If you are not confident in performing this repair yourself, it is always recommended to consult a qualified technician who can ensure a proper and safe installation of the new exhaust manifold gasket.
In conclusion, the exhaust manifold gasket is a critical component of the exhaust system that should be regularly inspected and replaced when necessary. By following the appropriate steps and using the right tools, you can replace a faulty gasket and restore the optimal performance of your vehicle’s exhaust system.
Preventing Future Exhaust Manifold Leaks
Tips to avoid exhaust manifold leaks in the future
– Regular inspections: It is essential to regularly inspect the exhaust manifold and other components of the exhaust system for any signs of damage or leaks. This can help detect any issues early on and prevent them from worsening.
– Avoid excessive heat: High temperatures can accelerate the wear and tear of the exhaust manifold. To prevent leaks, avoid subjecting the exhaust system to excessive heat, such as by avoiding prolonged idling or driving in very hot conditions.
– Be cautious during repairs: When performing any repairs or maintenance on the exhaust system, it is important to exercise caution to avoid damaging the exhaust manifold. Ensure that all components are properly aligned and tightened to prevent leaks.
– Use quality gaskets and seals: When replacing gaskets or seals, always use high-quality, manufacturer-recommended parts. This can help ensure a proper, long-lasting seal and prevent leaks from developing.
– Drive responsibly: Rough driving, such as aggressive acceleration and sudden braking, can put extra stress on the exhaust system, including the exhaust manifold. Drive responsibly to minimize unnecessary strain on the components.
Regular maintenance practices for the exhaust system
– Regular cleaning: Keep the exhaust manifold and the entire exhaust system clean and free from debris or buildup. Regularly inspect and clean any visible soot or carbon deposits. This can help prevent corrosion and prolong the lifespan of the manifold.
– Check for loose or damaged parts: Periodically check for any loose or damaged components in the exhaust system, including the exhaust manifold. Replace or repair any damaged parts to maintain the integrity of the system and prevent leaks.
– Monitor exhaust system performance: Pay attention to any changes in the exhaust system’s performance, such as unusual noises, decreased power, or increased fuel consumption. These could be signs of a developing issue, including a potential exhaust manifold leak.
– Follow manufacturer maintenance schedules: Adhere to the recommended maintenance schedules provided by the vehicle manufacturer. This includes regular servicing and inspections of the exhaust system. Following these guidelines can help identify and address any potential issues before they worsen.
– Seek professional assistance: If you suspect an exhaust manifold leak or have any concerns about the exhaust system, it is advisable to consult a qualified technician. They can conduct a thorough inspection, diagnose any issues, and recommend appropriate repairs or replacements.
By following these tips and practicing regular maintenance, you can help prevent future exhaust manifold leaks and ensure the optimal performance and durability of your vehicle’s exhaust system. Remember, a well-maintained exhaust system not only keeps you safe from harmful gases but also ensures your car runs efficiently and smoothly.
Preventing Future Exhaust Manifold Leaks
Tips to avoid exhaust manifold leaks in the future
– Regular inspections: It is essential to regularly inspect the exhaust manifold and other components of the exhaust system for any signs of damage or leaks. This can help detect any issues early on and prevent them from worsening.
– Avoid excessive heat: High temperatures can accelerate the wear and tear of the exhaust manifold. To prevent leaks, drivers should avoid subjecting the exhaust system to excessive heat, such as by avoiding prolonged idling or driving in very hot conditions.
– Be cautious during repairs: When performing any repairs or maintenance on the exhaust system, it is important to exercise caution to avoid damaging the exhaust manifold. All components should be properly aligned and tightened to prevent leaks.
– Use quality gaskets and seals: When replacing gaskets or seals, it is recommended to use high-quality, manufacturer-recommended parts. This can help ensure a proper, long-lasting seal and prevent leaks from developing.
– Drive responsibly: Rough driving, such as aggressive acceleration and sudden braking, can put extra stress on the exhaust system, including the exhaust manifold. Responsible driving can help minimize unnecessary strain on the components.
Regular maintenance practices for the exhaust system
– Regular cleaning: Keeping the exhaust manifold and the entire exhaust system clean and free from debris or buildup is important. Regularly inspecting and cleaning any visible soot or carbon deposits can help prevent corrosion and prolong the lifespan of the manifold.
– Check for loose or damaged parts: Periodically checking for any loose or damaged components in the exhaust system, including the exhaust manifold, is crucial. Replacing or repairing any damaged parts will help maintain the integrity of the system and prevent leaks.
– Monitor exhaust system performance: Paying attention to any changes in the exhaust system’s performance, such as unusual noises, decreased power, or increased fuel consumption, is essential. These could be signs of a developing issue, including a potential exhaust manifold leak.
– Follow manufacturer maintenance schedules: Adhering to the recommended maintenance schedules provided by the vehicle manufacturer is highly recommended. This includes regular servicing and inspections of the exhaust system. Following these guidelines can help identify and address any potential issues before they worsen.
– Seek professional assistance: If drivers suspect an exhaust manifold leak or have any concerns about the exhaust system, it is advisable to consult a qualified technician. They can conduct a thorough inspection, diagnose any issues, and recommend appropriate repairs or replacements.
Conclusion
Recap of steps to fix an exhaust manifold leak
To prevent future exhaust manifold leaks, drivers should take the following steps:
1. Regularly inspect the exhaust manifold and other components of the exhaust system.
2. Avoid subjecting the exhaust system to excessive heat.
3. Be cautious during repairs to avoid damaging the exhaust manifold.
4. Use high-quality gaskets and seals when replacing parts.
5. Drive responsibly to minimize strain on the components.
Final thoughts and recommendations for professional assistance if needed
Regular maintenance practices, such as cleaning the exhaust system, checking for loose or damaged parts, monitoring performance, and following manufacturer maintenance schedules, are crucial in preventing exhaust manifold leaks. However, if drivers suspect a leak or have concerns about the exhaust system, it is always best to seek professional assistance from a qualified technician. They have the expertise to conduct thorough inspections and provide appropriate repairs or replacements to ensure the optimal performance and durability of the vehicle’s exhaust system. Remember, a well-maintained exhaust system not only keeps drivers safe from harmful gases but also ensures the car runs efficiently and smoothly.