how to fix a burn mark in a car headliner
Introduction
If you have a burn mark in your car headliner, you may be wondering how to fix it. Fortunately, there are a few simple steps you can take to repair the burn mark and restore the headliner to its original condition. In this guide, we will discuss the best methods for fixing a burn mark in a car headliner, including cleaning the area, applying a repair patch, and using a headliner repair kit. With the right tools and a bit of patience, you can easily fix a burn mark in your car headliner and get your car looking like new again.
How to Repair a Burn Mark in a Car Headliner with a Heat Gun
If you have a burn mark in your car headliner, you can repair it with a heat gun. This method is relatively simple and can be done in a few steps.
First, you will need to gather the necessary materials. You will need a heat gun, a piece of cloth, and a pair of gloves. Make sure to wear the gloves to protect your hands from the heat.
Next, you will need to set up the heat gun. Make sure to read the instructions carefully and follow them closely. Once the heat gun is set up, you can begin the repair process.
Start by holding the heat gun about two inches away from the burn mark. Move the heat gun in a circular motion around the burn mark. This will help to loosen the fabric and make it easier to remove.
Once the fabric is loose, you can use the cloth to gently remove the burn mark. Be sure to move the cloth in a circular motion to avoid damaging the headliner.
Finally, you can use the heat gun to seal the area. Move the heat gun in a circular motion around the area to ensure that the fabric is sealed properly.
By following these steps, you can easily repair a burn mark in your car headliner with a heat gun. Be sure to take your time and be careful when using the heat gun to avoid any further damage.
How to Fix a Burn Mark in a Car Headliner with a Fabric Repair Kit
If you have a burn mark in your car headliner, you can use a fabric repair kit to fix it. This guide will provide you with the steps necessary to repair the burn mark in your car headliner.
First, you will need to purchase a fabric repair kit. These kits are available at most auto parts stores and online. Make sure to read the instructions on the package before purchasing the kit.
Once you have the kit, you will need to prepare the area around the burn mark. Use a vacuum cleaner to remove any dirt or debris from the area. Then, use a damp cloth to clean the area. Allow the area to dry completely before proceeding.
Next, you will need to apply the adhesive included in the fabric repair kit. Use a cotton swab to apply the adhesive to the burn mark. Make sure to cover the entire area. Allow the adhesive to dry completely before proceeding.
Once the adhesive is dry, you will need to apply the fabric patch included in the kit. Place the patch over the burn mark and press it firmly into place. Use a warm iron to heat the patch and adhere it to the headliner.
Finally, you will need to apply the sealant included in the kit. Use a cotton swab to apply the sealant to the patch. Allow the sealant to dry completely before using the headliner.
By following these steps, you can easily repair a burn mark in your car headliner with a fabric repair kit. Make sure to read the instructions on the package before beginning the repair process.
How to Remove a Burn Mark from a Car Headliner with a Cleaning Solution
Removing a burn mark from a car headliner can be a tricky task. However, with the right cleaning solution and a bit of patience, it is possible to restore the headliner to its original condition.
The first step is to identify the type of material used in the headliner. This will determine the type of cleaning solution that should be used. If the headliner is made of cloth, a mild detergent should be used. If the headliner is made of vinyl, a mild all-purpose cleaner should be used.
Once the appropriate cleaning solution has been identified, it should be applied to a soft cloth and gently rubbed onto the burn mark. It is important to avoid scrubbing the headliner too hard, as this could cause further damage. The cleaning solution should be allowed to sit on the burn mark for a few minutes before being wiped away with a damp cloth.
If the burn mark is still visible after the first attempt, the process should be repeated until the mark is no longer visible. It is important to remember to use a gentle touch when cleaning the headliner, as too much pressure could cause further damage.
Once the burn mark has been removed, the headliner should be allowed to dry completely before being used again. With the right cleaning solution and a bit of patience, it is possible to remove a burn mark from a car headliner and restore it to its original condition.
How to Cover Up a Burn Mark in a Car Headliner with a Fabric Patch
If you have a burn mark in your car headliner, you can cover it up with a fabric patch. This is a relatively simple process that can be done in a few steps.
First, you will need to purchase a fabric patch that is the same color as your headliner. You can find these at most auto parts stores. Once you have the patch, you will need to cut it to the size of the burn mark. Make sure to leave a few inches of extra fabric around the edges of the burn mark.
Next, you will need to attach the patch to the headliner. You can do this by using a strong adhesive, such as a hot glue gun. Make sure to apply the glue evenly and press the patch firmly onto the headliner. Allow the glue to dry completely before moving on to the next step.
Finally, you will need to trim the excess fabric from the patch. Use a pair of scissors to carefully cut away the extra fabric. Make sure to leave a small border of fabric around the patch to ensure that it is securely attached to the headliner.
Once you have completed these steps, your burn mark should be covered up with the fabric patch. This is a simple and effective way to cover up a burn mark in your car headliner.
How to Restore a Burn Mark in a Car Headliner with a Dye Kit
Restoring a burn mark in a car headliner can be a daunting task, but with the right tools and a bit of patience, it can be done. A dye kit is an effective way to restore the headliner and make it look like new. Here is a step-by-step guide on how to restore a burn mark in a car headliner with a dye kit.
Step 1: Gather the necessary materials. You will need a dye kit, a clean cloth, a spray bottle, and a soft-bristled brush.
Step 2: Prepare the area. Make sure the area around the burn mark is clean and free of dirt and debris.
Step 3: Apply the dye. Follow the instructions on the dye kit to apply the dye to the burn mark. Make sure to cover the entire area.
Step 4: Allow the dye to dry. Allow the dye to dry completely before proceeding to the next step.
Step 5: Apply a sealant. Use a clean cloth to apply a sealant to the area. This will help protect the dye and ensure it lasts longer.
Step 6: Use a soft-bristled brush. Use a soft-bristled brush to gently brush the area. This will help blend the dye and sealant together.
Step 7: Apply a protective coating. Use a spray bottle to apply a protective coating to the area. This will help protect the dye from fading and wear.
By following these steps, you can restore a burn mark in a car headliner with a dye kit. With a bit of patience and the right tools, you can make your car headliner look like new.
How to Repair a Burn Mark in a Car Headliner with a Vinyl Repair Kit
If you have a burn mark in your car headliner, you can repair it with a vinyl repair kit. This guide will provide you with the steps necessary to repair the burn mark in your car headliner.
Before you begin, make sure you have the necessary materials. You will need a vinyl repair kit, a clean cloth, a pair of scissors, and a heat gun.
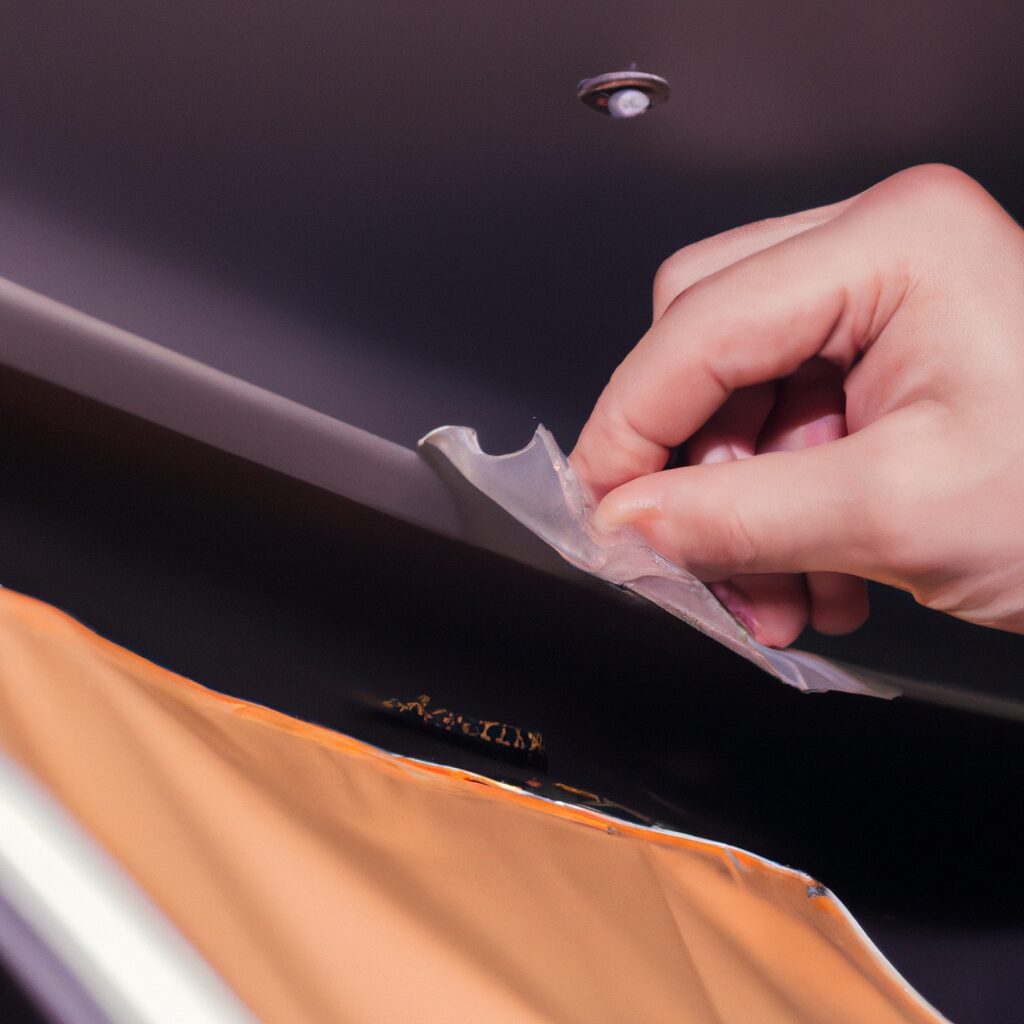
Step 1: Cut out the damaged area of the headliner. Use the scissors to cut out the area of the headliner that has been burned. Make sure to cut out a slightly larger area than the burn mark itself.
Step 2: Clean the area. Use the clean cloth to remove any dirt or debris from the area.
Step 3: Apply the vinyl repair kit. Follow the instructions on the vinyl repair kit to apply the material to the area. Make sure to cover the entire area.
Step 4: Use the heat gun. Use the heat gun to heat the area. This will help the vinyl repair kit to adhere to the headliner.
Step 5: Allow the area to cool. Once the area has cooled, you can trim any excess material with the scissors.
Your car headliner should now be repaired. With a vinyl repair kit, you can easily repair a burn mark in your car headliner.
How to Fix a Burn Mark in a Car Headliner with a Heat Shield
If you have a burn mark in your car headliner, you may be able to fix it with a heat shield. Heat shields are designed to protect the interior of your car from heat damage, and they can also be used to repair burn marks. Here is a step-by-step guide to fixing a burn mark in a car headliner with a heat shield.
Step 1: Purchase a heat shield that is the same size as the burn mark. Make sure that the heat shield is made of a material that is designed to withstand high temperatures.
Step 2: Clean the area around the burn mark with a damp cloth. This will help to ensure that the heat shield adheres properly.
Step 3: Cut the heat shield to the same size as the burn mark. Make sure that the edges of the heat shield are smooth and even.
Step 4: Apply a thin layer of adhesive to the back of the heat shield.
Step 5: Place the heat shield over the burn mark and press firmly to ensure that it is securely attached.
Step 6: Allow the adhesive to dry completely before using the headliner.
By following these steps, you can easily fix a burn mark in a car headliner with a heat shield. Make sure to use a heat shield that is designed to withstand high temperatures, and be sure to allow the adhesive to dry completely before using the headliner.
How to Remove a Burn Mark from a Car Headliner with a Professional Cleaning Service
If you have a burn mark on your car headliner, it can be difficult to remove without professional help. Fortunately, a professional cleaning service can help you restore your headliner to its original condition. Here is a step-by-step guide on how to remove a burn mark from a car headliner with a professional cleaning service.
Step 1: Contact a Professional Cleaning Service.
The first step is to contact a professional cleaning service that specializes in car headliner cleaning. Make sure to ask about their experience with burn marks and the type of cleaning products they use.
Step 2: Prepare the Headliner.
Before the cleaning service arrives, you should prepare the headliner by vacuuming it to remove any dirt and debris. This will help the cleaning service to get a better result.
Step 3: Apply the Cleaning Solution.
The cleaning service will then apply a special cleaning solution to the burn mark. This solution will help to break down the stain and make it easier to remove.
Step 4: Clean the Headliner.
Once the cleaning solution has been applied, the cleaning service will use a soft cloth to gently scrub the headliner. This will help to remove the burn mark without damaging the fabric.
Step 5: Rinse the Headliner.
After the headliner has been scrubbed, the cleaning service will rinse it with clean water to remove any remaining residue.
Step 6: Dry the Headliner.
Finally, the cleaning service will use a soft cloth to dry the headliner. This will help to prevent any water spots from forming.
By following these steps, you can remove a burn mark from your car headliner with the help of a professional cleaning service. With their expertise and specialized cleaning products, they can restore your headliner to its original condition.
Q&A
1. What materials do I need to fix a burn mark in a car headliner?
You will need a piece of matching fabric, a pair of scissors, a glue gun, and a lighter.
2. How do I cut the fabric to fit the burn mark?
Measure the size of the burn mark and cut the fabric to match the size.
3. How do I attach the fabric to the headliner?
Use a glue gun to attach the fabric to the headliner. Make sure to apply the glue evenly and press the fabric firmly into place.
4. How do I make sure the fabric stays in place?
Once the glue has dried, use a lighter to heat the fabric and melt the glue. This will help the fabric to adhere to the headliner.
5. How do I make sure the fabric blends in with the headliner?
If the fabric is a different color than the headliner, you can use a fabric dye to match the colors.
6. How do I clean the headliner after I’ve fixed the burn mark?
Use a damp cloth to wipe away any excess glue or dye.
7. How do I prevent future burn marks?
Be sure to keep any hot items away from the headliner.
8. Is there anything else I should know about fixing a burn mark in a car headliner?
Be sure to take your time and be careful when applying the glue and fabric. If done incorrectly, it could cause further damage to the headliner.
Conclusion
The best way to fix a burn mark in a car headliner is to use a heat gun to carefully heat the area around the burn mark and then use a vinyl repair kit to patch the area. This method is relatively easy and cost-effective, and it can help restore the headliner to its original condition. It is important to be careful when using the heat gun, as too much heat can cause further damage to the headliner. Additionally, it is important to follow the instructions provided with the vinyl repair kit to ensure the best results.