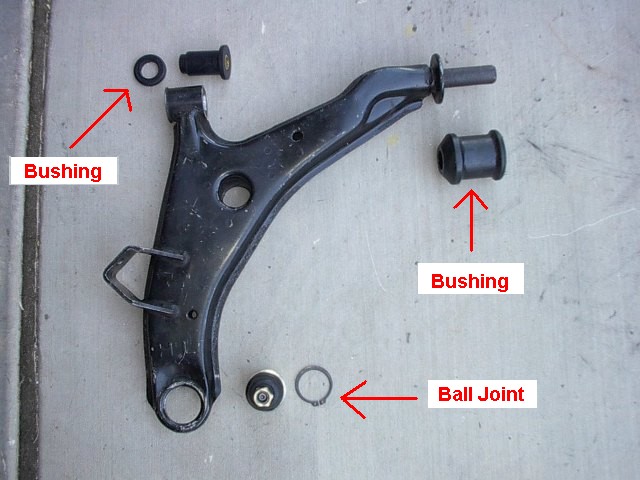
How to Change Control Arm Bushings
To change control arm bushings, lift the vehicle, remove the wheel, disconnect the control arm, press out the old bushings, and install new ones. Changing control arm bushings improves handling and steering response, ensuring a smoother and safer driving experience.
Proper maintenance prolongs the life of your vehicle and prevents potential issues down the road. By following a few simple steps, you can easily replace your control arm bushings and keep your car in top condition. Understanding the process and having the right tools will make this maintenance task straightforward and manageable.
So, let’s dive into the steps needed to replace control arm bushings and enhance your vehicle’s performance.
Choosing The Right Control Arm Bushings
If your vehicle’s control arm bushings are worn out, it’s crucial to select the right replacements. To change control arm bushings, start by lifting the car and removing the control arm. Then, press out the old bushings and install the new ones, ensuring they are properly aligned and lubricated for optimal performance.
One of the most critical aspects of changing control arm bushings is selecting the correct ones for your vehicle. Choosing the right control arm bushings can significantly impact the overall performance and handling of your car. There are a few key factors to consider when making this decision. Let’s take a closer look.Consider Your Driving Style
When selecting control arm bushings, it is essential to take into account your driving style. Are you a daily commuter seeking a smooth and comfortable ride? Do you enjoy spirited driving or participate in motorsports activities? Your driving style will dictate the type of control arm bushings that will suit your needs best. If you primarily use your vehicle for daily commuting or prefer a comfortable ride, opting for rubber bushings may be the right choice. Rubber bushings provide excellent vibration and noise insulation, ensuring a smooth and quiet driving experience. These bushings are suitable for those seeking a cushy ride without compromising on durability. On the other hand, if you’re an enthusiastic driver who enjoys pushing their vehicle to its limits, you may want to consider urethane bushings. Urethane bushings offer enhanced performance and handling characteristics. They provide improved responsiveness and tighter suspension feel, allowing for better control during spirited driving and cornering. Keep in mind that urethane bushings may transmit more road noise and vibrations compared to rubber bushings. However, if performance is your priority, these bushings can significantly enhance your driving experience.Material Selection
Another crucial aspect to consider when choosing control arm bushings is the material they are made from. Control arm bushings can be crafted from various materials, including rubber, polyurethane (urethane), and other synthetic blends. Rubber bushings are the most common and widely used type. They offer excellent insulation against vibrations and noise, making them suitable for everyday driving. Additionally, rubber bushings are relatively affordable, making them a cost-effective choice for many vehicle owners. Polyurethane (urethane) bushings are favored by performance enthusiasts for their stiffer composition. These bushings provide increased responsiveness and reduced suspension deflection, resulting in improved handling and cornering capabilities. Urethane bushings are known for their durability and resistance to wear, making them suitable for high-performance vehicles. When deciding between rubber and urethane bushings, it’s essential to carefully evaluate your priorities. If comfort and a quiet ride are your main concerns, rubber bushings are a sensible option. However, if improved handling and performance are your primary objectives, urethane bushings are worth considering. Remember, choosing the right control arm bushings can make a substantial difference in how your vehicle performs, handles, and rides. By considering your driving style and selecting the appropriate material, you’ll be well on your way to enjoying a smoother and more enjoyable driving experience.Preparing For The Replacement
Preparing for the replacement of control arm bushings is a crucial step in ensuring a smooth and successful repair process. Proper preparation will help you work efficiently and safely. Here are the steps to get ready for the replacement:
Gathering Necessary Tools
Ensure you have all the tools required for the job, including wrenches, sockets, jack stands, and a hydraulic jack.
Lifting And Securing The Vehicle
Before starting, lift the vehicle using a hydraulic jack and securely support it with jack stands for safety.
Removing The Old Bushings
Loosening The Control Arm
1. Secure the vehicle on jack stands and remove the wheel.
2. Use a wrench to loosen the bolts connecting the control arm to the chassis.
3. Gently tap the bolts with a hammer to loosen them further, if needed.
4. Support the control arm and remove the bolts completely.
5. Carefully lower the control arm to access the bushings.
Extracting The Worn Bushings
1. Identify the bushing attachment points on the control arm.
2. Use a bushing removal tool or a suitable substitute to extract the old bushings.
3. Apply penetrating oil if the bushings are stuck and require extra force to remove.
4. Press or pull the bushings out of their housings using the appropriate technique.
5. Clean the mounting areas thoroughly to prepare for the installation of new bushings.
“` Note: Remember to adapt the content as necessary to match the overall style and tone of your blog post.
Credit: www.youtube.com
Installing The New Bushings
Now that you have removed the old control arm bushings, it’s time to fit the replacement bushings. Follow these steps to ensure a secure and proper installation.
1. Clean The Control Arm
Before fitting the replacement bushings, clean the control arm thoroughly to remove any dirt, grease, or debris. This will ensure a good connection between the control arm and the new bushings.
2. Apply Lubrication
Apply a small amount of lubrication to the control arm and the inner surfaces of the replacement bushings. This will help ease the installation process and prevent any damage to the bushings.
3. Align The Bushings
Align the replacement bushings with the control arm, making sure they are positioned correctly. Refer to the manufacturer’s instructions or the markings on the bushings to ensure they are facing the right way.
4. Press The Bushings Into Place
Using a bushing press or a large socket that matches the diameter of the bushing, slowly and evenly press the bushings into place. Make sure they are fully seated and flush against the control arm.
5. Secure The Control Arm
Once the replacement bushings are fitted, it’s time to secure the control arm back in its original position. Follow these steps to ensure a proper and secure installation.
6. Reattach The Control Arm
Line up the mounting holes of the control arm with the corresponding holes on the vehicle frame. Insert and tighten the bolts or screws to secure the control arm in place. Make sure to follow the specified torque settings provided by the manufacturer.
7. Double-check The Installation
Give the control arm a gentle shake to ensure it is properly and securely attached. Check for any loose connections or misaligned parts. If everything looks good, move on to the final step.
8. Test Drive And Adjust
Before hitting the road, take the vehicle for a short test drive to ensure everything feels right. Pay attention to any unusual noises or vibrations. If necessary, make adjustments or seek professional help.
By following these steps, you can successfully install the new control arm bushings, ensuring a smooth and safe driving experience.
Testing And Maintenance
When it comes to the maintenance and testing of control arm bushings, it is essential to ensure the proper functioning of your vehicle’s suspension system. Testing the vehicle for any issues related to control arm bushings and conducting regular inspections and lubrication can help in extending the lifespan of these critical components.
Testing The Vehicle
Testing the vehicle for potential control arm bushing issues is crucial for maintaining optimal performance. Look out for signs such as excessive noise or vibration during driving, uneven tire wear, or a loose steering feel. If any of these symptoms are present, it’s essential to inspect the control arm bushings for wear or damage.
Regular Inspection And Lubrication
Regular inspection and lubrication of control arm bushings are necessary to ensure their longevity. A visual inspection for signs of wear, tears, or deterioration should be conducted routinely. Additionally, applying a suitable lubricant to the bushings as per the manufacturer’s recommendations can help in minimizing friction and preventing premature wear.

Credit: knowhow.napaonline.com

Credit: www.racingjunk.com
Frequently Asked Questions On How To Change Control Arm Bushings
Is It Hard To Change Control Arm Bushings?
Changing control arm bushings may require some effort, but it is not overly difficult. With the right tools and instructions, you can replace them yourself or enlist the help of a professional. Ensure to follow proper safety procedures and consult a reliable source for specific guidance.
How Do You Remove Control Arm Bushings Without A Press?
To remove control arm bushings without a press, use a propane torch to heat the metal sleeve. Then, use a hammer and chisel to carefully tap out the bushing. This method helps loosen the bushing for removal without a press.
Can You Replace Bushings Yourself?
Yes, you can replace bushings yourself with proper tools and knowledge. It is manageable for DIY enthusiasts.
How Do I Know If My Control Arm Bushings Are Bad?
If your control arm bushings are bad, you may notice excessive tire wear, a pulling sensation while driving, or a clunking noise when going over bumps. Check for any cracking, corrosion, or movement in the bushings to determine their condition.
Why Are Control Arm Bushings Important?
Control arm bushings are crucial for providing stability and reducing vibration in the suspension system.
How Often Should Control Arm Bushings Be Replaced?
Control arm bushings should be inspected regularly and replaced every 80,000-100,000 miles or if signs of wear are evident.
Can I Change Control Arm Bushings Myself?
Yes, changing control arm bushings can be done at home with the right tools, knowledge, and safety precautions.
Conclusion
To sum up, changing control arm bushings is an essential maintenance task for ensuring the proper functionality of your vehicle’s suspension system. By following the step-by-step guide provided in this blog post, you can successfully replace the worn-out bushings without the need for extensive mechanical expertise.
Remember to prioritize safety and always use the right tools and equipment. With this new knowledge, you’ll be able to enhance your car’s performance and enjoy a smoother ride. Happy DIY-ing!

